×
ToyotaParts- Hello
- Login or Register
- Quick Links
- Live Chat
- Track Order
- Parts Availability
- RMA
- Help Center
- Contact Us
- Shop for
- Toyota Parts
- Scion Parts
My Garage
My Account
Cart
OEM 2006 Scion tC Power Steering Pump
Power Steering Pump Unit- Select Vehicle by Model
- Select Vehicle by VIN
Select Vehicle by Model
orMake
Model
Year
Select Vehicle by VIN
For the most accurate results, select vehicle by your VIN (Vehicle Identification Number).
1 Power Steering Pump found


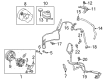
2006 Scion tC Power Steering Pump
Part Number: 44310-21050$362.39 MSRP: $531.10You Save: $168.71 (32%)Ships in 1-3 Business DaysProduct Specifications- Other Name: Pump Assembly, Vane; Pump
- Part Name Code: 44320
- Item Weight: 4.10 Pounds
- Item Dimensions: 8.0 x 5.9 x 5.9 inches
- Condition: New
- Fitment Type: Direct Replacement
- SKU: 44310-21050
- Warranty: This genuine part is guaranteed by Toyota's factory warranty.
2006 Scion tC Power Steering Pump
Looking for affordable OEM 2006 Scion tC Power Steering Pump? Explore our comprehensive catalogue of genuine 2006 Scion tC Power Steering Pump. All our parts are covered by the manufacturer's warranty. Plus, our straightforward return policy and speedy delivery service ensure an unparalleled shopping experience. We look forward to your visit!
2006 Scion tC Power Steering Pump Parts Q&A
- Q: How to service and repair the power steering pump on 2006 Scion tC?A: The power steering pump service requires the front wheel removal on the right side followed by power steering fluid drain along with front fender apron seal removal on the right hand side. The first step includes removing the fan and generator V belt before taking off the No. 1 oil reservoir to pump hose using the clip remover. The V belt should be handled with care to avoid fluid drips. You must disconnect the pressure feed tube assembly by taking out the bolt and pressure feed tube from the pump bracket rear point while applying a 27mm wrench to hold the pressure port union for bolt and gasket removal. Separate the vane pump assembly after disconnecting the oil pressure switch connector and loosening 2 bolts through use of Special Service Tool: 09249-63010 and a 14 mm deep socket before removing the vane pump. Use Special Service Tool: 09630-00014 (09631-00132) to fix the vane pump assembly in a vise before removing the rear vane pump bracket and the power steering suction port union and extracting the O-ring from the suction port union. After removing the flow control valve and compression spring it is crucial to replace the oil pressure switch if found damaged. To detach the rear vane pump housing workers must first remove 4 bolts alongside the O-ring and then separate the shaft sub-assembly with pulley by removing the snap ring and the shaft. The first step requires removal of vane pump rotor and cam ring and front vane pump side plate and O-rings from both front side plate and front housing before extracting the oil seal from the vane pump housing. The vane pump shaft and bush in front housing should be inspected for oil clearance and it must stay at or below 0.07 mm (0.0028 inch). Verify that the plates of the vane pump measure between 1.405 to 1.411 mm (0.05531 to 0.05555 inch) and confirm that the gap between the vane pump rotor groove and plates does not surpass 0.03 mm (0.0012 inch). The smooth operation of the flow control valve must be tested along with compressed air leak detection. In the case of failure, replace the complete vane pump assembly. The compression spring should maintain a free length of at least 36.9 mm (1.453 inch) while the pressure port union must be inspected for signs of damage. Press the new oil seal inside its housing using Special Service Tool: 09950-60010 (09951-00280), 09950-70010 (09951-07100) while its lip is coated with power steering fluid. Start by inserting the shaft sub-assembly with pulley with care to maintain safety of the oil seal lip before assembling the front vane pump side plate and O-rings by achieving proper alignment. First layer the vane pump plates with power steering fluid before placing them with round ends facing outwards. Follow this step by installing the vane pump rotor and cam ring that both receive power steering fluid application. The replacement begins with installing a fresh snap ring onto the shaft while you connect the rear vane pump housing alongside a new O-ring with correct alignment before torquing bolt connections to 22 Nm (224 kgf-cm, 16 ft. lbs.). In the next step check the pump preload through rotation while installing the power steering oil pressure switch using a torque setting of 21 Nm (214 kgf-cm, 15 ft. lbs.). Begin by fastening the flow control valve along with the compression spring before attaching the pressure port union to 69 Nm (704 kgf-cm, 51 ft. lbs.) torque and the rear vane pump bracket at 37 Nm (377 kgf-cm, 27 ft. lbs.). Complete the power steering suction port union with an application of power steering fluid onto the O-ring and torque to 12 Nm (122 kgf-cm, 9 ft. lbs.). Secure a temporary fastening of the vane pump assembly using two bolts followed by complete tightening with Special Service Tool: 09249-63010 and 14 mm deep socket to reach 34 Nm (347 kgf-cm, 25 ft. lbs.). The pressure feed tube assembly and No. 1 oil reservoir need to be joined with pump hoses with great care to prevent V belt fluid leakage before reinstalling the fan and generator belts along with the RH front fender apron seal and RH front wheel. After bleeding power steering fluid personnel should inspect the vehicle for any fluid leakages.
Related 2006 Scion tC Parts
 2006 Scion tC Steering Wheel
 2006 Scion tC Rack And Pinion
 2006 Scion tC Drag Link
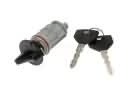 2006 Scion tC Ignition Lock Cylinder
 2006 Scion tC Power Steering Hose
 2006 Scion tC Power Steering Reservoir
 2006 Scion tC Rack and Pinion Boot
 2006 Scion tC Steering Column
 2006 Scion tC Steering Shaft
 2006 Scion tC Tie Rod End