×
ToyotaParts- Hello
- Login or Register
- Quick Links
- Live Chat
- Track Order
- Parts Availability
- RMA
- Help Center
- Contact Us
- Shop for
- Toyota Parts
- Scion Parts
My Garage
My Account
Cart
OEM 2005 Toyota Highlander Heater Core
HVAC Heater Core- Select Vehicle by Model
- Select Vehicle by VIN
Select Vehicle by Model
orMake
Model
Year
Select Vehicle by VIN
For the most accurate results, select vehicle by your VIN (Vehicle Identification Number).
2 Heater Cores found

 Product Specifications
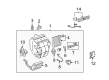
- Other Name: Unit Sub-Assembly, Radiator; HVAC Heater Core, Front; Unit Sub-Assembly, Heater Radiator; HVAC Heater Core
- Position: Front
- Part Name Code: 87107A
- Item Weight: 1.60 Pounds
- Item Dimensions: 13.4 x 11.7 x 8.6 inches
- Condition: New
- Fitment Type: Direct Replacement
- SKU: 87107-48080
- Warranty: This genuine part is guaranteed by Toyota's factory warranty.

 Product Specifications
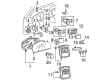
- Other Name: Unit Sub-Assembly, Radiator; HVAC Heater Core, Rear; Unit Sub-Assembly, Rear Heater; HVAC Heater Core
- Manufacturer Note: W(REAR HEATER)
- Part Name Code: 87107R
- Item Weight: 1.60 Pounds
- Item Dimensions: 13.4 x 11.6 x 8.3 inches
- Condition: New
- Fitment Type: Direct Replacement
- SKU: 87107-48090
- Warranty: This genuine part is guaranteed by Toyota's factory warranty.
2005 Toyota Highlander Heater Core
Looking for affordable OEM 2005 Toyota Highlander Heater Core? Explore our comprehensive catalogue of genuine 2005 Toyota Highlander Heater Core. All our parts are covered by the manufacturer's warranty. Plus, our straightforward return policy and speedy delivery service ensure an unparalleled shopping experience. We look forward to your visit!
2005 Toyota Highlander Heater Core Parts Q&A
- Q: How to replace the Heater Core on 2005 Toyota Highlander?A: Start your Heater Rear Assembly replacement by taking out both Deck Side Trim Cover Front LH and RH then proceed to the Deck Trim Side Panel Assembly RH. Start by disconnecting the Heater Water Outlet Hose through plier-manipulation of the clip; secure the heater water pipes while you perform this step to guard against hose damage; lay down a drain pan or cloth ready to collect any coolant that would leak during the process. Execute the exact procedure for disconnection on the Heater Water Inlet Hose. Start by uninstalling the Foot Air Duct Rear through 2 clip removal followed by detaching Air Duct Rear No.5 after unplugging its wire harness clamp and unfastening the 2 clips. The Rear Heater Assembly requires the washer hose clamp disconnection followed by bolt removal along with the plate and unfastening the Heater Relay No.1 clamp and Heater Blower Resistor connection before extracting the assembly. Extract the Water Pipe & Hose Sub-Assembly after sliding off the 2 clips with pliers since applying excessive force can be detrimental. The installer should begin by disconnecting the 2 clamps and connector from the Rear Heater Blower Resistor before using 2 screws to remove it altogether. Start dismantling by removing the nine screws and clamp from the Rear Heater Unit Sub-Assembly then proceed to disconnect the Rear Heater Blower Fan Sub-Assembly by uninstalling the nut and washer. The last step involves disconnecting the connector clamp from the Rear Heater Blower Motor Sub-Assembly before removing it together with its 3 screws. First position the Rear Heater Blower Fan Sub-Assembly with washer then secure it with a nut before tightening it to 4.0 N.m (41 kgf.cm, 35 in.lbf). First secure all 4 bolts on the Rear Heater Assembly using the specified torque order of 9.8 N.m (100 kgf.cm, 87 in.lbf), before reconnecting the Heater Blower Resistor connector, installing the Heater Relay No.1, reconnecting the water hose and finally tightening the plate with 4 bolts which includes tightening Bolt A to 9.8 N.m (100 kgf.cm, 87 in.lbf).
Related 2005 Toyota Highlander Parts
 2005 Toyota Highlander Cabin Air Filter
 2005 Toyota Highlander Blower Motor
 2005 Toyota Highlander Blower Motor Resistor
 2005 Toyota Highlander A/C Accumulator
 2005 Toyota Highlander A/C Clutch
 2005 Toyota Highlander A/C Compressor
 2005 Toyota Highlander A/C Condenser
 2005 Toyota Highlander A/C Expansion Valve
 2005 Toyota Highlander A/C Hose
 2005 Toyota Highlander Ambient Temperature Sensor
 2005 Toyota Highlander Blower Control Switches
 2005 Toyota Highlander HVAC Pressure Switch