×
ToyotaParts- Hello
- Login or Register
- Quick Links
- Live Chat
- Track Order
- Parts Availability
- RMA
- Help Center
- Contact Us
- Shop for
- Toyota Parts
- Scion Parts
My Garage
My Account
Cart
OEM 2003 Toyota Sequoia Coil Springs
Strut Spring- Select Vehicle by Model
- Select Vehicle by VIN
Select Vehicle by Model
orMake
Model
Year
Select Vehicle by VIN
For the most accurate results, select vehicle by your VIN (Vehicle Identification Number).
10 Coil Springs found


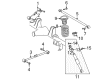
2003 Toyota Sequoia Coil Spring, Rear
Part Number: 48231-AF060$181.96 MSRP: $259.80You Save: $77.84 (30%)Ships in 1-3 Business DaysProduct Specifications- Other Name: Spring, Coil, Rear; Coil Spring, Rear; Coil Springs; Spring; Spring, Coil, Rear Passenger Side; Spring, Coil, Rear Driver Side
- Position: Rear
- Item Weight: 4.30 Pounds
- Item Dimensions: 17.3 x 10.7 x 5.7 inches
- Condition: New
- Fitment Type: Direct Replacement
- SKU: 48231-AF060
- Warranty: This genuine part is guaranteed by Toyota's factory warranty.

2003 Toyota Sequoia Coil Spring, Rear
Part Number: 48231-AF030$163.90 MSRP: $232.02You Save: $68.12 (30%)Product Specifications- Other Name: Spring, Coil, Rear; Coil Spring, Rear; Coil Springs; Spring; Spring, Coil, Rear Passenger Side; Spring, Coil, Rear Driver Side
- Position: Rear
- Item Weight: 10.50 Pounds
- Item Dimensions: 17.2 x 10.7 x 5.6 inches
- Condition: New
- Fitment Type: Direct Replacement
- SKU: 48231-AF030
- Warranty: This genuine part is guaranteed by Toyota's factory warranty.


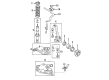
2003 Toyota Sequoia Coil Spring, Driver Side
Part Number: 48131-AF140$222.50 MSRP: $317.68You Save: $95.18 (30%)Ships in 1-3 Business DaysProduct Specifications- Other Name: Spring, Coil, Front; Coil Spring, Front Left; Coil Springs; Spring; Spring, Front Coil, Driver Side
- Position: Driver Side
- Part Name Code: 48132
- Item Weight: 13.00 Pounds
- Item Dimensions: 15.8 x 7.1 x 5.9 inches
- Condition: New
- Fitment Type: Direct Replacement
- SKU: 48131-AF140
- Warranty: This genuine part is guaranteed by Toyota's factory warranty.

2003 Toyota Sequoia Coil Spring, Passenger Side
Part Number: 48131-AF110$180.21 MSRP: $257.30You Save: $77.09 (30%)Ships in 1-3 Business DaysProduct Specifications- Other Name: Spring, Coil, Front; Coil Spring, Front Right; Coil Springs; Spring; Spring, Front Coil, Passenger Side
- Position: Passenger Side
- Part Name Code: 48131
- Item Weight: 6.70 Pounds
- Item Dimensions: 16.1 x 6.9 x 5.8 inches
- Condition: New
- Fitment Type: Direct Replacement
- SKU: 48131-AF110
- Warranty: This genuine part is guaranteed by Toyota's factory warranty.
2003 Toyota Sequoia Coil Spring, Passenger Side
Part Number: 48131-AF130$222.50 MSRP: $317.68You Save: $95.18 (30%)Product Specifications- Other Name: Spring, Coil, Front; Coil Spring, Front Right; Coil Springs; Spring; Spring, Front Coil, Passenger Side
- Position: Passenger Side
- Part Name Code: 48131
- Item Weight: 13.20 Pounds
- Item Dimensions: 15.5 x 7.1 x 5.9 inches
- Condition: New
- Fitment Type: Direct Replacement
- SKU: 48131-AF130
- Warranty: This genuine part is guaranteed by Toyota's factory warranty.


 Product Specifications
- Other Name: Spring, Coil, Rear; Coil Spring, Rear; Coil Springs; Spring; Spring, Coil, Rear Passenger Side; Spring, Coil, Rear Driver Side
- Manufacturer Note: W(THIRD SEAT 5:5 SPLIT) OR W(TOWING HICH)
- Position: Rear
- Item Weight: 4.40 Pounds
- Item Dimensions: 17.3 x 11.1 x 5.7 inches
- Condition: New
- Fitment Type: Direct Replacement
- SKU: 48231-AF050
- Warranty: This genuine part is guaranteed by Toyota's factory warranty.
 Product Specifications
- Other Name: Spring, Coil, Rear; Coil Spring, Rear; Coil Springs; Spring; Spring, Coil, Rear Passenger Side; Spring, Coil, Rear Driver Side
- Manufacturer Note: W(THIRD SEAT 5:5 SPLIT) OR W(TOWING HICH)
- Position: Rear
- Item Weight: 4.40 Pounds
- Item Dimensions: 17.3 x 11.0 x 5.6 inches
- Condition: New
- Fitment Type: Direct Replacement
- SKU: 48231-AF020
- Warranty: This genuine part is guaranteed by Toyota's factory warranty.
- Product Specifications
- Other Name: Spring, Coil, Front; Coil Spring, Front Left; Coil Springs; Spring; Spring, Front Coil, Driver Side
- Position: Driver Side
- Part Name Code: 48132
- Item Weight: 6.90 Pounds
- Item Dimensions: 16.1 x 7.0 x 5.9 inches
- Condition: New
- Fitment Type: Direct Replacement
- SKU: 48131-AF120
- Warranty: This genuine part is guaranteed by Toyota's factory warranty.
- Product Specifications
- Other Name: Spring, Coil, Rear Right-Hand; Coil Spring, Rear; Coil Springs; Spring; Spring, Coil, Rear Passenger Side; Spring, Coil, Rear Driver Side
- Position: Rear Passenger Side
- Item Weight: 4.20 Pounds
- Item Dimensions: 17.0 x 10.7 x 5.6 inches
- Condition: New
- Fitment Type: Direct Replacement
- SKU: 48231-AF040
- Warranty: This genuine part is guaranteed by Toyota's factory warranty.
- Product Specifications
- Other Name: Spring, Coil, Rear Right-Hand; Coil Spring, Rear; Coil Springs; Spring; Spring, Coil, Rear Passenger Side; Spring, Coil, Rear Driver Side
- Position: Rear Passenger Side
- Item Weight: 4.10 Pounds
- Item Dimensions: 17.2 x 10.8 x 5.8 inches
- Condition: New
- Fitment Type: Direct Replacement
- SKU: 48231-AF010
- Warranty: This genuine part is guaranteed by Toyota's factory warranty.
2003 Toyota Sequoia Coil Springs
Looking for affordable OEM 2003 Toyota Sequoia Coil Springs? Explore our comprehensive catalogue of genuine 2003 Toyota Sequoia Coil Springs. All our parts are covered by the manufacturer's warranty. Plus, our straightforward return policy and speedy delivery service ensure an unparalleled shopping experience. We look forward to your visit!
2003 Toyota Sequoia Coil Springs Parts Q&A
- Q: How to service the coil springs on 2003 Toyota Sequoia?A: A proper coil spring service requires removing the rear wheels under a torque of 110 Nm (1,150 kgf-cm, 83 ft. lbs.) before proceeding. A jack should be used to bolster the rear axle housing. The normal type shock absorber bolt needs a 87 Nm (887 kgf-cm, 64 ft. lbs.) torque for bolt removal to separate from the axle housing before doing the same to the other side. You should remove the piston rod nut while holding it in position before taking out the 2 retainers and cushion and shock absorber with 58 Nm (591 kgf-cm, 43 ft. lbs.) torque then proceeding to remove only the 2 retainers and cushion. The steps for disconnection and removal of auto leveler type shock absorbers include complete extension of the shock absorber material before completion. You should disconnect both LH and RH stabilizer bar links after removing their two nuts with 69 Nm torque (704 kgf-cm or 51 ft. lbs.) and then separate the lateral control rod by taking out its bolt and washer and nut with 140 Nm torque (1,428 kgf-cm or 103 ft. lbs.) while stabilizing the suspension. Lower the axle housing steadily to prevent brake line and parking brake cable damage while removing the coil spring, follow spring along with insulator ensuring the coil spring end maintenance is correct. The inspection of normal type shock absorbers requires compression and extension of the rod to check for abnormal noises and resistance; replace if any issue is detected. Prior to disposal of normal and auto leveler shock absorbers extend the rod to maximum length before using appropriate safety precautions to drill a cylinder release hole. The procedure for bushing removal and installation requires the use of Special Service Tools: 09710-10061 (09710-14013), 09710-7031 (09710-28012) and 09951-07100 (09950-70010) and these same tools are needed for installing a new bushing. Assembly must be performed in the opposite sequence of uninstalation.
Related 2003 Toyota Sequoia Parts
 2003 Toyota Sequoia Control Arm
 2003 Toyota Sequoia Axle Beam Mount
 2003 Toyota Sequoia Ball Joint
 2003 Toyota Sequoia Bump Stop
 2003 Toyota Sequoia Control Arm Bushing
 2003 Toyota Sequoia Front Cross-Member
 2003 Toyota Sequoia Shock And Strut Mount
 2003 Toyota Sequoia Steering Knuckle
 2003 Toyota Sequoia Sway Bar Bracket
 2003 Toyota Sequoia Sway Bar Bushing
 2003 Toyota Sequoia Sway Bar Kit
 2003 Toyota Sequoia Sway Bar Link