×
ToyotaParts- Hello
- Login or Register
- Quick Links
- Live Chat
- Track Order
- Parts Availability
- RMA
- Help Center
- Contact Us
- Shop for
- Toyota Parts
- Scion Parts
My Garage
My Account
Cart
OEM 2003 Toyota Prius Brake Pad Set
Disc Brake Pad Set- Select Vehicle by Model
- Select Vehicle by VIN
Select Vehicle by Model
orMake
Model
Year
Select Vehicle by VIN
For the most accurate results, select vehicle by your VIN (Vehicle Identification Number).
1 Brake Pad Set found


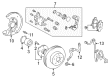
2003 Toyota Prius Brake Pads, Front
Part Number: 04465-17140$76.07 MSRP: $105.63You Save: $29.56 (28%)Ships in 1-2 Business DaysProduct Specifications- Other Name: Pad Kit, Disc Brake; Disc Brake Pad Set, Front; Brake Pad Set, Disc Brake; Disc Brake Pad Kit; Front Pads; Pads; Pad Kit, Disc Brake, Front; Disc Brake Pad Set
- Manufacturer Note: MARK NBK PN540H
- Position: Front
- Replaces: 04465-17100, 04465-17101, 04465-52010, 04465-52060
- Part Name Code: 04465
- Item Weight: 3.20 Pounds
- Item Dimensions: 15.3 x 10.9 x 3.0 inches
- Condition: New
- Fitment Type: Direct Replacement
- SKU: 04465-17140
- Warranty: This genuine part is guaranteed by Toyota's factory warranty.
2003 Toyota Prius Brake Pad Set
Looking for affordable OEM 2003 Toyota Prius Brake Pad Set? Explore our comprehensive catalogue of genuine 2003 Toyota Prius Brake Pad Set. All our parts are covered by the manufacturer's warranty. Plus, our straightforward return policy and speedy delivery service ensure an unparalleled shopping experience. We look forward to your visit!
2003 Toyota Prius Brake Pad Set Parts Q&A
- Q: How to replace the Brake Pad Set on 2003 Toyota Prius?A: A driver should start brake pad replacement by removing the front wheel followed by checking pad lining thickness through the caliper inspection hole before pad replacement when the thickness falls below 1.0 mm (0.039 inch). Start by lifting the caliper through a hold of the sliding pin followed by bottom side installation bolt removal and continue without perturbing the flexible hose connected to the brake caliper while suspending the caliper properly. Take out the two pads and four antivibratory spacers as well as the two pad support plates. You can use the support plates again if they lack deformation and possess no cracks or wear while being free of rust and dirt along with foreign items. Verify the disc thickness and inspect runout before pad support plate installation to avoid wrong assembly order. During pad installation with new anti-squeal shims users must grease both sides of the inner shims then place shims onto each pad before positioning the inner pads upward using their wear indicators while making sure no friction surface has grease or oil. Pull a small brake fluid amount from the reservoir while using a taping-handled hammer to push the piston forward and optionally opening the bleeder plug as needed. Before installing the caliper maintain your hold on the sliding pin while you tightened its bolts to 34 Nm (350 kgf-cm, 25 ft. lbs.). Then reinstall the front wheel by torquing it to 103 Nm (1,050 kgf-cm, 76 ft. lbs.). Use the brake pedal to perform several depressions before verifying that the fluid reaches the maximum mark in the reservoir.
Related 2003 Toyota Prius Parts
 2003 Toyota Prius Wheel Bearing
 2003 Toyota Prius Brake Caliper
 2003 Toyota Prius Speed Sensor
 2003 Toyota Prius ABS Pump And Motor Assembly
 2003 Toyota Prius Backing Plate
 2003 Toyota Prius Brake Caliper Bracket
 2003 Toyota Prius Brake Disc
 2003 Toyota Prius Brake Line
 2003 Toyota Prius Hydraulic Hose
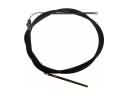 2003 Toyota Prius Parking Brake Cable
 2003 Toyota Prius Parking Brake Shoe
 2003 Toyota Prius Wheel Cylinder