×
ToyotaParts- Hello
- Login or Register
- Quick Links
- Live Chat
- Track Order
- Parts Availability
- RMA
- Help Center
- Contact Us
- Shop for
- Toyota Parts
- Scion Parts
My Garage
My Account
Cart
OEM 2003 Toyota Avalon Power Steering Pump
Power Steering Pump Unit- Select Vehicle by Model
- Select Vehicle by VIN
Select Vehicle by Model
orMake
Model
Year
Select Vehicle by VIN
For the most accurate results, select vehicle by your VIN (Vehicle Identification Number).
1 Power Steering Pump found


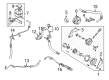
2003 Toyota Avalon Pump Assembly, Vane
Part Number: 44320-07012$299.96 MSRP: $428.28You Save: $128.32 (30%)Product Specifications- Other Name: Pump Assembly, L/Pulley; Power Steering Pump
- Manufacturer Note: (L)
- Replaces: 44320-33110, 44320-33111, 44320-07010, 44320-07011
- Part Name Code: 44320
- Item Weight: 6.30 Pounds
- Item Dimensions: 7.8 x 6.0 x 4.8 inches
- Condition: New
- Fitment Type: Direct Replacement
- SKU: 44320-07012
- Warranty: This genuine part is guaranteed by Toyota's factory warranty.
2003 Toyota Avalon Power Steering Pump
Looking for affordable OEM 2003 Toyota Avalon Power Steering Pump? Explore our comprehensive catalogue of genuine 2003 Toyota Avalon Power Steering Pump. All our parts are covered by the manufacturer's warranty. Plus, our straightforward return policy and speedy delivery service ensure an unparalleled shopping experience. We look forward to your visit!
2003 Toyota Avalon Power Steering Pump Parts Q&A
- Q: How to service and repair the power steering pump on 2003 Toyota Avalon?A: Service or repair of the power steering pump begins with a front fender apron seal RH removal through the removal of its two bolts. Remove the hose connector by unclipping it while taking care to avoid drive belt contamination from any fluids. To disconnect the pressure feed tube you should start by removing the 2 clamp plate set nuts along with the bolt and 2 clamp plates and 2 holders until you can use Special Service Tool: 09023-12700 to unscrew the tube under spanner assistance. To remove the drive belt disconnect the 2 bolts (A and B). The oil pressure switch connector requires removal after loosening bolt A enough to extract the pump assembly keeping in mind bolt A cannot be fully removed. Use tool 09821-E0218 and remove bolt B and PS vane pump assembly. Then remove the oil pressure switch ensuring it does not drop as a replaced switch will be necessary if it is dropped or damaged. Start by detaching the oil pressure switch from the union bolt and then proceed to remove the union bolt together with its gasket and pressure feed tube. To install the pressure feed tube and gasket to the PS vane pump assembly through the union bolt, position the stopper correctly against the front bracket before tightening the bolt to 52 Nm (530 kgf-cm, 38 ft. lbs.). Torque the oil pressure switch to 21 Nm (210 kgf-cm, 15 ft. lbs.) and maintain caution when installing the oil seal onto the connector. Use Special Service Tool: 09249-63010 to adjust the drive belt tension and torque bolt A to 29 Nm (300 kgf-cm, 22 ft. lbs.) while holding a torque wrench with 300 mm (11.81 inch) of fulcrum length before disconnecting the engine wire clamp. Reconnect the oil pressure switch connector while torquing bolt B to 43 Nm (440 kgf-cm, 32 ft. lbs.). Connect the pressure feed tube with Special Service Tool: 09023-12700 while holding it steady with a spanner until reaching 23 Nm (230 kgf-cm, 17 ft. lbs.) torque with the same torque wrench specifications. Connect both pressure feed tube holders along with clamp plates to the tube by using a bolt before securing 2 clamp plates with 2 nuts at 7.8 Nm (80 kgf-cm, 69 inch lbs.). You should connect the return hose through a clip followed by installing the front fender apron seal RH with two bolts then finish with power steering system bleeding.
Related 2003 Toyota Avalon Parts
 2003 Toyota Avalon Power Steering Hose
 2003 Toyota Avalon Steering Wheel
 2003 Toyota Avalon Drag Link
 2003 Toyota Avalon Power Steering Control Valve
 2003 Toyota Avalon Power Steering Reservoir
 2003 Toyota Avalon Rack And Pinion
 2003 Toyota Avalon Rack and Pinion Boot
 2003 Toyota Avalon Steering Column Cover
 2003 Toyota Avalon Steering Gear Box
 2003 Toyota Avalon Tie Rod End
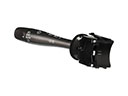 2003 Toyota Avalon Turn Signal Switch
 2003 Toyota Avalon Wiper Switch