×
ToyotaParts- Hello
- Login or Register
- Quick Links
- Live Chat
- Track Order
- Parts Availability
- RMA
- Help Center
- Contact Us
- Shop for
- Toyota Parts
- Scion Parts
My Garage
My Account
Cart
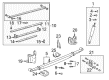
OEM 2001 Toyota Tundra Leaf Spring
Leaf Helper Spring- Select Vehicle by Model
- Select Vehicle by VIN
Select Vehicle by Model
orMake
Model
Year
Select Vehicle by VIN
For the most accurate results, select vehicle by your VIN (Vehicle Identification Number).
64 Leaf Springs found

2001 Toyota Tundra Leaf Spring Assembly, Rear Driver Side
Part Number: 48220-0C031$598.95 MSRP: $877.77You Save: $278.82 (32%)Ships in 1-3 Business DaysProduct Specifications- Other Name: Spring Assembly, Rear Left-Hand; Leaf Spring, Rear Left; Leaf Spring
- Position: Rear Driver Side
- Replaces: 48220-0C030
- Condition: New
- SKU: 48220-0C031
- Warranty: This genuine part is guaranteed by Toyota's factory warranty.
2001 Toyota Tundra Leaf Spring Assembly, Rear Passenger Side
Part Number: 48210-0C031$601.62 MSRP: $881.68You Save: $280.06 (32%)Ships in 1-3 Business DaysProduct Specifications- Other Name: Spring Assembly, Rear, Right-Hand; Leaf Spring, Rear Right; Leaf Spring
- Position: Rear Passenger Side
- Replaces: 48210-0C030
- Condition: New
- SKU: 48210-0C031
- Warranty: This genuine part is guaranteed by Toyota's factory warranty.
2001 Toyota Tundra Leaf Spring, Rear Passenger Side
Part Number: 48210-0C011$685.30 MSRP: $1004.32You Save: $319.02 (32%)Ships in 1-3 Business DaysProduct Specifications- Other Name: Spring Assembly, Rear, Right-Hand; Leaf Spring, Rear Right; Leaf Spring Assembly; Spring Assembly, Rear Passenger Side
- Manufacturer Note: 4-LEAF
- Position: Rear Passenger Side
- Replaces: 48210-0C010
- Part Name Code: 48210
- Item Weight: 18.10 Pounds
- Item Dimensions: 42.9 x 6.8 x 2.9 inches
- Condition: New
- Fitment Type: Direct Replacement
- SKU: 48210-0C011
- Warranty: This genuine part is guaranteed by Toyota's factory warranty.
2001 Toyota Tundra Leaf Spring, Rear Passenger Side
Part Number: 48210-0C081$661.01 MSRP: $968.73You Save: $307.72 (32%)Ships in 1-3 Business DaysProduct Specifications- Other Name: Spring Assembly, Rear Right-Hand; Leaf Spring, Rear Right; Leaf Spring Assembly; Spring Assembly, Rear Passenger Side
- Manufacturer Note: 4-LEAF,W(REAR STABILIZER)
- Position: Rear Passenger Side
- Replaces: 48210-0C080
- Part Name Code: 48210
- Item Weight: 17.50 Pounds
- Item Dimensions: 41.3 x 6.8 x 3.0 inches
- Condition: New
- Fitment Type: Direct Replacement
- SKU: 48210-0C081
- Warranty: This genuine part is guaranteed by Toyota's factory warranty.
2001 Toyota Tundra Leaf Spring, Rear Driver Side
Part Number: 48220-0C011$685.30 MSRP: $1004.32You Save: $319.02 (32%)Ships in 1-3 Business DaysProduct Specifications- Other Name: Spring Assembly, Rear Left-Hand; Leaf Spring, Rear Left; Leaf Spring Assembly; Spring Assembly, Rear Driver Side
- Manufacturer Note: 4-LEAF
- Position: Rear Driver Side
- Replaces: 48220-0C010
- Part Name Code: 48220
- Item Weight: 17.60 Pounds
- Item Dimensions: 42.9 x 6.9 x 2.9 inches
- Condition: New
- Fitment Type: Direct Replacement
- SKU: 48220-0C011
- Warranty: This genuine part is guaranteed by Toyota's factory warranty.
2001 Toyota Tundra Leaf Spring, Rear Driver Side
Part Number: 48220-0C081$685.30 MSRP: $1004.32You Save: $319.02 (32%)Ships in 1-3 Business DaysProduct Specifications- Other Name: Spring Assembly, Rear Left-Hand; Leaf Spring, Rear Left; Leaf Spring Assembly; Spring Assembly, Rear Driver Side
- Manufacturer Note: 4-LEAF,W(REAR STABILIZER)
- Position: Rear Driver Side
- Replaces: 48220-0C080
- Part Name Code: 48220
- Item Weight: 17.50 Pounds
- Item Dimensions: 43.4 x 6.9 x 3.0 inches
- Condition: New
- Fitment Type: Direct Replacement
- SKU: 48220-0C081
- Warranty: This genuine part is guaranteed by Toyota's factory warranty.
2001 Toyota Tundra Leaf Spring, Rear Passenger Side
Part Number: 48210-0C061$710.04 MSRP: $1040.58You Save: $330.54 (32%)Ships in 1-3 Business DaysProduct Specifications- Other Name: Spring Assembly, Rear, Right-Hand; Leaf Spring, Rear Right; Leaf Spring Assembly; Spring Assembly, Rear Passenger Side
- Manufacturer Note: 4-LEAF
- Position: Rear Passenger Side
- Replaces: 48210-0C060
- Part Name Code: 48210
- Item Weight: 17.60 Pounds
- Item Dimensions: 43.4 x 6.7 x 3.0 inches
- Condition: New
- Fitment Type: Direct Replacement
- SKU: 48210-0C061
- Warranty: This genuine part is guaranteed by Toyota's factory warranty.
2001 Toyota Tundra Leaf Spring, Rear Driver Side
Part Number: 48220-0C061$710.04 MSRP: $1040.58You Save: $330.54 (32%)Ships in 1-3 Business DaysProduct Specifications- Other Name: Spring Assembly, Rear Left-Hand; Leaf Spring, Rear Left; Leaf Spring Assembly; Spring Assembly, Rear Driver Side
- Manufacturer Note: 4-LEAF
- Position: Rear Driver Side
- Replaces: 48220-0C060
- Part Name Code: 48220
- Item Weight: 18.80 Pounds
- Item Dimensions: 41.7 x 6.8 x 3.0 inches
- Condition: New
- Fitment Type: Direct Replacement
- SKU: 48220-0C061
- Warranty: This genuine part is guaranteed by Toyota's factory warranty.

2001 Toyota Tundra Leaf Spring, Passenger Side
Part Number: 48214-0C010$180.33 MSRP: $257.47You Save: $77.14 (30%)Ships in 1-3 Business DaysProduct Specifications- Other Name: Leaf, Rear Spring; Leaf Spring, Rear Right
- Manufacturer Note: RH
- Position: Passenger Side
- Part Name Code: 48214
- Condition: New
- Fitment Type: Direct Replacement
- SKU: 48214-0C010
- Warranty: This genuine part is guaranteed by Toyota's factory warranty.
2001 Toyota Tundra Leaf Spring, Passenger Side
Part Number: 48214-0C060$180.33 MSRP: $257.47You Save: $77.14 (30%)Ships in 1-3 Business DaysProduct Specifications- Other Name: Leaf, Rear Spring; Leaf Spring, Rear Right
- Manufacturer Note: RH
- Position: Passenger Side
- Part Name Code: 48214
- Condition: New
- Fitment Type: Direct Replacement
- SKU: 48214-0C060
- Warranty: This genuine part is guaranteed by Toyota's factory warranty.
2001 Toyota Tundra Leaf Spring, Driver Side
Part Number: 48278-0C010$180.33 MSRP: $257.47You Save: $77.14 (30%)Ships in 1-3 Business DaysProduct Specifications- Other Name: Leaf, Rear Spring; Leaf Spring, Rear Left
- Manufacturer Note: LH
- Position: Driver Side
- Part Name Code: 48214
- Condition: New
- Fitment Type: Direct Replacement
- SKU: 48278-0C010
- Warranty: This genuine part is guaranteed by Toyota's factory warranty.
2001 Toyota Tundra Leaf Spring, Driver Side
Part Number: 48278-0C060$180.33 MSRP: $257.47You Save: $77.14 (30%)Ships in 1-3 Business DaysProduct Specifications- Other Name: Leaf, Rear Spring; Leaf Spring, Rear Left
- Manufacturer Note: LH
- Position: Driver Side
- Part Name Code: 48214
- Condition: New
- Fitment Type: Direct Replacement
- SKU: 48278-0C060
- Warranty: This genuine part is guaranteed by Toyota's factory warranty.

2001 Toyota Tundra Leaf Spring, Passenger Side
Part Number: 48201-0C060$245.41 MSRP: $350.39You Save: $104.98 (30%)Ships in 1-3 Business DaysProduct Specifications- Other Name: Leaf Sub-Assembly, Rear Spring; Leaf Spring, Rear Right; Leaf, Rear Spring
- Manufacturer Note: RH
- Position: Passenger Side
- Part Name Code: 48211
- Condition: New
- Fitment Type: Direct Replacement
- SKU: 48201-0C060
- Warranty: This genuine part is guaranteed by Toyota's factory warranty.
2001 Toyota Tundra Leaf Spring, Driver Side
Part Number: 48031-0C050$245.47 MSRP: $350.48You Save: $105.01 (30%)Ships in 1-3 Business DaysProduct Specifications- Other Name: Leaf Sub-Assembly, Rear Spring; Leaf Spring, Rear Left; Leaf, Rear Spring
- Manufacturer Note: LH
- Position: Driver Side
- Part Name Code: 48211
- Item Weight: 18.20 Pounds
- Condition: New
- Fitment Type: Direct Replacement
- SKU: 48031-0C050
- Warranty: This genuine part is guaranteed by Toyota's factory warranty.
2001 Toyota Tundra Leaf Spring, Driver Side
Part Number: 48031-0C060$245.47 MSRP: $350.48You Save: $105.01 (30%)Ships in 1-3 Business DaysProduct Specifications- Other Name: Leaf Sub-Assembly, Rear Spring; Leaf Spring, Rear Left; Leaf, Rear Spring
- Manufacturer Note: LH
- Position: Driver Side
- Part Name Code: 48211
- Condition: New
- Fitment Type: Direct Replacement
- SKU: 48031-0C060
- Warranty: This genuine part is guaranteed by Toyota's factory warranty.
2001 Toyota Tundra Leaf Spring, Passenger Side
Part Number: 48201-0C040$246.42 MSRP: $351.83You Save: $105.41 (30%)Ships in 1-3 Business DaysProduct Specifications- Other Name: Leaf Sub-Assembly, Rear Spring; Leaf Spring, Rear Right; Leaf, Rear Spring
- Manufacturer Note: RH
- Position: Passenger Side
- Part Name Code: 48211
- Condition: New
- Fitment Type: Direct Replacement
- SKU: 48201-0C040
- Warranty: This genuine part is guaranteed by Toyota's factory warranty.
2001 Toyota Tundra Leaf Spring, Driver Side
Part Number: 48031-0C030$273.51 MSRP: $390.50You Save: $116.99 (30%)Ships in 1-3 Business DaysProduct Specifications- Other Name: Leaf Sub-Assembly, Rear Spring; Leaf Spring, Rear Left; Leaf, Rear Spring
- Position: Driver Side
- Part Name Code: 48211
- Condition: New
- Fitment Type: Direct Replacement
- SKU: 48031-0C030
- Warranty: This genuine part is guaranteed by Toyota's factory warranty.
2001 Toyota Tundra Leaf Spring, Passenger Side
Part Number: 48201-0C030$273.51 MSRP: $390.50You Save: $116.99 (30%)Ships in 1-3 Business DaysProduct Specifications- Other Name: Leaf Sub-Assembly, Rear Spring; Leaf Spring, Rear Right; Leaf, Rear Spring
- Position: Passenger Side
- Part Name Code: 48211
- Condition: New
- Fitment Type: Direct Replacement
- SKU: 48201-0C030
- Warranty: This genuine part is guaranteed by Toyota's factory warranty.

2001 Toyota Tundra Leaf Spring, Passenger Side
Part Number: 48212-0C030$95.10 MSRP: $133.49You Save: $38.39 (29%)Ships in 1-3 Business DaysProduct Specifications- Other Name: Leaf, Rear Spring; Leaf Spring, Rear Right
- Position: Passenger Side
- Part Name Code: 48212
- Condition: New
- Fitment Type: Direct Replacement
- SKU: 48212-0C030
- Warranty: This genuine part is guaranteed by Toyota's factory warranty.
2001 Toyota Tundra Leaf Spring, Driver Side
Part Number: 48276-0C030$95.10 MSRP: $133.49You Save: $38.39 (29%)Ships in 1-3 Business DaysProduct Specifications- Other Name: Leaf, Rear Spring; Leaf Spring, Rear Left
- Position: Driver Side
- Part Name Code: 48212
- Condition: New
- Fitment Type: Direct Replacement
- SKU: 48276-0C030
- Warranty: This genuine part is guaranteed by Toyota's factory warranty.
| Page 1 of 4 |Next >
1-20 of 64 Results
2001 Toyota Tundra Leaf Spring
Looking for affordable OEM 2001 Toyota Tundra Leaf Spring? Explore our comprehensive catalogue of genuine 2001 Toyota Tundra Leaf Spring. All our parts are covered by the manufacturer's warranty. Plus, our straightforward return policy and speedy delivery service ensure an unparalleled shopping experience. We look forward to your visit!
2001 Toyota Tundra Leaf Spring Parts Q&A
- Q: How to service and repair a leaf spring on 2001 Toyota Tundra?A: The first step for leaf spring service and repair consists of applying safety stands under the body while raising and lowering the axle housing for complete leaf spring tension freedom. The repair process begins by removing the rear wheel followed by disassembly of 4 U-bolt mounting nuts and washers, spring seat and 2 U-bolts, and ending with taking off the spring bumper. The leaf spring requires you to disconnect the installed nut, washer, and bolt before removing the two nuts with washers and bolts alongside the shackle and leaf spring from the setup. The bushing replacement process begins with sawing off both tabs followed by insertion into Special Service Tool: 09950-60010 (09951-00350) 09950-70010 (09951-07150). A press must then be used to expel inner tubes and rubber parts from the bushings. Finally, outer tubes can be tapped out with a chisel and hammer. Install the new bushings through the use of Special Service Tool: 09710-28012 (09710-07062), 09710-30041 09710-03211) together with a press. To replace the leaf spring properly prepare it by lifting the spring clips open with a chisel and hammer, and removing the center bolt and nut from the spring when held in a metal box clamp. To replace the spring clip begin by drilling off the rivet head then driving the rivet out to prepare for new rivets which you must then install through press operation. Install the spring center bolt and nut while positioning the leaf spring holes correctly in a vise before torqueing up to 44 Nm (450 kgf-cm, 33 ft. lbs.). A lightweight hammer should be used to restore the spring clips to their original shape. Attach the leaf spring with its shackle through three bolts, washers, and nuts then stabilize the suspension before torquing these parts to 170 Nm (1,735 kgf-cm, 125 ft. lbs.). Fasten the spring bumper to the spring seat using two U-bolts followed by four washers and nuts while maintaining equal lengths between the U-bolts underneath the spring seat and torquing everything to 133 Nm (1,350 kgf-cm, 98 ft. lbs.). To complete the installation thread in the rear wheel before torqueing it to 110 Nm (1,150 kgf-cm, 83 ft. lbs.) and then remove safety stands.
Related 2001 Toyota Tundra Parts
 2001 Toyota Tundra Control Arm
 2001 Toyota Tundra Coil Springs
 2001 Toyota Tundra Sway Bar Link
 2001 Toyota Tundra Bump Stop
 2001 Toyota Tundra Sway Bar Kit
 2001 Toyota Tundra Alignment Bolt
 2001 Toyota Tundra Axle Beam Mount
 2001 Toyota Tundra Control Arm Bushing
 2001 Toyota Tundra Shock Absorber
 2001 Toyota Tundra Sway Bar Bracket
 2001 Toyota Tundra Sway Bar Bushing
 2001 Toyota Tundra Wheel Seal