×
ToyotaParts- Hello
- Login or Register
- Quick Links
- Live Chat
- Track Order
- Parts Availability
- RMA
- Help Center
- Contact Us
- Shop for
- Toyota Parts
- Scion Parts
My Garage
My Account
Cart
OEM 2001 Toyota Tundra Axle Shaft
Car Axle Shaft- Select Vehicle by Model
- Select Vehicle by VIN
Select Vehicle by Model
orMake
Model
Year
Select Vehicle by VIN
For the most accurate results, select vehicle by your VIN (Vehicle Identification Number).
3 Axle Shafts found


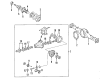
2001 Toyota Tundra Axle Shaft, Rear
Part Number: 42311-34040$411.88 MSRP: $603.62You Save: $191.74 (32%)Ships in 1-3 Business DaysProduct Specifications- Other Name: Shaft, Rear Axle; Drive Axle Shaft, Rear; Axle Shafts; Shaft, Rear Axle, Passenger Side; Shaft, Rear Axle, Driver Side
- Manufacturer Note: W(ABS)
- Position: Rear
- Item Weight: 22.90 Pounds
- Item Dimensions: 51.5 x 8.5 x 8.1 inches
- Condition: New
- Fitment Type: Direct Replacement
- SKU: 42311-34040
- Warranty: This genuine part is guaranteed by Toyota's factory warranty.
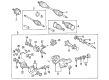
2001 Toyota Tundra Axle Shaft, Rear
Part Number: 42311-34030$490.76 MSRP: $719.22You Save: $228.46 (32%)Ships in 1-3 Business DaysProduct Specifications- Other Name: Shaft, Rear Axle; Drive Axle Shaft, Rear; Axle Shafts; Shaft, Rear Axle, Passenger Side; Shaft, Rear Axle, Driver Side
- Position: Rear
- Item Weight: 10.50 Pounds
- Item Dimensions: 47.8 x 10.5 x 7.4 inches
- Condition: New
- Fitment Type: Direct Replacement
- SKU: 42311-34030
- Warranty: This genuine part is guaranteed by Toyota's factory warranty.


2001 Toyota Tundra Axle Assembly, Front
Part Number: 43430-0C010$372.28 MSRP: $572.11You Save: $199.83 (35%)Product Specifications- Other Name: Shaft Assembly, Front Drive; CV Axle Assembly, Front Left, Front Right; GSP Cv Axle; Axle Shaft; Shaft Assembly, Front Drive, Passenger Side; Shaft Assembly, Front Drive, Driver Side; CV Axle Assembly
- Position: Front
- Item Weight: 23.70 Pounds
- Item Dimensions: 30.7 x 6.2 x 6.2 inches
- Condition: New
- Fitment Type: Direct Replacement
- SKU: 43430-0C010
- Warranty: This genuine part is guaranteed by Toyota's factory warranty.
2001 Toyota Tundra Axle Shaft
Looking for affordable OEM 2001 Toyota Tundra Axle Shaft? Explore our comprehensive catalogue of genuine 2001 Toyota Tundra Axle Shaft. All our parts are covered by the manufacturer's warranty. Plus, our straightforward return policy and speedy delivery service ensure an unparalleled shopping experience. We look forward to your visit!
2001 Toyota Tundra Axle Shaft Parts Q&A
- Q: How to service and repair the axle shaft on 2001 Toyota Tundra?A: Start the axle shaft servicing process by removing the wheel and brake components together with the gasket from the rear of the vehicle. The bearing backlash measurement requires a dial indicator to check if it stays below 0.7 mm (0.028 inch); replace the bearing when the measurement is exceeded. Check the hub bolt surface outside measurement of the axle shaft for deviation that must stay below 0.1 mm (0.004 inch) or replace the axle shaft. In vehicles equipped with ABS the rear axle ABS speed sensor needs to be detached from the housing. You must first detach the rear brake assembly then disconnect the brake line through Special Service Tool: 09023-00100 after separating the parking brake cable clip and pin. The 4 backing plate mounting nuts must be undone first to allow the rear axle shaft assembly to be removed while keeping the oil seal from being damaged. Take out the O-ring that exists inside the rear axle housing. Heating and preparation of the serration bolts allow inspection by connecting 4 nuts onto the bolts before hammer removal and subsequent chiseling and grinding operations on retainer components and the rotor assembly. Follow this procedure to reinstall serration bolts by placing washers on them followed by nuts before completing the torque adjustment. Position Special Service Tool: 09521-25011 on the backing plate before using it to push out both the rear axle shaft along with its bearing retainer. Examine the axle shaft and flange runout through measurements because both components should not exceed 2.0 mm (0.079 inch) for the shaft and 0.1 mm (0.004 inch) for the flange; replace these components if found damaged or worn. Special Service Tool: 09308-00010 allows you to extract the damaged and worn outer side oil seal. The procedure requires Special Service Tool 09223-56010 along with 09950-60010 (09951-00560) for the axle bearing removal process followed by Special Service Tool 09515-30010 and 09950-60020 (09951-00890) for mounting purposes. Use Special Service Tool: 09950-60010 (09951-00610), 09950-70010 (09951-07150) together with a hammer to install a new outer side oil seal. To check the bearing case for wear or damage replace it by taking out the outer side oil seal and bearing along with the serration bolts before putting in a new bearing case with the backing plate and serration bolts through a press operation. The process requires removing hub bolts while replacing the oil deflector alongside its gasket with a new combination of brass bar and hammer technique before final assembly with a washer and nut. Single out the rear axle shaft by placing it inside the backing plate while the new outer side oil seal lip gets MP grease coating. The mounting will be carried out using Special Service Tool: 09316-60011 (09316-00051) and a press so the shaft can be set inside its placement. You can install the new snap ring when using a snap ring expander. When installing the ABS speed sensor rotor and bearing retainer into vehicles with this system use Special Service Tool: 09316-60011 (09316-00051) and a press which must achieve 122.2 plus or minus 1.0 mm (4.811 plus or minus 0.039 inch) length standard. After coating the new oil seal lip with MP grease, install it using Special Service Tool: 09308-00010 to remove it and Special Service Tool: 09950-60020 (09951-00710), 09950-70010 (09951-07150). Fitting a fresh O-ring on the rear axle housing lets you install rear axle shafts which need to be torqued to 69 Nm (700 kgf-cm, 51 ft. lbs.). The brake line needs connection with the parking brake cable while Special Service Tool: 09023-00100 ensures proper wheel cylinder attachment through 15 Nm (155 kgf-cm) torque (11 ft. lbs.). The rear brake assembly installation should be completed alongside installing the ABS speed sensor for vehicles with this system that requires 8.0 Nm (82 kgf-cm, 71 ft. lbs.) torque. Bearing backlash and axle shaft deviation measurement must be performed before installing a new gasket and brake drum while torquing the rear wheel to 110 Nm (1,150 kgf-cm, 83 ft. lbs). Vehicle owners should perform a brake system bleed before checking the ABS speed sensor signal for vehicles that have ABS.
Related 2001 Toyota Tundra Parts
 2001 Toyota Tundra CV Boot
 2001 Toyota Tundra CV Joint
 2001 Toyota Tundra Coil Springs
 2001 Toyota Tundra Leaf Spring
 2001 Toyota Tundra Steering Knuckle
 2001 Toyota Tundra Sway Bar Kit
 2001 Toyota Tundra Differential Mount
 2001 Toyota Tundra Shock Absorber
 2001 Toyota Tundra Spare Wheel
 2001 Toyota Tundra Sway Bar Bracket
 2001 Toyota Tundra Wheel Cover
 2001 Toyota Tundra Wheel Seal