×
ToyotaParts- Hello
- Login or Register
- Quick Links
- Live Chat
- Track Order
- Parts Availability
- RMA
- Help Center
- Contact Us
- Shop for
- Toyota Parts
- Scion Parts
My Garage
My Account
Cart
OEM 2001 Toyota Corolla Power Steering Pump
Power Steering Pump Unit- Select Vehicle by Model
- Select Vehicle by VIN
Select Vehicle by Model
orMake
Model
Year
Select Vehicle by VIN
For the most accurate results, select vehicle by your VIN (Vehicle Identification Number).
1 Power Steering Pump found

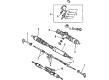 Product Specifications
- Other Name: Pump Assembly, L/Pulley; Pump Assembly, Vane; Pump
- Part Name Code: 44320
- Item Weight: 2.10 Pounds
- Item Dimensions: 7.5 x 5.6 x 4.7 inches
- Condition: New
- Fitment Type: Direct Replacement
- SKU: 44320-02034
- Warranty: This genuine part is guaranteed by Toyota's factory warranty.
2001 Toyota Corolla Power Steering Pump
Looking for affordable OEM 2001 Toyota Corolla Power Steering Pump? Explore our comprehensive catalogue of genuine 2001 Toyota Corolla Power Steering Pump. All our parts are covered by the manufacturer's warranty. Plus, our straightforward return policy and speedy delivery service ensure an unparalleled shopping experience. We look forward to your visit!
2001 Toyota Corolla Power Steering Pump Parts Q&A
- Q: How to service and repair the power steering pump on 2001 Toyota Corolla?A: Service and repair operations on the power steering pump start after you remove the RH engine under cover by unfastening its 4 bolts and 2 screws. The drive belt tension needs adjustment through clockwise rotation of the drive belt tensioner arm before removing the drive belt. Safely disconnect the suction hose while removing its clip to avoid spillage of fluid onto the drive belt. Detach the connector before unscrewing the oil pressure switch while keeping it safe from falling; get a replacement if the switch shows damage. The connection of the pressure feed tube requires you to remove its union bolt and gasket. You must use Special Service Tool: 09960-10010 with parts 09962-01000 or 09963-01000 to clamp the vane pump pulley before loosening its retaining nut. After clamping the pulley you can take out the nut and pulley from the vane pump shaft. The PS vane pump assembly removal starts with unfastening the 2 pump assembly set bolts and nuts to free the component. For PS vane pump assembly installation, follow the step of placing all components back with 2 set bolts and nuts before torquing to 37 Nm (370 kgf-cm, 27 ft. lbs.). You can use the same special service tool to stop the vane pump pulley from rotating before torquing the nut to 43 Nm (440 kgf-cm, 32 ft. lbs.). Fasten the pressure feed tube using a new gasket alongside the union bolt and check that the stopper engages the pressure feed No. 2 tube before securing the bolt at 54 Nm (550 kgf-cm, 40 ft. lbs.). Put the oil pressure switch into position and torque it at 21 Nm (210 kgf-cm, 15 ft. lbs.) before carefully connecting the wires while alerting others about the presence of oil on the wires. The suction hose requires connecting to its clip before the drive belt reinstallation occurs through tension adjustment and installation of the RH engine under cover using 4 bolts and 2 screws. Perform bleeding procedures on the power steering system while finishing this task.
Related 2001 Toyota Corolla Parts
 2001 Toyota Corolla Steering Wheel
 2001 Toyota Corolla Power Steering Hose
 2001 Toyota Corolla Rack And Pinion
 2001 Toyota Corolla Steering Column
 2001 Toyota Corolla Wiper Switch
 2001 Toyota Corolla Drag Link
 2001 Toyota Corolla Power Steering Control Valve
 2001 Toyota Corolla Shift Interlock Solenoid
 2001 Toyota Corolla Steering Column Cover
 2001 Toyota Corolla Steering Gear Box
 2001 Toyota Corolla Steering Shaft
 2001 Toyota Corolla Tie Rod End