×
ToyotaParts- Hello
- Login or Register
- Quick Links
- Live Chat
- Track Order
- Parts Availability
- RMA
- Help Center
- Contact Us
- Shop for
- Toyota Parts
- Scion Parts
My Garage
My Account
Cart
OEM 2001 Toyota Avalon Air Bag
Air Bag Module- Select Vehicle by Model
- Select Vehicle by VIN
Select Vehicle by Model
orMake
Model
Year
Select Vehicle by VIN
For the most accurate results, select vehicle by your VIN (Vehicle Identification Number).
1 Air Bag found

 Product Specifications
- Other Name: Air Bag Assembly, Instrument Panel; Instrument Panel Air Bag, Upper; Passenger Inflator Module; Air Bag Assembly, Instrument Panel Passenger W/O Door
- Part Name Code: 73960A
- Item Weight: 7.90 Pounds
- Item Dimensions: 14.9 x 11.3 x 7.8 inches
- Condition: New
- Fitment Type: Direct Replacement
- SKU: 73960-07030
- Warranty: This genuine part is guaranteed by Toyota's factory warranty.
2001 Toyota Avalon Air Bag
Looking for affordable OEM 2001 Toyota Avalon Air Bag? Explore our comprehensive catalogue of genuine 2001 Toyota Avalon Air Bag. All our parts are covered by the manufacturer's warranty. Plus, our straightforward return policy and speedy delivery service ensure an unparalleled shopping experience. We look forward to your visit!
2001 Toyota Avalon Air Bag Parts Q&A
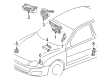
- Q: How to Service and Repair the Side Air Bag in a Power Seat on 2001 Toyota Avalon?A: The initial step for repairing or servicing the power seat side air bag requires using a finger to free the lock through slider movement before disconnecting the connector. To connect both parts align the male connector lock with the female connector slider while facing in the same direction shown in the illustration and then join them without causing friction. Users should insert these components until they lock into place before checking their security by light pulling action. A correct fit results in both an audible confirmation and full retraction of the outer parts. Touch the slider when it moves only by keeping your hands away, also pay attention to not bending the release board since using a new board becomes necessary in case of bending.
Related 2001 Toyota Avalon Parts
 2001 Toyota Avalon Camshaft Position Sensor
 2001 Toyota Avalon Fuse Box
 2001 Toyota Avalon Knock Sensor
 2001 Toyota Avalon Air Bag Control Module
 2001 Toyota Avalon Air Bag Sensor
 2001 Toyota Avalon Car Key
 2001 Toyota Avalon Clock Spring
 2001 Toyota Avalon Crankcase Breather Hose
 2001 Toyota Avalon Door Jamb Switch
 2001 Toyota Avalon Engine Control Module
 2001 Toyota Avalon Headlight Relay
 2001 Toyota Avalon Relay