×
ToyotaParts- Hello
- Login or Register
- Quick Links
- Live Chat
- Track Order
- Parts Availability
- RMA
- Help Center
- Contact Us
- Shop for
- Toyota Parts
- Scion Parts
My Garage
My Account
Cart
Ignition Lock - Electrical
2009 Toyota Tacoma Ignition Lock Cylinder, Transmitter
Currently shopping for
2009 Toyota Tacoma
Change VehicleCategories Close X
Currently selected
Electrical
- ABS Components
- Air Bag Components
- Antenna & Radio
- Anti-Theft Components
- Cruise Control System
- Electrical Components
- Flashers
- Front Door
- Front Seat Belts
- Horn
- Ignition Lock
- Ignition System
- Instruments & Gauges
- Keyless Entry Components
- Mirrors
- Parking Aid
- Powertrain Control
- Rear Door
- Rear Seat Belts
- Senders
- Supplemental Restraint System
- Switches
- Tire Pressure Monitoring
- Wipers
Other Categories
A/C & Heating
Air & Fuel Delivery
Belts & Cooling
Body & Hardware
Brakes
Charging & Starting
Driveline & Axles
Emission Control & Exhaust
Engine
Headlights & Lighting
Interior & Exterior Trim
Maintenance & Lubrication
Steering
Suspension
Transmission

How to use OE catalog
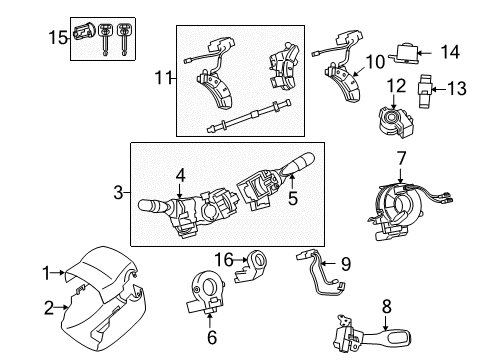
Diagram (1 of 1): Steering column - Shroud, switches & levers
Sort by:
Ref No.
Ref No.
Part No. & Part Description
Price & Qty.
Part No. &
Part Description
Part Description
- 1
 MSRP: $69.51 Your Price: $49.941
- 2
 MSRP: $128.89 Your Price: $91.831
- 3
 MSRP: $360.43 Your Price: $252.441
 - 3MSRP: $353.11 Your Price: $247.321
- 4
 MSRP: $208.90 Your Price: $147.571
- 5


 MSRP: $256.81 Your Price: $179.861
 - 5MSRP: $173.97 Your Price: $122.891
- 6
 MSRP: $560.04 Your Price: $382.141
- 8


 MSRP: $208.57 Your Price: $147.331
- 9


 MSRP: $24.43 Your Price: $17.551
 - 9
 MSRP: $64.02 Your Price: $46.001
- 10

- 11

 MSRP: $374.40 Your Price: $262.23
- 12


 MSRP: $149.35 Your Price: $106.401
- 13

 MSRP: $94.79 Your Price: $67.531
- 14


 MSRP: $107.10 Your Price: $76.301
- 15
 MSRP: $469.72 Your Price: $328.981
 - 15MSRP: $166.82 Your Price: $117.841
- 16

 MSRP: $230.69 Your Price: $162.961
OEM 2009 Toyota Tacoma Parts for Ignition Lock - Electrical
Genuine 2009 Toyota Tacoma parts are produced by Toyota with the official design and standards, thus they ensure a high quality throughout the production process. OEM parts are the ideal choice for people looking for new Ignition Lock - Electrical parts. With our competitive prices, we offer 2009 Toyota Tacoma Ignition Lock Cylinder, Transmitter that fit tight budgets, while still including the manufacturer warranties, a hassle-free returns policy and quick shipping options.
Ignition Switch Installation and Repair Tips for 2009 Toyota Tacoma
- Q: How to install the ignition switch on 2009 Toyota Tacoma?A: To install the ignition switch for the 2TR-FE starting system, first install the ignition switch, then the steering column cover lower. Finally, connect the cable to the negative battery terminal, ensuring the proper torque is applied.