×
ToyotaParts- Hello
- Login or Register
- Quick Links
- Live Chat
- Track Order
- Parts Availability
- RMA
- Help Center
- Contact Us
- Shop for
- Toyota Parts
- Scion Parts
My Garage
My Account
Cart
Powertrain Control
2008 Toyota Prius Mass Air Flow Sensor, Camshaft Position Sensor, Knock Sensor
Currently shopping for
2008 Toyota Prius
Change VehicleVehicle Options
4 Cyl 1.5 L FULL HYBRID EV-GAS (FHEV)Vehicle Options
4 Cyl 1.5 L FULL HYBRID EV-GAS (FHEV)Categories Close X
Currently selected
Electrical
- ABS Components
- Air Bag Components
- Alarm System
- Antenna & Radio
- Anti-Theft Components
- Blower Motor - Hybrid Component
- Cooling System - Hybrid Component
- Cruise Control System
- Electrical Components
- Flashers
- Front Door
- Front Seat Belts
- Gauges
- Horn
- Hybrid Components
- Ignition Lock
- Ignition System
- Instruments & Gauges
- Keyless Entry Components
- Lift Gate
- Mirrors
- Navigation System
- Parking Aid
- Powertrain Control
- Rear Door
- Rear Seat Belts
- Ride Control Components
- Senders
- Supplemental Restraint System
- Switches
- Tire Pressure Monitoring
- Wipers
- Wiring Harness
Other Categories
A/C & Heating
Air & Fuel Delivery
Belts & Cooling
Body & Hardware
Brakes
Charging & Starting
Driveline & Axles
Emission Control & Exhaust
Engine
Headlights & Lighting
Interior & Exterior Trim
Maintenance & Lubrication
Steering
Suspension
Transmission
Categories Close X
How to use OE catalog
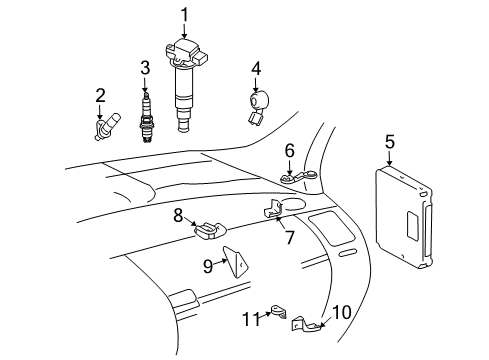
Diagram (1 of 1): Electrical - Ignition system
Sort by:
Ref No.
Ref No.
Part No. & Part Description
Price & Qty.
Part No. &
Part Description
Part Description
- 1


 MSRP: $134.22 Your Price: $95.621
- 2

 MSRP: $1.65 Your Price: $1.181
- 3

 MSRP: $14.46 Your Price: $10.381
- 5
 MSRP: $871.92 Your Price: $594.961
- 6
 MSRP: $14.60 Your Price: $10.491
- 7
 MSRP: $9.88 Your Price: $7.101
- 8
 MSRP: $12.10 Your Price: $8.691
- 9
 MSRP: $16.26 Your Price: $11.691
- 10
 MSRP: $10.49 Your Price: $7.541
- 11
 MSRP: $9.88 Your Price: $7.101


 MSRP: $168.15 Your Price: $118.781


 MSRP: $100.28 Your Price: $71.441
 MSRP: $112.09 Your Price: $79.861


 MSRP: $201.42 Your Price: $142.281


 MSRP: $199.59 Your Price: $140.991

 MSRP: $179.95 Your Price: $127.121

 MSRP: $257.64 Your Price: $180.451
")
") MSRP: $1.98 Your Price: $1.42
MSRP: $1.98 Your Price: $1.42

 MSRP: $2.81 Your Price: $2.02
")
") MSRP: $6.47 Your Price: $4.65
MSRP: $6.47 Your Price: $4.65
 89661-47161
Computer, Engine Control- Production Date: 12/2006-08/2007
- Fitting Vehicle Options: NHW20
- Part Name Code: 89661
- Replaced By: 89661-47162
MSRP: $900.03 Your Price: $614.14
")
") MSRP: $1.98 Your Price: $1.42
MSRP: $1.98 Your Price: $1.42
") MSRP: $2.31 Your Price: $1.66
MSRP: $2.31 Your Price: $1.66
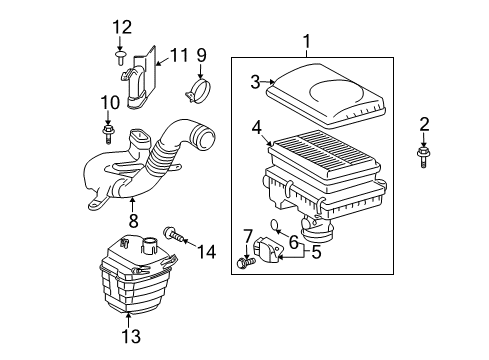
OEM 2008 Toyota Prius Parts for Powertrain Control
Genuine 2008 Toyota Prius parts are produced by Toyota with the official design and standards, thus they ensure a high quality throughout the production process. OEM parts are the ideal choice for people looking for new Powertrain Control parts. With our competitive prices, we offer 2008 Toyota Prius Mass Air Flow Sensor, Camshaft Position Sensor, Knock Sensor that fit tight budgets, while still including the manufacturer warranties, a hassle-free returns policy and quick shipping options.
Knock Sensor, Mass Air Flow Sensor Installation and Repair Tips for 2008 Toyota Prius
- Q: How to remove the Knock Sensor on 2008 Toyota Prius?A: To take the Knock Sensor out of the 1NZ-FXE engine control system, disconnect the negative battery terminal and wait to avoid Air Bag deployment. Disassemble the radiator support cover and engine under cover and empty coolant. Disassemble the air cleaner assembly, the dipstick guide, and disconnect a number of hoses and connectors. Lastly, take off the intake manifold and knock sensor.
- Q: How to service and repair the Mass Air Flow Sensor on 2008 Toyota Prius?A: When maintaining Mass Air Flow Sensor of the 1NZ-FXE engine, disconnecting the negative battery terminal and wait to avoid activating the Air Bag. The process will require removing the radiator support opening cover, removing the Mass Air Flow Sensor connector, and removing screws that will hold the sensor.