My Garage
Cart
Make sure this part fits

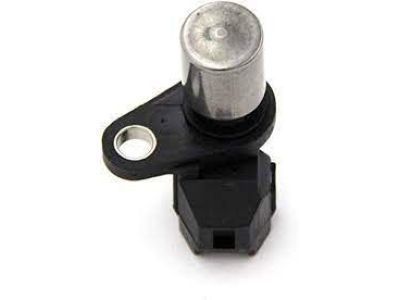
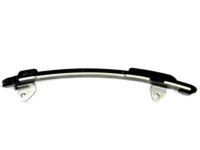
Toyota 90080-19009
Crankshaft Position Sensor

1995-2010 Toyota 9008019009

Customer Questions & Expert Answers (29)
Toyota 90080-19009 Crankshaft Position Sensor
  • Part Description
    Sensor, Crank Position; Engine Crankshaft Position Sensor; RPM Sensor, Engine Management; Crankshaft Sensor
  • Part Name Code
    15100R
  • Replaces
    90919-05012
  • Manufacturer
    Toyota
Make sure this part fits
$77.72 MSRP: $109.10
You Save: $31.38 (29%)
Ships in 1-2 Business Days
1
ADD TO CART
  • Related Parts
  • Product Specifications
  • Vehicle Fitment
  • Customer Questions & Expert Answers
  • Product Specifications

    BrandGenuine Toyota
    Part Name Code15100R
    Manufacturer Part Number90080-19009
    Part DescriptionSensor, Crank Position; Engine Crankshaft Position Sensor; RPM Sensor, Engine Management; Crankshaft Sensor
    Manufacturer Note(L)
    Item Dimensions1.6 x 2.2 x 3.4 inches
    Item Weight0.50 Pounds
    ConditionNew
    Fitment TypeDirect Replacement
    Replaces90919-05012
    ManufacturerToyota
    SKU90080-19009
    WarrantyThis genuine Toyota part is guaranteed by Toyota's factory warranty.
    Shipping & ReturnShipping Policy Return Policy
    Warning: California's Proposition 65
  • Vehicle Fitment

    Year Make Model Trim Engine
    1995-2004 Toyota AvalonXL, XLS6 Cyl 3.0 L GAS
    1995-2006 Toyota CamryCE, LE, SE, XLE6 Cyl 3.0 L GAS, 6 Cyl 3.3 L GAS
    2001-2010 Toyota HighlanderBase, Hybrid, Hybrid Limited, Limited, Sport6 Cyl 3.0 L GAS, 6 Cyl 3.3 L FULL HYBRID EV-GAS (FHEV), 6 Cyl 3.3 L GAS
    1998-2010 Toyota SiennaCE, LE, Limited, XLE, XLE Limited6 Cyl 3.0 L GAS, 6 Cyl 3.3 L GAS, 6 Cyl 3.5 L GAS
    2004-2008, 1999-2002 Toyota SolaraSE, SE Sport, SLE, Sport6 Cyl 3.0 L GAS, 6 Cyl 3.3 L GAS
  • Customer Questions & Expert Answers

    Q:
    Will 90080-19009 fit my vehicle? Posted by ToyotaPartsNow Specialist
    A:
    Find out if part number 90080-19009 is the right fit for your car by Selecting Your Vehicle model.
    Posted by ToyotaPartsNow Specialist
    Q:
    How to replace the Crankshaft Position Sensor on Toyota Camry? Posted by Customer
    A:
    The Crankshaft Position Sensor replacement requires removing the No.1 timing belt cover as the first step. The procedure starts by separating the sensor connector followed by disconnecting the connector from the generator drive belt adjusting bar before unscrewing the bolt and removing the sensor. The Crankshaft Position Sensor replacement process involves mounting the sensor with the bolt while tightening it to 9.5 N.m (97 kgf.cm, 84 in.lbf) before connecting the sensor connector to the generator drive belt adjusting bar followed by reconnecting the sensor connector. You should put back the No.1 timing belt cover as the last step in this procedure.
    Posted by ToyotaPartsNow Specialist
    Q:
    How to replace the Crankshaft Position Sensor on Toyota Highlander? Posted by Customer
    A:
    The procedure to replace a Crankshaft Position Sensor starts with the removal of engine under cover No.1 through six screws and two clips and one under cover. The front fender apron seal RH must be removed after removing its clip and 2 bolts while also unfastening the apron seal. The crankshaft position sensor needs its connector disconnected before separating the bolt along with the clamp and sensor. Start by placing the sensor together with its clamp followed by the bolt application until it reaches a torque measurement of 9.0 N.m (92 kgf.cm, 80 in.lbf) then reconnect the sensor connector. You must replace the front fender apron seal RH by securing the clip and 2 bolts before reinstalling the engine under cover No.1 with its 6 screws and 2 clips.
    Posted by ToyotaPartsNow Specialist
    Q:
    How to replace the Crankshaft Position Sensor on Toyota Solara? Posted by Customer
    A:
    The initial step to replace the Crankshaft Position Sensor includes removing the right-hand side engine under cover by detaching five screws and three clips. Begin sensor replacement by taking off the front fender apron seal of the right-hand side after unfastening the clip together with 2 bolts. Detach the sensor connector before eliminating the bolt and clamp and sensor from the housing. Torque the new Crankshaft Position Sensor to 9.0 N.m while following the specifications of 9.0 N.m (92 kgf.cm, 80 in.lbf). The technician should reattach the front fender apron seal on the right-hand side before reinstalling the engine under cover which is also located on the right side.
    Posted by ToyotaPartsNow Specialist
    Q:
    How to replace the Crankshaft Position Sensor on Toyota Sienna? Posted by Customer
    A:
    The Crankshaft Position Sensor replacement begins with extracting the front fender apron seal from the right-hand side by using a clip remover followed by removing its 2 bolts and eventual removal of the seal itself. After disconnecting the crankshaft position sensor connector you should remove the bolt which secures the sensor before removing it. Torque the new crankshaft position sensor to a value of 8.0 N.m (80 kgf.cm, 71 in.lbf) when installing it. Reposition the front fender apron seal on the right-hand side as the last step of the installation.
    Posted by ToyotaPartsNow Specialist
    Q:
    What is the first step to service and repair the Crankshaft Position Sensor for the 2000 Toyota Camry? Posted by Customer
    A:
    First, remove the drive belts and the timing cover.
    Posted by ToyotaPartsNow Specialist
    See expert answers on similar Crankshaft Position Sensor
    Q:
    How should the new Crankshaft Position Sensor be installed for the 2005 Toyota Camry? Posted by Customer
    A:
    Ensure it is torqued to 9.0 N.m (92 kgf.cm, 80 in.lbf).
    Posted by ToyotaPartsNow Specialist
    See expert answers on similar Crankshaft Position Sensor
    Q:
    What is the first step to replace the Crankshaft Position Sensor for the 2001 Toyota Avalon? Posted by Customer
    A:
    Remove the RH fender apron seal.
    Posted by ToyotaPartsNow Specialist
    See expert answers on similar Crankshaft Position Sensor
    Q:
    What is the first step to replace the Crankshaft Position Sensor for the 2003 Toyota Avalon? Posted by Customer
    A:
    Remove the RH fender apron seal.
    Posted by ToyotaPartsNow Specialist
    See expert answers on similar Crankshaft Position Sensor
    Q:
    How do you install the new crankshaft position sensor for the 2004 Toyota Avalon? Posted by Customer
    A:
    Install the new crankshaft position sensor with the bolt, ensuring to torque it to 8 N.m (80 kgf.cm, 69 in.lbf).
    Posted by ToyotaPartsNow Specialist
    See expert answers on similar Crankshaft Position Sensor
    Q:
    How do you install the new crankshaft position sensor for the 2002 Toyota Avalon? Posted by Customer
    A:
    Install the new crankshaft position sensor with the bolt, ensuring it is torqued to 8 N.m (80 kgf.cm, 69 in.lbf).
    Posted by ToyotaPartsNow Specialist
    See expert answers on similar Crankshaft Position Sensor
    Q:
    What is the first step to service and repair the crankshaft position sensor for the 2000 Toyota Avalon? Posted by Customer
    A:
    Remove the RH fender apron seal.
    Posted by ToyotaPartsNow Specialist
    See expert answers on similar Crankshaft Position Sensor
    Q:
    How do you install the sensor for the 2006 Toyota Highlander? Posted by Customer
    A:
    Begin by placing the sensor and clamp back in position with the bolt, ensuring a torque of 9.0 N.m (92 kgf.cm, 80 in..lbf) is applied.
    Posted by ToyotaPartsNow Specialist
    See expert answers on similar Crankshaft Position Sensor
    Q:
    What hoses need to be disconnected after removing the radiator assembly for the 2008 Toyota Highlander? Posted by Customer
    A:
    Disconnect the discharge hose sub-assembly and suction hose sub-assembly, followed by the compressor and magnetic clutch.
    Posted by ToyotaPartsNow Specialist
    See expert answers on similar Crankshaft Position Sensor
    Q:
    What is the next step after disconnecting the sensor connector for the 2009 Toyota Highlander? Posted by Customer
    A:
    Remove the bolt.
    Posted by ToyotaPartsNow Specialist
    See expert answers on similar Crankshaft Position Sensor
    Q:
    What is the first step to replace the Crankshaft Position Sensor for the 2004 Toyota Camry? Posted by Customer
    A:
    Remove the engine under cover on the right-hand side by taking out 5 screws and 3 clips.
    Posted by ToyotaPartsNow Specialist
    See expert answers on similar Crankshaft Position Sensor
    Q:
    What is the first step to service the Crankshaft Position Sensor for the 2000 Toyota Solara? Posted by Customer
    A:
    Remove the RH fender apron seal.
    Posted by ToyotaPartsNow Specialist
    See expert answers on similar Crankshaft Position Sensor
    Q:
    What should be done after removing the compressor and magnetic clutch for the 2007 Toyota Sienna? Posted by Customer
    A:
    Disconnect the crankshaft position sensor connector.
    Posted by ToyotaPartsNow Specialist
    See expert answers on similar Crankshaft Position Sensor
    Q:
    What is the next step after disconnecting the connector for the 2003 Toyota Sienna? Posted by Customer
    A:
    Remove the bolt and the crankshaft position sensor.
    Posted by ToyotaPartsNow Specialist
    See expert answers on similar Crankshaft Position Sensor
    Q:
    How do you install the sensor for the 2007 Toyota Highlander? Posted by Customer
    A:
    Place the sensor and clamp back in position using the bolt, ensuring a torque of 9.0 N.m (92 kgf.cm, 80 in.lbf), and reconnect the sensor connector.
    Posted by ToyotaPartsNow Specialist
    See expert answers on similar Crankshaft Position Sensor
    Q:
    What is the procedure for installation for the 2000 Toyota Sienna? Posted by Customer
    A:
    Installation follows the reverse order of removal.
    Posted by ToyotaPartsNow Specialist
    See expert answers on similar Crankshaft Position Sensor
    Q:
    What is the first step to replace the Crankshaft Position Sensor for the 2004 Toyota Sienna? Posted by Customer
    A:
    Remove the front fender apron seal on the right-hand side by using a clip remover to take out the clip, followed by removing the 2 bolts and the seal itself.
    Posted by ToyotaPartsNow Specialist
    See expert answers on similar Crankshaft Position Sensor
    Q:
    What is the next step after connecting the sensor for the 2009 Toyota Sienna? Posted by Customer
    A:
    Proceed to install the compressor and magnetic clutch.
    Posted by ToyotaPartsNow Specialist
    See expert answers on similar Crankshaft Position Sensor
    Q:
    What is the final step after installing the new sensor for the 2001 Toyota Sienna? Posted by Customer
    A:
    Reconnect the crankshaft position sensor connector and reinstall the RH fender apron seal.
    Posted by ToyotaPartsNow Specialist
    See expert answers on similar Crankshaft Position Sensor
    Q:
    What is the torque specification for securing the Crankshaft Position Sensor during installation for the 2007 Toyota Solara? Posted by Customer
    A:
    Secure the Crankshaft Position Sensor with a torque of 9.0 N.m (92 kgf.cm, 80 in.lbf).
    Posted by ToyotaPartsNow Specialist
    See expert answers on similar Crankshaft Position Sensor
    Q:
    What is the final step after installing the crankshaft position sensor for the 2006 Toyota Sienna? Posted by Customer
    A:
    Reinstall the front fender apron seal on the right-hand side.
    Posted by ToyotaPartsNow Specialist
    See expert answers on similar Crankshaft Position Sensor
    Q:
    What should you do after securing the sensor for the 2008 Toyota Sienna? Posted by Customer
    A:
    Connect the crankshaft position sensor connector.
    Posted by ToyotaPartsNow Specialist
    See expert answers on similar Crankshaft Position Sensor
    Q:
    What is the final step in the installation process for the 2008 Toyota Solara? Posted by Customer
    A:
    The final step is to install the Engine Under Cover RH.
    Posted by ToyotaPartsNow Specialist
    See expert answers on similar Crankshaft Position Sensor
    Q:
    What is the first step to service the Crankshaft Position Sensor for the 2006 Toyota Solara? Posted by Customer
    A:
    Remove the engine under cover on the right-hand side by taking out 5 screws and 3 clips.
    Posted by ToyotaPartsNow Specialist
    See expert answers on similar Crankshaft Position Sensor
    If you have any questions about this product, please don't hesitate to ask us. We will be happy to help you!

OEM Toyota 90080-19009, Excellent Performance and Perfect Fitment

To ensure reliability, purchase Toyota part # 90080-19009 Crankshaft Position Sensor. It is sometimes referred to as Toyota Crankshaft Position Sensor. OEM parts are unrivaled in terms of quality. They go through extensive quality control inspections and are produced in accordance with Toyota's official factory specifications. All of these remove defects and imperfections. So you can relax knowing they promise exceptional lifespan and flawless fitment.

ToyotaPartsNow.com is a leading supplier of genuine Toyota parts such as Toyota 9008019009 Crankshaft Position Sensor. At ToyotaPartsNow.com, we have a wide variety of OEM Toyota parts available at competitive prices. Our comprehensive range of genuine Toyota parts come with a manufacturer's warranty for peace of mind. We also prioritize customer satisfaction, providing a hassle-free return policy and expedited delivery for all our parts. For detailed Toyota parts information, click here.
Choose ToyotaPartsNow for discounted prices, exceptional service and fast delivery