My Garage
Cart
Make sure this part fits

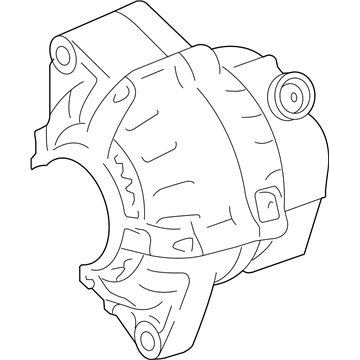
Toyota 27060-0P141-84
Reman Alternator

2005-2018 Toyota 270600P14184

Customer Questions & Expert Answers (16)
Toyota 27060-0P141-84 Reman Alternator
  • Part Description
    Alternator
  • Replaces
    27060-0P141, 27060-0P140
  • Manufacturer
    Toyota
Make sure this part fits
$315.46 MSRP: $420.98
You Save: $105.52 (26%)
Core Charge: $75.00
Ships in 1-3 Business Days
1
ADD TO CART
  • Related Parts
  • Product Specifications
  • Vehicle Fitment
  • Customer Questions & Expert Answers
  • Product Specifications

    BrandGenuine Toyota
    Manufacturer Part Number27060-0P141-84
    Part DescriptionAlternator
    Item Dimensions9.6 x 8.2 x 7.5 inches
    Item Weight14.60 Pounds
    ConditionNew
    Replaces27060-0P141, 27060-0P140
    ManufacturerToyota
    SKU27060-0P141-84
    WarrantyThis genuine Toyota part is guaranteed by Toyota's factory warranty.
    Shipping & ReturnShipping Policy Return Policy
    Warning: California's Proposition 65
  • Vehicle Fitment

    Year Make Model Trim Engine
    2005-2018 Toyota AvalonBase, Hybrid Limited, Hybrid XLE, Hybrid XLE Plus, Hybrid XLE Premium, Hybrid XLE Touring, Limited, Touring, XL, XLE, XLE Plus, XLE Premium, XLE Touring, XLE Touring SE, XLS4 Cyl 2.5 L FULL HYBRID EV-GAS (FHEV), 6 Cyl 3.5 L GAS
    2007-2017 Toyota CamryLE, SE, XLE, XSE6 Cyl 3.5 L GAS
    2010-2013 Toyota HighlanderBase, Limited, Plus, SE, Sport6 Cyl 3.5 L GAS
    2009-2012 Toyota RAV4Base, Limited, Sport6 Cyl 3.5 L GAS
    2009-2015 Toyota VenzaBase, LE, Limited, XLE6 Cyl 3.5 L GAS
  • Customer Questions & Expert Answers

    Q:
    Any advice on whether 27060-0P141-84 is suitable for my car? Posted by ToyotaPartsNow Specialist
    A:
    Find out if part number 27060-0P141-84 is the right fit for your car by Selecting Your Vehicle model.
    Posted by ToyotaPartsNow Specialist
    Q:
    How to overhaul the alternator on Toyota Avalon? Posted by Customer
    A:
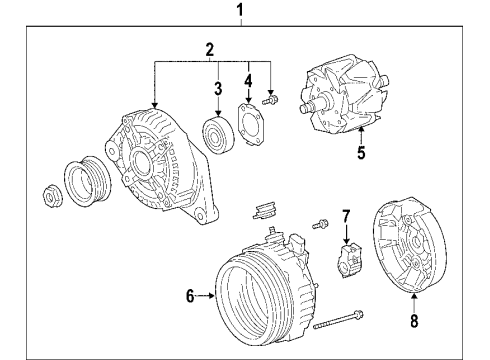
    Begin the alternator overhaul process by eliminating the generator with clutch pulley while using a screwdriver to detach the generator pulley cap and inserting SST (A) and (B) equipped with SST 09820-63020 to position the rotor shaft onto SST (A) before securing it in a vise. Install the generator using the SST while you rotate SST (B) clockwise to loosen the generator pulley thus removing both components from SST and the rotor shaft. Afterward you should remove 3 nuts prior to removing the generator rear end cover along with the terminal insulator. To access the generator brush holder assembly the technician must remove the two screws before they can take off the generator coil assembly through four bolts with SST 09950-40011 (09951-04020, 09952-04010, 09953-04020, 09954-04010, 09955-04071, 09957-04010, 09958-04011) tool followed by the removal of the generator washer. Remove all parts from the generator rotor assembly. Check that the clutch pulley of the generator turns counterclockwise only without experiencing clockwise rotation. Use vernier calipers to measure the exposed brush length of the generator brush holder assembly and verify that the length satisfies 10.5 mm (0.413 in.) and exceeds 4.5 mm (0.177 in.) and if not replace with a new part. DEL will inspect the generator rotor assembly bearing for irregularities or wear and will replace it if essential and will test the slip ring resistance at 20 degrees Celsius with an ohmmeter to check it stays between 2.3 to 2.7 Ohms; any results failing will require replacement. To check for short circuits perform two tests: measure the 1 MOhm or higher resistance between each slip ring and rotor and determine the slip ring diameter falls between 14.2 to 14.4 mm (0.559 to 0.567 in.) with a minimum of 14.0 mm (0.551 in.). Replacement is needed if minimums are not met. Check for wear or roughness on the drive end frame bearing of the generator and replace it as needed. The bearing removal process for the generator drive end frame requires the removal of bearing retainer screws and SST utility with 09950-60010 (09951-00250) and 09950-70010 (09951-07100) for tapping it out using an SST hammer. To put in a new generator drive end frame bearing, begin by inserting it with SST 09950-60010 (09951-00470) and 09950-70010 (09951-07100) while using a press tool. Finish with bearing retainer installation through the use of 4 screws that should be torqued to 2.3 N.m (23 kgf.cm, 20 in.lbf). Slowly push the generator coil assembly into the drive end frame structure with a deep 21 mm socket wrench which should be activated by a press tool to secure it through four bolt screws torqued up to 5.8 N.m (59 kgf.cm, 51 in.lbf). The generator brush holder assembly requires two brush compressions followed by a 1.0 mm (0.039 in.) pin insertion into the generator brush holder hole. The next step is to install both screws at 1.8 N.m (18 kgf.cm, 16 in.lbf) while keeping the pin in position until it is removed. The terminal insulator requires proper orientation before you install it and then you can add the rear end cover with the three nuts torqued to 4.6 N.m (47 kgf.cm, 41 in.lbf). Utilize SST (A) and (B) for this step while positioning SST (A) in the vise to start installation of the generator on the SST. Rotate SST (B) clockwise until the generator pulley reaches 87 N.m (891 kgf.cm or 64 ft.lbf) using a torque wrench set at 380 mm (14.96 in.). After generator removal from the SST inspections must demonstrate smooth generator pulley rotation and the new generator pulley cap must be installed.
    Posted by ToyotaPartsNow Specialist
    Q:
    How to service and repair the alternator on Toyota Avalon? Posted by Customer
    A:
    A proper alternator repair requires generator removal together with the clutch pulley. The screwdriver removes the generator pulley cap while you should set the rotor shaft to use Rotor Shaft Holding Tool (SST: 09820-63020). Secure this tool in a vise. The Special Service Tool allows you to install the generator counterclockwise while turning the Clutch Pulley Wrench clockwise to remove the generator from the SST before removing the pulley from the rotor shaft. The procedure starts with removing the 3 nuts and generator rear end cover before extracting the terminal insulator. Continue by undoing the 2 screws that secure the generator brush holder assembly followed by the generator coil assembly that requires removal of the 4 bolts before detaching it with SST. Finish the process by removing the generator washer. Then separate the generator rotor and proceed with removing the drive end frame bearing through the removal of 4 screws and bearing retainer. Finally use Special Service Tools along with a hammer to extract the bearing (SST: 09950-60010, 09951-00250, SST: 09950-70010, 09951-07100).
    Posted by ToyotaPartsNow Specialist
    Q:
    How do you disconnect the wire harness from the generator assembly for the 2007 Toyota Avalon? Posted by Customer
    A:
    Disconnect the wire harness clamp, remove the terminal cap, and then remove the nut to disconnect the wire harness from terminal B.
    Posted by ToyotaPartsNow Specialist
    See expert answers on similar Alternator
    Q:
    What should be done after disconnecting the wire harness clamp for the 2008 Toyota Avalon? Posted by Customer
    A:
    Remove the terminal cap and then remove the nut to disconnect the wire harness from terminal B.
    Posted by ToyotaPartsNow Specialist
    See expert answers on similar Alternator
    Q:
    What is the next step after disconnecting the generator connector for the 2009 Toyota Avalon? Posted by Customer
    A:
    Remove the nut from the cylinder block.
    Posted by ToyotaPartsNow Specialist
    See expert answers on similar Alternator
    Q:
    What is the next action after removing the fender apron seal for the 2009 Toyota Camry? Posted by Customer
    A:
    Remove the V-ribbed belt.
    Posted by ToyotaPartsNow Specialist
    See expert answers on similar Alternator
    Q:
    How do you access the generator brush holder assembly for the 2007 Toyota Camry? Posted by Customer
    A:
    Place the generator assembly on the clutch pulley and remove the 3 nuts and rear end cover.
    Posted by ToyotaPartsNow Specialist
    See expert answers on similar Alternator
    Q:
    What is the first step in the installation process for the 2006 Toyota Avalon? Posted by Customer
    A:
    Secure the bracket with a bolt, torqued to 20 N.m (204 kgf.cm, 15 ft.lbf).
    Posted by ToyotaPartsNow Specialist
    See expert answers on similar Alternator
    Q:
    How do you install the terminal insulator and rear end cover for the 2005 Toyota Avalon? Posted by Customer
    A:
    Install the terminal insulator ensuring correct orientation, followed by the rear end cover with 3 nuts torqued to 4.6 N.m (47 kgf.cm, 41 in.lbf).
    Posted by ToyotaPartsNow Specialist
    See expert answers on similar Alternator
    Q:
    How do you begin disassembling the alternator for the 2009 Toyota Camry? Posted by Customer
    A:
    Start by removing the generator clutch pulley by puncturing the center of the generator pulley cap with a screwdriver and prying it off, ensuring not to reuse the cap.
    Posted by ToyotaPartsNow Specialist
    See expert answers on similar Alternator
    Q:
    What should be removed after disconnecting the battery for the 2008 Toyota Camry? Posted by Customer
    A:
    Remove the front right wheel.
    Posted by ToyotaPartsNow Specialist
    See expert answers on similar Alternator
    Q:
    What is the torque specification for installing the clamp bracket for the 2007 Toyota Camry? Posted by Customer
    A:
    Torque it to 8.4 N.m (86 kgf.cm, 74 in.lbf).
    Posted by ToyotaPartsNow Specialist
    See expert answers on similar Alternator
    Q:
    What is the first step to remove the alternator for the 2009 Toyota Venza? Posted by Customer
    A:
    Disconnect the cable from the negative battery terminal, noting that some systems may require initialization after reconnection.
    Posted by ToyotaPartsNow Specialist
    See expert answers on similar Alternator
    Q:
    How do you loosen the generator pulley for the 2009 Toyota Venza? Posted by Customer
    A:
    Use a wrench to hold the Rotor Shaft Holding Tool while turning the Clutch Pulley Wrench counterclockwise, ensuring the drive end frame is secured tightly in the vise.
    Posted by ToyotaPartsNow Specialist
    See expert answers on similar Alternator
    Q:
    What is the final step in the installation process for the 2009 Toyota Venza? Posted by Customer
    A:
    Connect the cable to the negative battery terminal, noting that some systems may require initialization after reconnection.
    Posted by ToyotaPartsNow Specialist
    See expert answers on similar Alternator
    If you have any questions about this product, please don't hesitate to ask us. We will be happy to help you!

OEM Toyota 27060-0P141-84, Excellent Performance and Perfect Fitment

To ensure reliability, purchase Toyota part # 27060-0P141-84 Reman Alternator. It is sometimes referred to as Toyota Alternator. OEM parts are unrivaled in terms of quality. They go through extensive quality control inspections and are produced in accordance with Toyota's official factory specifications. All of these remove defects and imperfections. So you can relax knowing they promise exceptional lifespan and flawless fitment.

ToyotaPartsNow.com is a leading supplier of genuine Toyota parts such as Toyota 270600P14184 Reman Alternator. At ToyotaPartsNow.com, we have a wide variety of OEM Toyota parts available at competitive prices. Our comprehensive range of genuine Toyota parts come with a manufacturer's warranty for peace of mind. We also prioritize customer satisfaction, providing a hassle-free return policy and expedited delivery for all our parts. For detailed Toyota parts information, click here.
Choose ToyotaPartsNow for discounted prices, exceptional service and fast delivery