×
ToyotaParts- Hello
- Login or Register
- Quick Links
- Live Chat
- Track Order
- Parts Availability
- RMA
- Help Center
- Contact Us
- Shop for
- Toyota Parts
- Scion Parts
My Garage
My Account
Cart
OEM Toyota MR2 Spyder Intake Manifold
Engine Intake Manifold- Select Vehicle by Model
- Select Vehicle by VIN
Select Vehicle by Model
orMake
Model
Year
Select Vehicle by VIN
For the most accurate results, select vehicle by your VIN (Vehicle Identification Number).
1 Intake Manifold found

Toyota MR2 Spyder Intake Manifold Part Number: 17120-0D040
$377.04 MSRP: $552.55You Save: $175.51 (32%)
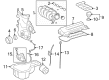
Toyota MR2 Spyder Intake Manifold
Choose genuine Intake Manifold that pass strict quality control tests. You can trust the top quality and lasting durability. Shopping for OEM Intake Manifold for your Toyota MR2 Spyder? Our website is your one-stop destination. We stock an extensive selection of genuine Toyota MR2 Spyder parts. The price is affordable so you can save more. It only takes minutes to browse and find the exact fit. Easily add to cart and check out fast. Our hassle-free return policy will keep you stress-free. We process orders quickly for swift delivery. Your parts will arrive faster, so you can get back on the road sooner.
In the present paper, I shall describe and analyze the main part of the Toyota MR2 Spyder - the Intake Manifold, which is a critical factor for improving the performance and cyclical strength of the beloved convertible sports car which was manufactured between 1999 and 2007. This Intake Manifold was especially designed so as the air or the air/fuel mixture will flow sufficiently to all cylinders; this is important in the actual production of horsepower. Regarding the technical aspect, employing element like the Helmholtz resonance, the Toyota MR2 Spyder Intake Manifold enhancement compresses the air in the combustion chamber for better combustion efficiency. For instance, in the recent generation MR2 Spyder models there is extensive use of lightweight composite plastic that in addition to saving weight also has the effect of facilitating heat dissipation which is instrumental in the improvement of the vehicle's performance. On some models variable length intake manifolds VLIM is used that allows the intake system to change length in accordance with the load of the engine; thus, both power and fuel economy are enhanced. The ability therefore proves that the Toyota MR2 Spyder is a reliable and powerful car. Intended for use with different MR2 Spyder models, the Intake Manifold serves an important function in improving performance as well as safety to make the ride customized, fast and intense. The Toyota MR2 Spyder is still one of the recognized models of the automotive legend Toyota, which itself is a symbol of powerful engineering; and when it comes to the Intake Manifold, it is still unique and important in the market influencing overall performance of the vehicle. In light of the described features, combined with dependability, effectiveness as well as progressive emphases, the Toyota MR2 Spyder Intake Manifold exemplifies Toyota's enduring dedication to automobiles' advancement in design.
Toyota MR2 Spyder Intake Manifold Parts and Q&A
- Q: How to remove and install the intake manifold and associated components on Toyota MR2 Spyder?A:The first step for intake manifold removal consists of disconnecting the engine unit and generator together with ignition coils and spark plugs and injectors. Start by disconnecting the 2 heated oxygen sensor connectors before removing the 2 heated oxygen sensors. Then uninstall the 4 bolts with upper heat insulator, 4 bolts with 2 exhaust manifold stays and finally remove the 5 nuts for the exhaust manifold and gasket. Following the detachment of connectors containing the heated oxygen sensor (bank 1 sensor 1), Camshaft timing oil control valve, crankshaft position sensor, knock sensor, oil pressure switch, camshaft position sensor, ECT sensor, Throttle Position Sensor, throttle control motor, accelerator position sensor, IAC valve, and noise filter the 2 bolts are removed and followed by disconnecting the 2 ground straps and engine wire. Mandatory first step involves caps and hoses from the PCV system then continues with removal of the assembly unit that includes Throttle Body and intake manifold by unmounting 2 water lines and 2 vacuum lines followed by elimination of 4 bolts and 2 nuts and 2 wire brackets. You must start by evenly loosening and removing the 19 bearing cap bolts and 9 bearing caps to access the gasket, camshaft Timing Chain, timing sprocket, VVT sprocket, camshaft timing oil control valve together with camshafts. The cylinder head assembly requires removal of the water bypass pipe bolt followed by gradual removal of the ten cylinder head bolts while respecting their specific sequence then taking off the ten plate washers before gently removing the cylinder head. The repair procedure requires removal of the camshaft timing oil control valve filter together with the camshaft position sensor and ECT sensor. Before installation clean all parts of the engine and apply fresh engine oil on slip and rotational components while replacing each gasket and oil seal. The mechanic should first position the new cylinder head gasket onto the cylinder block followed by gentle placement of the cylinder head. The bolt installation ends in a light engine oil application before a uniform tightening process then consists of paint marking the cylinder head bolt front for future retightening. Attach the water bypass pipe bolt before linking the upper radiator hose with the heater hose and setting in place the two camshafts joined to the cylinder head and fixing the bearing caps while tightening their bolts. Reposition the timing sprocket, VVT timing sprocket and timing chain before placing the camshaft position sensor and oil filler cap together with the camshaft timing oil control valve, filter. The intake manifold and throttle body assembly receive a new gasket before installation of vacuum and water hoses together with PCV valve and hoses and the engine wire with its required connectors. Place the exhaust manifold that contains a new gasket and follow with the installation of injectors along with spark plugs and ignition coils and generator and engine unit.

Related Toyota MR2 Spyder Parts
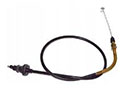 Toyota MR2 Spyder Accelerator Cable
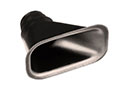 Toyota MR2 Spyder Air Duct
 Toyota MR2 Spyder Air Filter
 Toyota MR2 Spyder Fuel Filter
 Toyota MR2 Spyder Fuel Injector O-Rings
 Toyota MR2 Spyder Fuel Line Clamps
 Toyota MR2 Spyder Fuel Pump Seal
 Toyota MR2 Spyder Fuel Tank
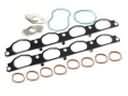 Toyota MR2 Spyder Intake Manifold Gasket
 Toyota MR2 Spyder Mass Air Flow Sensor
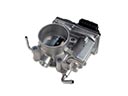 Toyota MR2 Spyder Throttle Body
 Toyota MR2 Spyder Throttle Body Gasket