×
ToyotaParts- Hello
- Login or Register
- Quick Links
- Live Chat
- Track Order
- Parts Availability
- RMA
- Help Center
- Contact Us
- Shop for
- Toyota Parts
- Scion Parts
My Garage
My Account
Cart
OEM Toyota Matrix A/C Compressor
Air Conditioning Compressor- Select Vehicle by Model
- Select Vehicle by VIN
Select Vehicle by Model
orMake
Model
Year
Select Vehicle by VIN
For the most accurate results, select vehicle by your VIN (Vehicle Identification Number).
4 A/C Compressors found


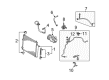
Toyota Matrix Compressor Part Number: 88310-02510
$561.25 MSRP: $826.36You Save: $265.11 (33%)Ships in 1-3 Business Days

Toyota Matrix Compressor Part Number: 88310-02711
$533.44 MSRP: $764.41You Save: $230.97 (31%)Ships in 1-2 Business Days
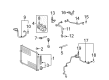
Toyota Matrix Compressor Assembly Part Number: 88310-02520
$384.30 MSRP: $563.20You Save: $178.90 (32%)Ships in 1-3 Business Days
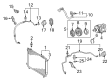
Toyota Matrix Compressor Part Number: 88320-02120
$273.41 MSRP: $390.37You Save: $116.96 (30%)Ships in 1-2 Business Days
Toyota Matrix A/C Compressor
Choose genuine A/C Compressor that pass strict quality control tests. You can trust the top quality and lasting durability. Shopping for OEM A/C Compressor for your Toyota Matrix? Our website is your one-stop destination. We stock an extensive selection of genuine Toyota Matrix parts. The price is affordable so you can save more. It only takes minutes to browse and find the exact fit. Easily add to cart and check out fast. Our hassle-free return policy will keep you stress-free. We process orders quickly for swift delivery. Your parts will arrive faster, so you can get back on the road sooner.
Toyota Matrix A/C Compressor Parts and Q&A
- Q: How to remove the A/C Compressor on Toyota Matrix?A:A proper HVAC compressor removal for 2AZ-FE engines starts by recovering refrigerant from the refrigeration system. The first step requires removal of both the right-hand side engine under cover along with the V-ribbed belt. Remove the bolt to disconnect the suction hose sub-assembly from the compressor assembly with pulley before taking out the O-ring from the No.1 cooler refrigerant suction hose. Properly tape all opened sections with vinyl to block entry of moisture and foreign matter. Disconnection of the discharge hose sub-assembly starts with bolthook removal and pulley separation from the compressor assembly after which the O-ring from the discharge hose sub-assembly needs removal before opening sealing. To remove the compressor assembly with pulley start by disconnecting the connector and afterward removing the bolts and nuts followed by using a "TORX" socket wrench (E8) to detach the stud bolts together with the compressor assembly.
- Q: How to install the A/C Compressor on Toyota Matrix?A:The installation of an HVAC compressor for the 2AZ-FE requires first step-by-step reduction of inert gas (helium) from the service valve and then draining the correct amount of oil from the specified vents before reinstalling the drain bolt and washer. The total oil capacity for the new compressor ranges between 90 + 15 cc (3.04 + 0.51 fl.oz.) however the needed oil removal amount is determined by subtracting the current oil volume inside the original compressor. The system will fail if too much oil enters the refrigeration system so ND-OIL 8 or an equivalent compressor oil should be used carefully. Install the compressor assembly with pulley by using a "TORX" socket wrench (E8) then attach it with 2 stud bolts at 9.8 Nm (100 kgf-cm, 87 in-lbf) torque followed by attaching 2 bolts and 2 nuts at 25 Nm (255 kgf-cm, 18 ft-lbf) then tighten in the specified order. First remove the vinyl tape from the discharge hose sub-assembly then apply compressor oil to a new O-ring and the fit surface before installing the O-ring and fastening it with a bolt at 9.8 Nm (100 kgf-cm, 87 in-lbf). Perform this installation method again when connecting the suction hose sub-assembly. Complete the procedure by installing the V-ribbed belt before checking it and attaching the engine under cover RH and filling the system with refrigerant and allowing the engine to warm up and performing a refrigerant leak inspection.


Related Toyota Matrix Parts
 Toyota Matrix Blower Motor
 Toyota Matrix A/C Accumulator
 Toyota Matrix A/C Compressor Clutch
 Toyota Matrix A/C Compressor Cut-Out Switches
 Toyota Matrix A/C Condenser
 Toyota Matrix A/C Hose
 Toyota Matrix A/C Service Cap
 Toyota Matrix Ambient Temperature Sensor
 Toyota Matrix Blend Door Actuator
 Toyota Matrix Blower Motor Resistor
 Toyota Matrix Evaporator
 Toyota Matrix Heater Core