My Garage
Cart
Make sure this part fits

Toyota 88320-02120
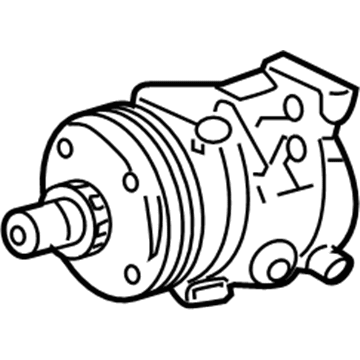
Compressor

2003-2008 Toyota 8832002120

Customer Questions & Expert Answers (4)
Toyota 88320-02120 Compressor
  • Part Description
    Compressor Assembly; A/C Compressor; New A/C Compressor
  • Part Name Code
    88320
  • Replaces
    88320-02120-84
  • Manufacturer
    Toyota
Make sure this part fits
$273.41 MSRP: $390.37
You Save: $116.96 (30%)
Ships in 1-2 Business Days
1
ADD TO CART
  • Related Parts
  • Product Specifications
  • Vehicle Fitment
  • Customer Questions & Expert Answers
  • Product Specifications

    BrandGenuine Toyota
    Part Name Code88320
    Manufacturer Part Number88320-02120
    Part DescriptionCompressor Assembly; A/C Compressor; New A/C Compressor
    Other NamesCompressor Assembly, Cooler
    Item Dimensions11.5 x 7.4 x 8.1 inches
    Item Weight14.10 Pounds
    ConditionNew
    Fitment TypeDirect Replacement
    Replaces88320-02120-84
    ManufacturerToyota
    SKU88320-02120
    WarrantyThis genuine Toyota part is guaranteed by Toyota's factory warranty.
    Shipping & ReturnShipping Policy Return Policy
    Warning: California's Proposition 65
  • Vehicle Fitment

    Year Make Model Trim Engine
    2003-2008 Toyota CorollaCE, LE, S, XRS4 Cyl 1.8 L GAS
    2003-2008 Toyota MatrixBase, XR, XRS4 Cyl 1.8 L GAS
  • Customer Questions & Expert Answers

    Q:
    Can you provide the right 88320-02120 for my car? Posted by ToyotaPartsNow Specialist
    A:
    Find out if part number 88320-02120 is the right fit for your car by Selecting Your Vehicle model.
    Posted by ToyotaPartsNow Specialist
    Q:
    How to replace the A/C Compressor and its magnetic clutch in a refrigeration system on Toyota Corolla? Posted by Customer
    A:
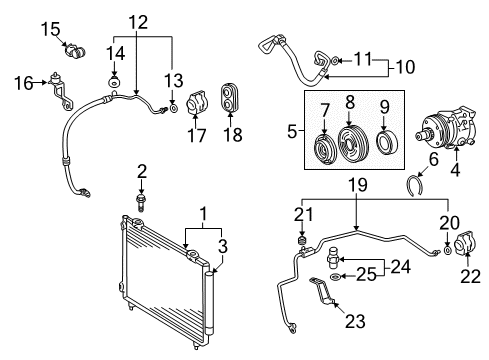
    The first step to replace the compressor and magnetic clutch requires exhausting refrigerant from the refrigeration system by using Special Service Tool: 07110-58060 (07117-58080, 07117-58090, 07117-78050, 07117-88060, 07117-88070, 07117-88080). The procedure for removing Cleaner cooler refrigerant suction hose No.1 requires users to remove its bolt and o-ring and cover both openings with vinyl tape to stop moisture and foreign matter from entering. The second task involves removing the discharge hose sub-assy through bolt removal and O-ring extraction and sealing the exposed ends using vinyl tape. The procedure starts by removing the engine under cover RH and fan and generator V belt then proceeding to disconnect compressor and magnetic clutch connectors while removing three bolts. You should place the compressor in a vise clamp before removing the bolt with vise pliers while taking off the hub along with the washer from the magnet clutch assembly. The snap ring expander lets you extract both the snap ring and rotor before you uninstall the connector and remover the snap ring and starter. Move on to uninstall the components of the cooler compressor. The installation process for the magnet clutch assembly starts with part matching according to the visuals followed by starter installation and utilization of a snap ring expander to put in the new snap ring with the chamfered side facing upwards. After installing the screw and connector, add the rotor together with another new snap ring that has its chamfered side facing upward and then attach the washer and hub maintaining the original magnet clutch washer arrangement. Use a 18 Nm (183 kgf.cm, 13 ft.lbf) torque value to fasten the hub by bolt. An inspection of the magnetic clutch requires a dial indicator during which you should connect the battery leads to the magnet clutch connector while measuring the clearance within 0.35 - 0.60 mm (0.013 - 0.023 in.) range. Use three maximum number of magnet clutch washers to reposition the clearance when it exists the recommended range. To replace the compressor and magnetic clutch drain the necessary oil amount by subtracting the remaining oil amount from the new unit oil capacity which equals 120 + 15 cc (4.0 + 0.5 fl.oz.). Use ND-OIL8 for compressor oil. You should torque the compressor and magnetic clutch with three bolts to 29 Nm (295 kgf.cm, 21 ft.lbf) after installation then connect the connector. The discharge hose sub-assy installation requires compressor oil application onto the new O-ring and fitting surface before torquing the bolt to 9.8 Nm (100 kgf.cm, 87 in.lbf). Rephrase and tighten the bolt connecting cooler refrigerant suction hose No.1 with 9.8 Nm (100 kgf.cm, 87 in.lbf) after applying compressor oil to its new O-ring and fitting surface. Finish the charging of refrigerant by using Special Service Tools: 07117-48130, 07117-48140, 07110-58060 (07117-58060, 07117-58070, 07117-58080, 07117-58090, 07117-78050, 07117-88060, 07117-88070, 07117-88080) and 490 plus or minus 30 g (17.28 plus or minus 1.06 oz.) of specified amount while engine heating and checking for refrigerant leaks.
    Posted by ToyotaPartsNow Specialist
    Q:
    How to replace the A/C Compressor and its magnetic clutch in a refrigeration system on Toyota Corolla? Posted by Customer
    A:
    Initial steps for replacing the compressor and magnetic clutch include removing refrigerant from the refrigeration system using Specific Service Tool: 07110-58060 (07117-58080, 07117-58090, 07117-78050, 07117-88060, 07117-88070, 07117-88080). The refrigerant suction hose No.1 requires removal of its bolt and O-ring before sealing the openings with vinyl tape for moisture and foreign matter protection. After removing its bolt and O-ring the discharge hose sub-assembly should be disconnected but all opening spaces must get sealed with vinyl tape. To start the repair process remove the engine under cover RH and fan and generator V belt while detaching the compressor and magnetic clutch with a connector removal and three bolt removal. Position the compressor in a vise after which you can use vise pliers to hold the magnet clutch hub before removing bolt and hub followed by washer. Begin by using a snap ring expander to remove the snap ring and rotor from the starter. After disconnecting the connector you can take out the snap ring while removing the starter. Extract the components of the cooler compressor. A careful installation process of the magnet clutch assembly involves aligning the parts as depicted before starter mounting and snap ring deployment with an expander tool set to the up-facing chamfer. Use the screw and connector first and then install the rotor along with another new snap ring which should face upward with its chamfered side exposed before adding the washer and hub. Maintain the original combination of magnet clutch washers from before dissembling. Fasten the hub using the bolt while torquing it to 18 Nm (183 kgf.cm, 13 ft.lbf). A dial indicator should be used to check the magnetic clutch clearance by connecting the battery leads to the magnet clutch connector and recording measurements within the range of 0.35 - 0.60 mm (0.013 - 0.023 in.). The magnet clutch clearance should be fixed with three washers or less when it exceeds the accepted range. To drain the appropriate amount of oil from the new unit measure the difference between (120 + 15 cc (4.0 + 0.5 fl.oz.) oil capacity of new compressor and magnetic clutch) and (the remaining oil amount in the old compressor and magnetic clutch). Use ND-OIL8 for compressor oil. The compressor and magnetic clutch require three bolts with 29 Nm (295 kgf.cm, 21 ft.lbf) torque after which the connector must be connected. Affix the discharge hose by using compressor oil on the new O-ring as well as the fit surface and subsequent torque bolt to 9.8 Nm (100 kgf.cm, 87 in.lbf). Follow this same procedure for cooler refrigerant suction hose No.1 by applying compressor oil to the new O-ring before torquing the bolt to 9.8 Nm (100 kgf.cm, 87 in.lbf). Charging the refrigerant requires the use of Special Service Tools 07117-48130, 07117-48140, 07110-58060 (07117-58060, 07117-58070, 07117-58080, 07117-58090, 07117-78050, 07117-88060, 07117-88070, 07117-88080). Add the specified amount of 490 plus or minus 30 g (17.28 plus or minus 1.06 oz.) while performing engine warming followed by a leakage inspection.
    Posted by ToyotaPartsNow Specialist
    Q:
    How do you install the compressor and magnetic clutch for the 2003 Toyota Matrix? Posted by Customer
    A:
    Install with three bolts torqued to 29 N.m (295 kgf.cm, 21 ft.lbf), connecting the connector afterward.
    Posted by ToyotaPartsNow Specialist
    See expert answers on similar A/C Compressor
    If you have any questions about this product, please don't hesitate to ask us. We will be happy to help you!

OEM Toyota 88320-02120, Excellent Performance and Perfect Fitment

To ensure reliability, purchase Toyota part # 88320-02120 Compressor. It is sometimes referred to as Toyota A/C Compressor. OEM parts are unrivaled in terms of quality. They go through extensive quality control inspections and are produced in accordance with Toyota's official factory specifications. All of these remove defects and imperfections. So you can relax knowing they promise exceptional lifespan and flawless fitment.

ToyotaPartsNow.com is a leading supplier of genuine Toyota parts such as Toyota 8832002120 Compressor. At ToyotaPartsNow.com, we have a wide variety of OEM Toyota parts available at competitive prices. Our comprehensive range of genuine Toyota parts come with a manufacturer's warranty for peace of mind. We also prioritize customer satisfaction, providing a hassle-free return policy and expedited delivery for all our parts. For detailed Toyota parts information, click here.
Choose ToyotaPartsNow for discounted prices, exceptional service and fast delivery