×
ToyotaParts- Hello
- Login or Register
- Quick Links
- Live Chat
- Track Order
- Parts Availability
- RMA
- Help Center
- Contact Us
- Shop for
- Toyota Parts
- Scion Parts
My Garage
My Account
Cart
OEM Toyota Land Cruiser Crankshaft Seal
- Select Vehicle by Model
- Select Vehicle by VIN
Select Vehicle by Model
orMake
Model
Year
Select Vehicle by VIN
For the most accurate results, select vehicle by your VIN (Vehicle Identification Number).
9 Crankshaft Seals found


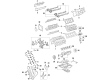
Toyota Land Cruiser Oil Seal, Front Part Number: 90311-A0005
$19.11 MSRP: $26.60You Save: $7.49 (29%)Ships in 1-3 Business Days

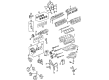
Toyota Land Cruiser Seal, Engine Rear Oil Part Number: 90311-95013
$43.49 MSRP: $60.53You Save: $17.04 (29%)Ships in 1-3 Business Days

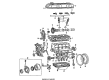
Toyota Land Cruiser Rear Main Seal Part Number: 90311-A0002
$32.37 MSRP: $45.06You Save: $12.69 (29%)Ships in 1 Business Day

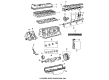
Toyota Land Cruiser Timing Cover Seal Part Number: 90311-45002
$16.48 MSRP: $22.94You Save: $6.46 (29%)Ships in 1-2 Business Days

Toyota Land Cruiser Front Crank Seal Part Number: 90311-45008
$20.06 MSRP: $27.92You Save: $7.86 (29%)Ships in 1-3 Business Days

Toyota Land Cruiser Rear Main Seal Part Number: 90311-99009
$62.79 MSRP: $88.14You Save: $25.35 (29%)Ships in 1 Business Day
Toyota Land Cruiser Crankshaft Seal, Front Part Number: 90311-A0033
$14.09 MSRP: $19.61You Save: $5.52 (29%)Ships in 1-3 Business Days
Toyota Land Cruiser Rear Main Seal Part Number: 90311-A0035
$41.57 MSRP: $57.87You Save: $16.30 (29%)Ships in 1-3 Business Days
Toyota Land Cruiser Front Crank Seal Part Number: 90311-52013
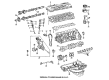
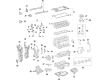
Toyota Land Cruiser Crankshaft Seal
Choose genuine Crankshaft Seal that pass strict quality control tests. You can trust the top quality and lasting durability. Shopping for OEM Crankshaft Seal for your Toyota Land Cruiser? Our website is your one-stop destination. We stock an extensive selection of genuine Toyota Land Cruiser parts. The price is affordable so you can save more. It only takes minutes to browse and find the exact fit. Easily add to cart and check out fast. Our hassle-free return policy will keep you stress-free. We process orders quickly for swift delivery. Your parts will arrive faster, so you can get back on the road sooner.
Toyota Land Cruiser Crankshaft Seal Parts and Q&A
- Q: How to install the rear Crankshaft Seal on Toyota Land Cruiser?A:Professional application of MP grease must occur on the new oil seal lip before installation of the rear crankshaft oil seal. The installation procedure requires Special Service Tool: 09223-56010 along with a hammer to tap the oil seal towards the rear seal retainer edge until the seal surface matches the edge while keeping the lip seal free from foreign matter and.tap it straight through. Supply gravity administers grease to the lip section of the new oil seal following installation of the drive plate and ring gear sub-assembly and automatic transmission assembly. To complete the process connect the cable to the negative battery terminal.
- Q: How to remove the front Crankshaft Seal on Toyota Land Cruiser?A:The first step for front crankshaft oil seal removal involves taking out the front fender splash shield sub-assembly LH and front fender splash shield sub-assembly RH. The maintenance procedure begins with draining engine coolant from the number one engine under cover sub-assembly before removing the V-bank cover sub-assembly. Next in the process you must take off the No. 1 radiator hose before removing the fan shroud. Start by taking out the oil pressure sender gauge assembly followed by the separation of the oil filter bracket (without oil cooler). To disconnect these components you must first remove the three bolts before disconnecting the two water by-pass hoses from the oil cooler when it has an attached cooler compressor assembly and No. 2 water by-pass pipe sub-assembly. The technician should detach both the No. 1 oil cooler bracket together with the oil filter bracket which includes an integrated oil cooler. Start the procedure by taking off the crankshaft pulley while simultaneously removing the crankshaft timing gear key. To remove the front crankshaft oil seal use a screwdriver which should be taped before contact while you pry out the seal carefully so it does not harm the oil seal press fit hole and crankshaft.


Related Toyota Land Cruiser Parts
 Toyota Land Cruiser Timing Chain
 Toyota Land Cruiser Cam Gear
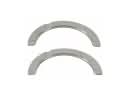 Toyota Land Cruiser Crankshaft Thrust Washer
 Toyota Land Cruiser Dipstick
 Toyota Land Cruiser Dipstick Tube
 Toyota Land Cruiser Engine Mount
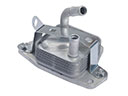 Toyota Land Cruiser Engine Oil Cooler
 Toyota Land Cruiser Oil Pan
 Toyota Land Cruiser Piston
 Toyota Land Cruiser Rod Bearing
 Toyota Land Cruiser Spool Valve
 Toyota Land Cruiser Valve Cover Gasket