×
ToyotaParts- Hello
- Login or Register
- Quick Links
- Live Chat
- Track Order
- Parts Availability
- RMA
- Help Center
- Contact Us
- Shop for
- Toyota Parts
- Scion Parts
My Garage
My Account
Cart
OEM Toyota Corolla A/C Compressor
Air Conditioning Compressor- Select Vehicle by Model
- Select Vehicle by VIN
Select Vehicle by Model
orMake
Model
Year
Select Vehicle by VIN
For the most accurate results, select vehicle by your VIN (Vehicle Identification Number).
22 A/C Compressors found


Toyota Corolla Compressor Part Number: 88310-02510
$561.25 MSRP: $826.36You Save: $265.11 (33%)Ships in 1-3 Business Days


Toyota Corolla Compressor Assembly Part Number: 88370-47092
$1080.64 MSRP: $1586.82You Save: $506.18 (32%)Ships in 1-3 Business Days

Toyota Corolla Compressor Part Number: 88310-02711
$533.44 MSRP: $764.41You Save: $230.97 (31%)Ships in 1-2 Business Days

Toyota Corolla Compressor Part Number: 88320-12240-84
$242.61 MSRP: $347.08You Save: $104.47 (31%)Ships in 1-2 Business Days
Toyota Corolla Compressor Assembly Part Number: 88310-02520
$384.30 MSRP: $563.20You Save: $178.90 (32%)Ships in 1-3 Business Days
Toyota Corolla Compressor Assembly, W/Pulley Part Number: 88310-02B60
$580.54 MSRP: $856.03You Save: $275.49 (33%)
Toyota Corolla Compressor Part Number: 88320-02120
$273.41 MSRP: $390.37You Save: $116.96 (30%)Ships in 1-2 Business Days
Toyota Corolla Compressor Part Number: 88310-02852
$568.79 MSRP: $839.11You Save: $270.32 (33%)Ships in 1-2 Business Days
Toyota Corolla Compressor Assembly Part Number: 88310-02B80
$467.04 MSRP: $685.82You Save: $218.78 (32%)Ships in 1-3 Business DaysToyota Corolla Compressor Part Number: 88320-0Z080
$414.94 MSRP: $564.03You Save: $149.09 (27%)Ships in 1-3 Business Days
Toyota Corolla Compressor Part Number: 88320-10511-84
$397.95 MSRP: $583.21You Save: $185.26 (32%)Ships in 1-3 Business Days
Toyota Corolla Compressor Part Number: 88320-12520-84
$265.48 MSRP: $379.79You Save: $114.31 (31%)Ships in 1-2 Business Days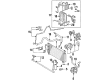
Toyota Corolla Compressor Part Number: 88320-1A420-84
$296.62 MSRP: $424.36You Save: $127.74 (31%)Ships in 1-3 Business DaysToyota Corolla Compressor Part Number: 88320-1A160-84
$323.92 MSRP: $463.41You Save: $139.49 (31%)Ships in 1-3 Business Days
Toyota Corolla Compressor Part Number: 88320-20450-84

Toyota Corolla Compressor Assembly Part Number: 88320-01011-84
Toyota Corolla Compressor Part Number: 88320-12320-84

Toyota Corolla Compressor Part Number: 88320-12250-84

Toyota Corolla Compressor Part Number: 88320-12740-84
Toyota Corolla Compressor Part Number: 88320-12710-84
| Page 1 of 2 |Next >
1-20 of 22 Results
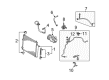
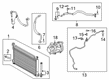
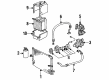
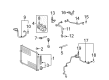
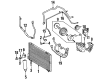
Toyota Corolla A/C Compressor
Choose genuine A/C Compressor that pass strict quality control tests. You can trust the top quality and lasting durability. Shopping for OEM A/C Compressor for your Toyota Corolla? Our website is your one-stop destination. We stock an extensive selection of genuine Toyota Corolla parts. The price is affordable so you can save more. It only takes minutes to browse and find the exact fit. Easily add to cart and check out fast. Our hassle-free return policy will keep you stress-free. We process orders quickly for swift delivery. Your parts will arrive faster, so you can get back on the road sooner.
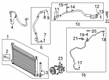
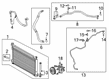
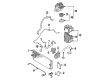
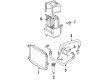
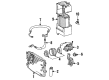
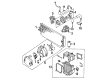
The A/C Compressor is an important component of the air conditioning system of Toyota Corolla models and its function is to pump Freon gas to transfer heat from the interior of the vehicle to the atmosphere. It due to fluid pressure that is used to expel heat thus the A/C Compressor plays an important role in managing temperatures inside the car. In the different generations of Corolla, Toyota has used several types of A/C Compressors with different operational mechanisms and features to cool the automobile cabin. The A/C Compressor is still an important system that is responsible for the comfort while driving a Toyota Corolla.
Toyota Corolla A/C Compressor Parts and Q&A
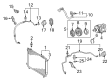
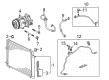
- Q: How to replace the A/C Compressor and its magnetic clutch in a refrigeration system on Toyota Corolla?A:Initial steps for replacing the compressor and magnetic clutch include removing refrigerant from the refrigeration system using Specific Service Tool: 07110-58060 (07117-58080, 07117-58090, 07117-78050, 07117-88060, 07117-88070, 07117-88080). The refrigerant suction hose No.1 requires removal of its bolt and O-ring before sealing the openings with vinyl tape for moisture and foreign matter protection. After removing its bolt and O-ring the discharge hose sub-assembly should be disconnected but all opening spaces must get sealed with vinyl tape. To start the repair process remove the engine under cover RH and fan and generator V belt while detaching the compressor and magnetic clutch with a connector removal and three bolt removal. Position the compressor in a vise after which you can use vise pliers to hold the magnet clutch hub before removing bolt and hub followed by washer. Begin by using a snap ring expander to remove the snap ring and rotor from the Starter. After disconnecting the connector you can take out the snap ring while removing the starter. Extract the components of the cooler compressor. A careful installation process of the magnet clutch assembly involves aligning the parts as depicted before starter mounting and snap ring deployment with an expander tool set to the up-facing chamfer. Use the screw and connector first and then install the rotor along with another new snap ring which should face upward with its chamfered side exposed before adding the washer and hub. Maintain the original combination of magnet clutch washers from before dissembling. Fasten the hub using the bolt while torquing it to 18 Nm (183 kgf.cm, 13 ft.lbf). A dial indicator should be used to check the magnetic clutch clearance by connecting the battery leads to the magnet clutch connector and recording measurements within the range of 0.35 - 0.60 mm (0.013 - 0.023 in.). The magnet clutch clearance should be fixed with three washers or less when it exceeds the accepted range. To drain the appropriate amount of oil from the new unit measure the difference between (120 + 15 cc (4.0 + 0.5 fl.oz.) oil capacity of new compressor and magnetic clutch) and (the remaining oil amount in the old compressor and magnetic clutch). Use ND-OIL8 for compressor oil. The compressor and magnetic clutch require three bolts with 29 Nm (295 kgf.cm, 21 ft.lbf) torque after which the connector must be connected. Affix the discharge hose by using compressor oil on the new O-ring as well as the fit surface and subsequent torque bolt to 9.8 Nm (100 kgf.cm, 87 in.lbf). Follow this same procedure for cooler refrigerant suction hose No.1 by applying compressor oil to the new O-ring before torquing the bolt to 9.8 Nm (100 kgf.cm, 87 in.lbf). Charging the refrigerant requires the use of Special Service Tools 07117-48130, 07117-48140, 07110-58060 (07117-58060, 07117-58070, 07117-58080, 07117-58090, 07117-78050, 07117-88060, 07117-88070, 07117-88080). Add the specified amount of 490 plus or minus 30 g (17.28 plus or minus 1.06 oz.) while performing engine warming followed by a leakage inspection.

Related Toyota Corolla Parts
 Toyota Corolla Cabin Air Filter
 Toyota Corolla Blower Motor
 Toyota Corolla A/C Compressor Clutch
 Toyota Corolla Blend Door Actuator
 Toyota Corolla Blower Motor Resistor
 Toyota Corolla A/C Accumulator
 Toyota Corolla A/C Compressor Cut-Out Switches
 Toyota Corolla A/C Condenser
 Toyota Corolla A/C Hose
 Toyota Corolla A/C System Valve Core
 Toyota Corolla Ambient Temperature Sensor
 Toyota Corolla HVAC Pressure Switch