×
ToyotaParts- Hello
- Login or Register
- Quick Links
- Live Chat
- Track Order
- Parts Availability
- RMA
- Help Center
- Contact Us
- Shop for
- Toyota Parts
- Scion Parts
My Garage
My Account
Cart
OEM Toyota Camry Shift Cable
Transmission Shift Cable- Select Vehicle by Model
- Select Vehicle by VIN
Select Vehicle by Model
orMake
Model
Year
Select Vehicle by VIN
For the most accurate results, select vehicle by your VIN (Vehicle Identification Number).
11 Shift Cables found


Toyota Camry Shift Control Cable Part Number: 33821-33170
$252.91 MSRP: $361.10You Save: $108.19 (30%)Ships in 1-3 Business Days
Toyota Camry Control Cable Part Number: 33820-06400
$169.54 MSRP: $240.01You Save: $70.47 (30%)Ships in 1-3 Business Days
Toyota Camry Control Cable Part Number: 33820-06590
$215.75 MSRP: $308.04You Save: $92.29 (30%)Ships in 1-3 Business Days
Toyota Camry Cable Assembly, Transmission Control Part Number: 33820-06520
$215.98 MSRP: $308.37You Save: $92.39 (30%)Ships in 1-3 Business Days
Toyota Camry Cable Assembly, Transmission Control Part Number: 33820-AQ010
$215.40 MSRP: $307.54You Save: $92.14 (30%)Ships in 1-2 Business DaysToyota Camry Control Cable Part Number: 33820-06710
$215.51 MSRP: $307.70You Save: $92.19 (30%)Ships in 1-3 Business Days
Toyota Camry Control Cable Part Number: 33820-06530
$264.33 MSRP: $377.40You Save: $113.07 (30%)Ships in 1-3 Business Days
Toyota Camry Shift Control Cable Part Number: 33820-06490
$169.54 MSRP: $240.01You Save: $70.47 (30%)Ships in 1-3 Business DaysToyota Camry Shift Control Cable Part Number: 33820-06410
$192.21 MSRP: $274.44You Save: $82.23 (30%)Ships in 1-3 Business Days
Toyota Camry Shift Control Cable Part Number: 33820-06370
$240.79 MSRP: $343.80You Save: $103.01 (30%)Ships in 1-3 Business Days

Toyota Camry Selector Cable Part Number: 33822-33080
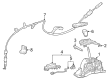
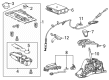
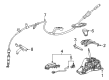
Toyota Camry Shift Cable
Choose genuine Shift Cable that pass strict quality control tests. You can trust the top quality and lasting durability. Shopping for OEM Shift Cable for your Toyota Camry? Our website is your one-stop destination. We stock an extensive selection of genuine Toyota Camry parts. The price is affordable so you can save more. It only takes minutes to browse and find the exact fit. Easily add to cart and check out fast. Our hassle-free return policy will keep you stress-free. We process orders quickly for swift delivery. Your parts will arrive faster, so you can get back on the road sooner.
Toyota Camry Shift Cable Parts and Q&A
- Q: How to Properly Install a Shift Cable for the U250E Automatic Transaxle on Toyota Camry?A:The first step to install the U250E automatic transaxle transmission control cable assembly requires passing the cable assembly through the cabin to the engine compartment and the NO. 2 shift cable grommet retainer installation using 2 bolts with torque at 5.0 Nm (51 kgf-cm, 44 in-lbf). Place the transmission control cable assembly so its floor shift cable uneven surface faces upward and its claws tightly hug the floor shift cable. The control cable requires attachment to its clamp and bracket using a new clip before connecting the transmission control cable to the control shaft lever while tightening the nut to 15 Nm (150 kgf-cm, 11 ft-lbf). Press the transmission control cable lock piece strongly to activate the slider lock while keeping the boot from getting misshapen. The correct sequence of installation includes placing the air cleaner case sub-assembly followed by the air cleaner cap sub-assembly and the air cleaner inlet assembly and the battery. During the last stage of installation you should install your air conditioner unit while performing required shift lever position checks.
- Q: How to replace the floor shift cable transmission control select on Toyota Camry?A:The first step in floor shift cable transmission control select replacement consists of removing the instrument panel safety pad sub-assembly with the air conditioning radiator assembly and Air Bag Sensor assembly center. To detach the floor shift cable start by uninstalling the clip accompanied by the washer which splits the select cable top from the transaxle followed by removal of both the clip and select cable from the control cable bracket. Begin by using the lock to break the select cable-free from the shift lever retainer followed by removing the clip to detach the cable top from the assembly and removing the 2 retainer set bolts from the floor. First disconnect the retainer from the grommet and take out the select cable from the grommet before pulling the select cable through the floor hole and retainer opening. The installation requires you to put the select cable inside the floor hole then retainer followed by attaching it to the grommet while verifying all 3 grommet projections fit into the 3 holes of the retainer. Connect the select cable to the shift lever retainer ensuring the projecting part of the cable outer faces up while making sure the cable outer lock extends from point A according to the illustration. Install the two retainer set bolts with a torque of 5.0 Nm (51 kgf-cm, 44 inch lbs.). Set the select cable top to the shift lever assembly then place the clip which has its serrated point facing upward toward the insertion point. To finish the procedure first connect the select cable to the control cable bracket by using a new clip before installing the cable to the transaxle while placing both a clip and washer in position. Replace the air bag sensor center and air conditioning radiator units as well as the instrument panel safety pad sub-assembly before checking the SRS warning light.


Related Toyota Camry Parts
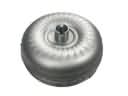 Toyota Camry Torque Converter
 Toyota Camry Valve Body
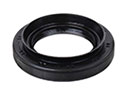 Toyota Camry Automatic Transmission Output Shaft Seal
 Toyota Camry Automatic Transmission Shift Levers
 Toyota Camry Clutch Disc
 Toyota Camry Clutch Fork
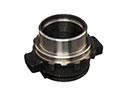 Toyota Camry Clutch Release Bearing
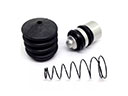 Toyota Camry Clutch Slave Repair Kit
 Toyota Camry Flywheel
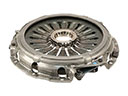 Toyota Camry Pressure Plate
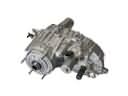 Toyota Camry Transfer Case
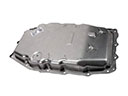 Toyota Camry Transmission Pan