×
ToyotaParts- Hello
- Login or Register
- Quick Links
- Live Chat
- Track Order
- Parts Availability
- RMA
- Help Center
- Contact Us
- Shop for
- Toyota Parts
- Scion Parts
My Garage
My Account
Cart
OEM Toyota Avalon Parking Brake Shoe
Emergency Parking Brake Shoe- Select Vehicle by Model
- Select Vehicle by VIN
Select Vehicle by Model
orMake
Model
Year
Select Vehicle by VIN
For the most accurate results, select vehicle by your VIN (Vehicle Identification Number).
4 Parking Brake Shoes found


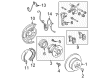
Toyota Avalon Parking Brake Shoes, Driver Side
Part Number: 46590-06020$39.30 MSRP: $54.71You Save: $15.41 (29%)Ships in 1-3 Business Days
Toyota Avalon Parking Brake Shoes, Passenger Side Or Center
Part Number: 46550-06020$39.30 MSRP: $54.71You Save: $15.41 (29%)Ships in 1-3 Business Days

Toyota Avalon Shoe Assembly, Parking Brake, Passenger Side Or Center
Part Number: 46540-20070$34.64 MSRP: $48.22You Save: $13.58 (29%)Ships in 1-2 Business Days

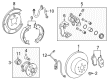
Toyota Avalon Parking Brake Shoes, Rear
Part Number: 46540-06030$31.30 MSRP: $43.57You Save: $12.27 (29%)Ships in 1-3 Business Days
Toyota Avalon Parking Brake Shoe
Choose genuine Parking Brake Shoe that pass strict quality control tests. You can trust the top quality and lasting durability. Shopping for OEM Parking Brake Shoe for your Toyota Avalon? Our website is your one-stop destination. We stock an extensive selection of genuine Toyota Avalon parts. The price is affordable so you can save more. It only takes minutes to browse and find the exact fit. Easily add to cart and check out fast. Our hassle-free return policy will keep you stress-free. We process orders quickly for swift delivery. Your parts will arrive faster, so you can get back on the road sooner.
Parking Brake Shoe as the component located in Toyota Avalon automobiles, has the important function of holding the wheels to prevent the car from moving when it is parked. Through applying Brake Lining on the surface of the Parking Brake Shoe, the shoe is able to create a frictional force against the material of the drum wall hence, making it impossible for the wheels to rotate. It is necessary to note that in different models or types of Avalon varieties there may be variations in the types or styles of Parking Brake Shoe required, however, their primary role is identical, which involves securing the parked car.
Toyota Avalon Parking Brake Shoe Parts and Q&A
- Q: What is the procedure to service and repair the Parking Brake Shoe on Toyota Avalon?A:You should start parking brake repairs by uninstalling the wheel while avoiding flexible hose detachment then removing the two bolts from the LH rear disc Brake Caliper assembly unit. First release the parking brake but maintain it marked while you both measure the rear disc and axle hub. Then take out the rear disc; in case of stiff resistance use the shoe adjuster to make the wheel spin freely. A brake drum gauge should measure the inside diameter of the rear disc which must be below 171 mm (6.73 inch) or require replacement. Use pliers with needle-nose to remove two return tension springs No.1 as the first step toward taking out both parking brake shoe struts LH with strut compression spring. The release of the spring cup claw allows you to remove the parking brake shoe assembly LH No.2 and No.1 while disconnecting the Parking Brake Cable assembly No.3 and taking out the return tension spring No.2 and adjusting screw set. Begin the repair by first removing the 2 hold down compression springs along with their respective 4 hold down spring cups and pair of hold down spring pins. A screwdriver will help extract both the C-washer and the shim and shoe lever from the parking brake shoe assembly LH No.2. The shoe lining must be at least 1.0mm (0.039inch) thick per ruler standards; in this case replace all parking brake shoes as a set to maintain proper performance. An inspection for proper brake shoe lining contact can be made by applying chalk to the brake disc before adjusting the lining through grinding as needed. High temperature grease is applied to the backing plate before installation of the shoe lever and Shim to the parking brake shoe assembly LH No.2 using a new C-washer and feeler gauge clearance measurement to validate less than 0.35 mm (0.0138 inch); note that the Shim must be replaced if necessary. Thread the adjusting screw set and connect it to return tension spring No.2 as well as the hold down parts before reconnecting parking brake cable assembly No.3. Proceed to install the parking brake shoe strut LH along with its compression spring before you begin adding the two return tension springs No.1. Ensure you start with the front side spring. The assembly must have proper part installation and all friction surfaces must be free from oil and grease residue. To achieve proper parking brake shoe clearance, temporarily install the hub nuts while removing the hole plug. Follow by rotating the adjuster until the disc locks and finally contract it until the disc rotates freely while returning 8 notches. Use the hole plug before installing the rear disc brake caliper assembly LH. Tighten it to 62 Nm (630 kgf-cm, 46 ft. lbs.). Set the rear wheel with 103 Nm (1,050 kgf-cm, 76 ft. lbs.). Then check and adjust the parking brake pedal travel.

Related Toyota Avalon Parts
 Toyota Avalon Wheel Bearing
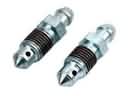 Toyota Avalon Brake Bleeder Screw
 Toyota Avalon Brake Disc
 Toyota Avalon Brake Line
 Toyota Avalon Brake Pad Set
 Toyota Avalon Brake Shoe Set
 Toyota Avalon Hydraulic Hose
 Toyota Avalon Spindle Nut
 Toyota Avalon Wheel Cylinder
 Toyota Avalon Wheel Cylinder Repair Kit
 Toyota Avalon Wheel Hub
 Toyota Avalon Yaw Sensor