×
ToyotaParts- Hello
- Login or Register
- Quick Links
- Live Chat
- Track Order
- Parts Availability
- RMA
- Help Center
- Contact Us
- Shop for
- Toyota Parts
- Scion Parts
My Garage
My Account
Cart
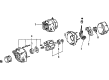
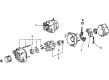
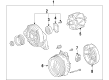
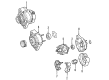
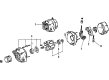
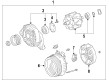
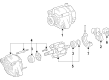
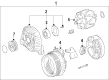
OEM Toyota Alternator Case Kit
Alternator Case Set- Select Vehicle by Model
- Select Vehicle by VIN
Select Vehicle by Model
orMake
Model
Year
Select Vehicle by VIN
For the most accurate results, select vehicle by your VIN (Vehicle Identification Number).
141 Alternator Case Kits found


Toyota Rear Cover Part Number: 27039-70470
$12.42 MSRP: $17.28You Save: $4.86 (29%)Ships in 1-3 Business DaysProduct Specifications- Other Name: Cover Sub-Assembly, End; Cover, Alternator Rear End
- Replaces: 27039-55080

Toyota Rear Cover Part Number: 27039-0C170
$13.61 MSRP: $18.95You Save: $5.34 (29%)Ships in 1-3 Business DaysProduct Specifications- Other Name: Cover Sub-Assembly, End; Cover, Alternator Rear End
- Replaces: 27039-37220

Toyota Front Cover Part Number: 27310-0F020
$347.95 MSRP: $509.91You Save: $161.96 (32%)Ships in 1-3 Business DaysProduct Specifications- Other Name: Frame Assembly, Drive End; Stator; Frame Assembly, Drive End, Alternator
- Manufacturer Note: 12V 100A
- Replaces: 27310-50060
Toyota Stator Part Number: 27310-11160
$363.10 MSRP: $532.12You Save: $169.02 (32%)Ships in 1-3 Business DaysProduct Specifications- Other Name: Frame Assembly, Drive End; Frame Assembly, Drive End, Alternator
Toyota Stator Part Number: 27310-43100
$369.03 MSRP: $540.83You Save: $171.80 (32%)Ships in 1-3 Business DaysProduct Specifications- Other Name: Frame Assembly, Drive End; Frame Assembly, Drive End, Alternator
- Manufacturer Note: 12V 60A
Toyota Frame Part Number: 27310-0S010
$389.87 MSRP: $571.37You Save: $181.50 (32%)Ships in 1-3 Business DaysProduct Specifications- Other Name: Frame Assembly; Frame Assembly, Drive End, Alternator
Toyota Stator Part Number: 27310-74120
$406.19 MSRP: $595.28You Save: $189.09 (32%)Ships in 1-3 Business DaysProduct Specifications- Other Name: Frame Assembly, Drive End; Frame Assembly, Drive End, Alternator
- Manufacturer Note: (J)
- Replaces: 27310-74210

Toyota Stator Part Number: 27310-46230
$428.56 MSRP: $628.06You Save: $199.50 (32%)Ships in 1-3 Business DaysProduct Specifications- Other Name: Frame Assembly, Drive End; Frame Assembly, Drive End, Alternator

Toyota Frame Part Number: 27310-0F060
$431.35 MSRP: $632.14You Save: $200.79 (32%)Ships in 1-3 Business DaysProduct Specifications- Other Name: Frame Assembly, Drive End; Stator; Frame Assembly, Drive End, Alternator
Toyota Stator Part Number: 27310-16270
$431.54 MSRP: $632.43You Save: $200.89 (32%)Ships in 1-3 Business DaysProduct Specifications- Other Name: Frame Assembly, Drive End; Frame Assembly, Drive End, Alternator
- Manufacturer Note: CHILE SPEC

Toyota Stator Part Number: 27310-15180
$437.50 MSRP: $641.16You Save: $203.66 (32%)Ships in 1-3 Business DaysProduct Specifications- Other Name: Frame Assembly, Drive End; Frame Assembly, Drive End, Alternator
- Manufacturer Note: TAIWAN SPEC
Toyota Frame Part Number: 27310-0H060
$461.30 MSRP: $676.04You Save: $214.74 (32%)Ships in 1-3 Business DaysProduct Specifications- Other Name: Frame Assembly, Drive End; Frame Assembly, Drive End, Alternator

Toyota Frame Assembly, Drive End, Alternator Part Number: 27310-0P140
$464.28 MSRP: $680.41You Save: $216.13 (32%)Ships in 1-3 Business DaysProduct Specifications- Other Name: Frame Assembly, Drive End
Toyota Stator Part Number: 27310-0A070
$464.28 MSRP: $680.41You Save: $216.13 (32%)Ships in 1-3 Business DaysProduct Specifications- Other Name: Frame Assembly, Drive End; Frame Assembly, Drive End, Alternator
Toyota Stator Part Number: 27310-0D010
$467.26 MSRP: $684.78You Save: $217.52 (32%)Ships in 1-3 Business DaysProduct Specifications- Other Name: Frame Assembly, Drive End; Frame Assembly, Drive End, Alternator
Toyota Stator Part Number: 27310-74490
$488.08 MSRP: $715.29You Save: $227.21 (32%)Ships in 1-3 Business DaysProduct Specifications- Other Name: Frame Assembly, Drive End; Frame Assembly, Drive End, Alternator

Toyota Stator Part Number: 27310-20030
$488.08 MSRP: $715.29You Save: $227.21 (32%)Ships in 1-3 Business DaysProduct Specifications- Other Name: Frame Assembly, Drive End; Frame Assembly, Drive End, Alternator
Toyota Frame Part Number: 27310-0A110
$611.80 MSRP: $896.59You Save: $284.79 (32%)Ships in 1-3 Business DaysProduct Specifications- Other Name: Frame Assembly, Drive End; Frame Assembly, Drive End, Alternator
Toyota Stator Part Number: 27310-63041
$726.17 MSRP: $1064.21You Save: $338.04 (32%)Product Specifications- Other Name: Frame Assembly, Drive End, Alternator
- Manufacturer Note: 12V 60A


Toyota Stator Part Number: 27360-31670
$732.13 MSRP: $1072.95You Save: $340.82 (32%)Ships in 1-3 Business DaysProduct Specifications- Other Name: Coil Assembly, Alternator
- Manufacturer Note: ACCESSORY CONNECTOR-12V 120W & AC120V 400W
| Page 1 of 8 |Next >
1-20 of 141 Results
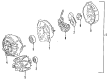
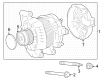
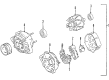
Toyota Alternator Case Kit
OEM parts deliver unmatched quality you can rely on. They pass extensive quality control inspections. Toyota produces them to the official factory specifications. This process helps prevent defects and imperfections. So you can get exceptional lifespan and a flawless fit. Need new OEM Toyota Alternator Case Kit? You'll love our wide selection of genuine options. Shop in minutes and skip the hunt. Our prices are unbeatable, you'll save time and money. It's easy to shop and find the right piece. Our committed customer service team gives professional help from start to finish. Every part includes a manufacturer's warranty. We ship quickly, your parts will arrive fast at your door.
The Toyota Alternator Case Kit now provides the solid housing around the alternator that allows your engine to keep charging reliably and now gives all Toyota owners the same confidence that they have with all models. Ever since 1937 Toyota has perfected an approach to manufacturing that minimizes waste, acceleration in solving problems and drives innovation such as the TNGA platform that enhances handling and safety measures. According to drivers, its hybrid progress applauds, including the enhanced Hybrid Synergy Drive and the 2024 RAV4 Plug-in Hybrid, which covers 42 electric miles but remains rugged where long journeys are required, Toyota declares its investment in efficiency and durability. The cast shell is an Alternator Case Kit which protects internal windings and contains bearings in one-line position and directs the heat off so that current remains constant. In the version, it also has factories tolerances in it and it lasts years with the electrical heart of your Toyota. In order to install the Alternator Case Kit at home, first find a safe parking space, remove the negative battery cable and relieve the belt tension using a wrench. Disconnect the leads of the alternator, unscrew mounting bolts, and remove the unit. Install Alternator Case Kit (new swap rotor, stator, bearings, regulator, etc.) and clean all parts and seals. Firmly screw the seat bearings together, screw the halves together and screws in a cross shape. Reconnect the pulley, re-fit the alternator in the bracket, fit bolts and adjust the belt to the correct tension. Lastly reconnect wiring, connect the battery, start the engine, and ensure the charge light remains off and the belt does not make noises.