×
ToyotaParts- Hello
- Login or Register
- Quick Links
- Live Chat
- Track Order
- Parts Availability
- RMA
- Help Center
- Contact Us
- Shop for
- Toyota Parts
- Scion Parts
My Garage
My Account
Cart
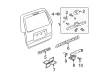
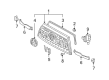
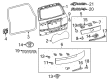
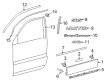
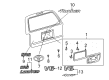
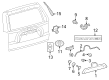
OEM Toyota 4Runner Emblem
Badge- Select Vehicle by Model
- Select Vehicle by VIN
Select Vehicle by Model
orMake
Model
Year
Select Vehicle by VIN
For the most accurate results, select vehicle by your VIN (Vehicle Identification Number).
81 Emblems found


Toyota 4Runner Nameplate, Rear Part Number: 75442-16530
$23.05 MSRP: $32.09You Save: $9.04 (29%)Ships in 1-3 Business Days

Toyota 4Runner Nameplate, Front Part Number: 75301-35040
$28.43 MSRP: $39.57You Save: $11.14 (29%)Ships in 1-3 Business Days

Toyota 4Runner Nameplate, Rear Part Number: 75445-35050
$52.33 MSRP: $72.84You Save: $20.51 (29%)Ships in 1-2 Business Days

Toyota 4Runner Emblem Part Number: 75432-06030
$29.86 MSRP: $41.57You Save: $11.71 (29%)Ships in 1-3 Business Days


Toyota 4Runner Nameplate, Front Part Number: 75442-35160
$38.11 MSRP: $53.04You Save: $14.93 (29%)Ships in 1-2 Business Days

Toyota 4Runner Emblem, Chrome, Rear Part Number: 75441-35010
$29.62 MSRP: $41.23You Save: $11.61 (29%)Ships in 1-3 Business Days

Toyota 4Runner Emblem, Chrome Part Number: 75311-35090
$39.78 MSRP: $55.37You Save: $15.59 (29%)Ships in 1-2 Business Days

Toyota 4Runner Nameplate, Black, Rear Part Number: 75431-35070
$75.00 MSRP: $105.27You Save: $30.27 (29%)Ships in 1 Business Day


Toyota 4Runner Emblem Part Number: 75311-35140
$38.11 MSRP: $53.04You Save: $14.93 (29%)Ships in 1-3 Business Days

Toyota 4Runner Nameplate, Front Part Number: 75442-35150
$31.66 MSRP: $44.06You Save: $12.40 (29%)Ships in 1-3 Business Days


Toyota 4Runner Emblem Part Number: 75311-35220
$43.96 MSRP: $61.19You Save: $17.23 (29%)Ships in 1-2 Business Days

Toyota 4Runner Nameplate, Front Part Number: PZ323-35056
$387.33 MSRP: $567.64You Save: $180.31 (32%)Ships in 1-2 Business Days
Toyota 4Runner Nameplate, Rear Part Number: 75431-35060
$80.81 MSRP: $113.42You Save: $32.61 (29%)Ships in 1-3 Business Days
Toyota 4Runner Nameplate, Front Part Number: PZ323-35058
$307.73 MSRP: $439.37You Save: $131.64 (30%)Ships in 1-3 Business Days


Toyota 4Runner Emblem, Rear Part Number: 75444-21220
$25.20 MSRP: $35.08You Save: $9.88 (29%)Ships in 1 Business Day


Toyota 4Runner Nameplate Part Number: 75442-35080
$33.33 MSRP: $46.39You Save: $13.06 (29%)Ships in 1-3 Business Days

Toyota 4Runner Nameplate, Rear Part Number: 75431-35020
$37.75 MSRP: $52.54You Save: $14.79 (29%)Ships in 1-2 Business Days

Toyota 4Runner Nameplate, Rear Part Number: 75445-35060
$43.13 MSRP: $60.03You Save: $16.90 (29%)Ships in 1-3 Business Days

Toyota 4Runner Nameplate, Rear Part Number: 75443-35040
$24.01 MSRP: $33.42You Save: $9.41 (29%)Ships in 1 Business Day

Toyota 4Runner Nameplate Part Number: 75442-35070
$26.28 MSRP: $36.58You Save: $10.30 (29%)Ships in 1-3 Business Days
| Page 1 of 5 |Next >
1-20 of 81 Results
Toyota 4Runner Emblem
Choose genuine Emblem that pass strict quality control tests. You can trust the top quality and lasting durability. Shopping for OEM Emblem for your Toyota 4Runner? Our website is your one-stop destination. We stock an extensive selection of genuine Toyota 4Runner parts. The price is affordable so you can save more. It only takes minutes to browse and find the exact fit. Easily add to cart and check out fast. Our hassle-free return policy will keep you stress-free. We process orders quickly for swift delivery. Your parts will arrive faster, so you can get back on the road sooner.
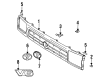
The Toyota 4Runner Emblem in the car indicates ruggedness but also gives the car a sharp feel on the grilles, allowing owners to display pride on any trail. The Toyota 4Runner has gained a reputation for body-on-frame durability, a V6 that is powerful yet smooth running, and a transfer case that pulls efficiently through sand, snow, and rock. Cabin size is enlarged, headlamps are modular and one piece, and bumpers are made to be comfortable and easy to repair, and the rear differential locks in when the slope is slick. Each 4Runner is produced in the Toyota Tahara plant, and the overall quality of the build remains consistent; the factory-matched parts are the same across all 4Runners, and families and adventurers can travel without any drama, whether it is to a remote camping location or a morning commute to work. The safety features that have been crash tested and fine-tuned suspension further demonstrate that the SUV can be both rough and civilized. In addition to mechanical strength, the Toyota 4Runner Emblem supports the brand story, is attracted by polished finishes, which are not similar to generic trucks, and its standardized sizing makes it easy to swap between generations to ensure customization remains simple. Drivers are aware that a clean Emblem on the hatch implies that there is still reliability to be experienced beneath. Installation of the new Emblem requires cleaning the surface, drawing a straight line using a piece of tape, peeling off the backing, aligning, pressing rubber, removing the tape, and allowing adhesive to dry.
Related Toyota 4Runner Parts
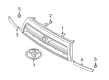
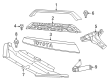
 Toyota 4Runner Grille
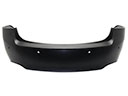 Toyota 4Runner Bumper Cover
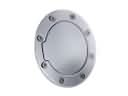 Toyota 4Runner Fuel Door
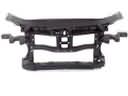 Toyota 4Runner Radiator Support
 Toyota 4Runner Window Regulator
 Toyota 4Runner Windshield Washer Pump
 Toyota 4Runner Wiper Arm
 Toyota 4Runner Door Moldings
 Toyota 4Runner Lift Support
 Toyota 4Runner Liftgate Lift Support
 Toyota 4Runner Side Marker Light
 Toyota 4Runner Weather Strip