×
ToyotaParts- Hello
- Login or Register
- Quick Links
- Live Chat
- Track Order
- Parts Availability
- RMA
- Help Center
- Contact Us
- Shop for
- Toyota Parts
- Scion Parts
My Garage
My Account
Cart
OEM Scion xA Camshaft
Cam- Select Vehicle by Model
- Select Vehicle by VIN
Select Vehicle by Model
orMake
Model
Year
Select Vehicle by VIN
For the most accurate results, select vehicle by your VIN (Vehicle Identification Number).
2 Camshafts found


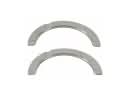
Scion xA Camshaft Part Number: 13501-21030
$257.34 MSRP: $367.42You Save: $110.08 (30%)Ships in 1-3 Business Days
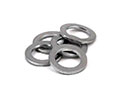
Scion xA Camshaft Part Number: 13502-21031
$266.19 MSRP: $380.06You Save: $113.87 (30%)Ships in 1-3 Business Days
Scion xA Camshaft
Choose genuine Camshaft that pass strict quality control tests. You can trust the top quality and lasting durability. Shopping for OEM Camshaft for your Scion xA? Our website is your one-stop destination. We stock an extensive selection of genuine Scion xA parts. The price is affordable so you can save more. It only takes minutes to browse and find the exact fit. Easily add to cart and check out fast. Our hassle-free return policy will keep you stress-free. We process orders quickly for swift delivery. Your parts will arrive faster, so you can get back on the road sooner.
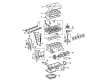
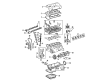
The Camshaft is a highly important part that bears the core responsibility of improving the reliability of Scion xA vehicles. Manufactured from iron or steel, the Camshaft is made to have a strong construction, and its main function is to properly regulate the intake as well as exhaust valves with relation to the engine. This camshaft is suitable for several xA models mainly with the 1.5 L DOHC I4 engine with excellent power outputs of up to 108 HP. Lift and duration are tuned perfectly in Camshaft which helps to enhance the vehicle performance, and strengthens the fuel economy of 27 mpg in city and 34 mpg on highway. Also, the Camshaft has another essential role of the proper coordination of the movement of the valves and pistons to ensure efficiency and safe running of the car. Conspicuously, the Camshaft has intricate settings that include; DOHC which entails that while there are separate cams for the intake of air and exhaust of fumes, the Scion can elevate performance. Such concentration not only increases horse power but also makes sure that the automobile has a steady and rich idle, thus making the Scion xA a powerful competitor in the automobile market. It may be common knowledge that a camshaft is one of the crucial components of a car, where it is equally important for the Camshaft to have the premier features to give a good account of the owner's prowess in car performance.
Scion xA Camshaft Parts and Q&A
- Q: How to replace the camshaft on Scion xA?A:Start the camshaft replacement process by removing the four nuts retaining the cylinder head cover No.2. The next step involves removing Ignition Coil No.1 after unscrewing its 4 bolts and retrieving the 4 ignition coils through the opening. Unplug both ventilation tubes from the cylinder head cover before you can remove the cylinder head sub-assembly which needs its 9 bolts and 2 nuts uninstalled. First remove the engine under cover RH then move onto the removal of No.2 camshaft while turning the crankshaft damper 40 degrees counterclockwise from TDC to prevent piston-valve contact. Before progressing align the TDC/compression timing mark on the No.1 cylinder then note down the Timing Chain configuration. A 8 mm hexagon wrench should unlatch the screw plug while you must insert a screwdriver into the service opening of the chain tensioner to stabilize the stopper plate. Use a clockwise rotation of camshaft No.2 to make the chain tensioner plunger extend and follow with application of a 2 to 3 mm diameter bar stopper plate installation. A wrench should be used to remove the bolt secured at the hexagonal camshaft lobe before slowly unthreading and removing the 11 bearing cap bolts and subsequent bearing caps. You should detach the No.2 camshaft along with its camshaft timing sprocket once you remove the fringe bolt. Begin by loosening the 8 bearing cap bolts and 4 bearing caps. After picking up the timing chain, remove the camshaft and camshaft timing gear assembly by securing the chain with string to minimize components from entering the timing chain cover. Set the camshaft inside a vise before taping the four oil paths on the cam journal. Mark the tape at both advance and retard oil paths then verify the timing device rotates in the advance direction using pressurized air. The fringe bolt of the camshaft timing gear assembly should be unfastened while keeping the remaining 4 bolts in place. Installation of the camshaft timing gear assembly must be done with proper alignment to the camshaft before torquing the fringe bolt to 64 Nm (653 kgf-cm, 47 ft. lbs.). Add engine oil to each camshaft journal followed by chain installation on the camshaft timing gear and tightening the bolts to a torque of 13 Nm (129 kgf-cm, 9.4 ft. lbs.) with maintenance of camshaft level. To install the No.2 camshaft correctly position its timing marks before tightening bolts to 13 Nm (129 kgf-cm, 9.4 ft. lbs.) then add bearing cap No.1 to 23 Nm (235 kgf-cm, 17 ft. lbs.) and finish with the bolt tightened using Special Service Tool: 09023-38400 at 64 Nm (653 kgf-cm, 47 ft. lbs.). First check the crankshaft damper timing notch against the timing mark "0" position while inspecting every timing mark. First install an 8 mm hexagon wrench to screw plug end tightness of 15 Nm (153 kgf-cm, 11 ft. lbs.), then distribute seal packing across the screw plug end (Part No. 08833-00070 or equivalent). Subsequently apply seal packing (Part No. 08826-00080 or equivalent) to the cylinder head cover sub-assembly and install with 9 bolts alongside two seal washers and two nuts and tighten to 10 Nm (102 kgf-cm, 7.4 ft. lbs.). Use 9.0 Nm torque for Ignition Coil installation before completing the cylinder head cover No.2 installation sequence by tightening A nuts first followed by B bolts to 7.0 Nm. Perform a leak test afterward.