×
ToyotaParts- Hello
- Login or Register
- Quick Links
- Live Chat
- Track Order
- Parts Availability
- RMA
- Help Center
- Contact Us
- Shop for
- Toyota Parts
- Scion Parts
My Garage
My Account
Cart
OEM 2009 Toyota Highlander Blend Door Actuator
Air Blend Door Actuator- Select Vehicle by Model
- Select Vehicle by VIN
Select Vehicle by Model
orMake
Model
Year
Select Vehicle by VIN
For the most accurate results, select vehicle by your VIN (Vehicle Identification Number).
6 Blend Door Actuators found


2009 Toyota Highlander Servo Sub-Assembly, Damper(For Recirculation)
Part Number: 87106-33270$131.47 MSRP: $186.11You Save: $54.64 (30%)Ships in 1 Business DayProduct Specifications- Other Name: Servo Sub-Assembly, Damper; HVAC Heater Blend Door Actuator
- Item Weight: 1.40 Pounds
- Item Dimensions: 6.3 x 4.9 x 3.6 inches
- Condition: New
- Fitment Type: Direct Replacement
- SKU: 87106-33270
- Warranty: This genuine part is guaranteed by Toyota's factory warranty.

2009 Toyota Highlander Actuator, Front
Part Number: 87106-33260$131.47 MSRP: $186.11You Save: $54.64 (30%)Ships in 1-2 Business DaysProduct Specifications- Other Name: Servo Sub-Assembly, Damper; HVAC Blend Door Actuator, Front; HVAC Heater Blend Door Actuator; Servo; Servo Sub-Assembly, Damper(For Airmix)
- Position: Front
- Part Name Code: 87106H
- Item Weight: 2.40 Pounds
- Item Dimensions: 6.1 x 4.7 x 3.6 inches
- Condition: New
- Fitment Type: Direct Replacement
- SKU: 87106-33260
- Warranty: This genuine part is guaranteed by Toyota's factory warranty.

2009 Toyota Highlander Servo Sub-Assembly, Damper(For Mode Rear)
Part Number: 87106-28180$131.47 MSRP: $186.11You Save: $54.64 (30%)Ships in 1-3 Business DaysProduct Specifications- Other Name: Servo Sub-Assembly, Damper; Servo Sub-Assembly, Damper(For Airmix); HVAC Heater Blend Door Actuator
- Item Weight: 0.80 Pounds
- Condition: New
- Fitment Type: Direct Replacement
- SKU: 87106-28180
- Warranty: This genuine part is guaranteed by Toyota's factory warranty.

2009 Toyota Highlander Servo, Rear
Part Number: 87106-28170$131.47 MSRP: $186.11You Save: $54.64 (30%)Ships in 1-3 Business DaysProduct Specifications- Other Name: Servo Sub-Assembly, Damper; HVAC Air Inlet Door Actuator, Rear; HVAC Heater Blend Door Actuator; Servo Sub-Assembly, Damper(For Airmix Rear)
- Position: Rear
- Part Name Code: 87106W
- Item Weight: 0.60 Pounds
- Condition: New
- Fitment Type: Direct Replacement
- SKU: 87106-28170
- Warranty: This genuine part is guaranteed by Toyota's factory warranty.

2009 Toyota Highlander Servo, Front
Part Number: 87106-33250$311.28 MSRP: $444.43You Save: $133.15 (30%)Ships in 1-3 Business DaysProduct Specifications- Other Name: Servo Sub-Assembly, Damper; HVAC Air Inlet, Defrost Mode, Heater Blend Door Actuators; Servo Sub-Assembly, Damper(For Mode)
- Position: Front
- Part Name Code: 87106J
- Item Weight: 1.40 Pounds
- Item Dimensions: 6.3 x 5.0 x 3.6 inches
- Condition: New
- Fitment Type: Direct Replacement
- SKU: 87106-33250
- Warranty: This genuine part is guaranteed by Toyota's factory warranty.
2009 Toyota Highlander Servo Sub-Assembly, Damper(For Mode), Front
Part Number: 87106-33290$292.75 MSRP: $417.98You Save: $125.23 (30%)Ships in 1-3 Business DaysProduct Specifications- Other Name: Servo Sub-Assembly, Damper; HVAC Heater Blend Door Actuator
- Manufacturer Note: FRONT AIR CONDITIONER-AUTO(DUAL MODE CONTROL)
- Position: Front
- Part Name Code: 87106J
- Item Weight: 1.40 Pounds
- Item Dimensions: 6.3 x 4.9 x 3.6 inches
- Condition: New
- Fitment Type: Direct Replacement
- SKU: 87106-33290
- Warranty: This genuine part is guaranteed by Toyota's factory warranty.
2009 Toyota Highlander Blend Door Actuator
Looking for affordable OEM 2009 Toyota Highlander Blend Door Actuator? Explore our comprehensive catalogue of genuine 2009 Toyota Highlander Blend Door Actuator. All our parts are covered by the manufacturer's warranty. Plus, our straightforward return policy and speedy delivery service ensure an unparalleled shopping experience. We look forward to your visit!
2009 Toyota Highlander Blend Door Actuator Parts Q&A
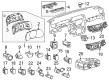
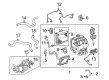
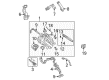
- Q: How to replace the Blend Door Actuator in the front air conditioning system on 2009 Toyota Highlander?A: The Air Mix Control Servo Motor replacement for front air conditioning starts by draining refrigerant from the cooling system and putting the wheels in forward center position. Take out the left front wheel while also disconnecting the cable from the negative terminal of the battery. Wait 90 seconds before continuing to avoid Air Bag activation. First detach both left and right front wiper arms and blades then proceed by removing cowl top ventilator louver sub-assembly, windshield wiper motor with links and cowl top outer panel assembly parts. Detach the heater water hose from both ends plus the cooler refrigerant liquid pipe A and No. 1 cooler refrigerant suction connection. Detach the bottom steering covers No. 3 and No. 2 and remove the steering pad and whole steering wheel assembly. Remove first the steering column cover and then continue by taking off the turn signal switch assembly with spiral cable sub-assembly, instrument cluster finish panel assembly, combination meter assembly, and center instrument panel register assembly. Normal vehicles need removal of the appropriate side panels and air conditioning controls but smart key systems also require taking out the radio or navigation units. Take out all necessary parts including the front door scuff plates and cowl side trim sub-assemblies together with the lower instrument panel finish panel and related console units. Take off the front door opening Weather Strip by disconnecting it while removing the front pillar garnishes. Disconnect the instrument panel wire assembly and take out speaker panels and safety pad assembly for both glass or pole antenna designs. Before you take out the brake pedal support sub-assembly with driver side knee Air Bag assembly you need to disconnect the brake pedal return spring and remove the brake master cylinder push rod clevis from the stop light switch assembly. Take off the No. 1 air supply unit and divide the steering intermediate shaft unit before removing the steering column. Take out the instrument panel junction block, disconnect the power steering ECU and certification ECU (Smart Key System) along with their assemblies, separate the air conditioning amplifier and rear air ducts. Afterward take out the No. 1 console box duct, center heater to register duct along with the No. 1 and No. 2 instrument panel brace sub-assemblies and instrument panel reinforcement assembly with the air conditioning unit. Following this step remove the air conditioning unit itself. To wrap up this process detach the connector and remove the two screws holding the front air mix control servo motor sub-assembly.
Related 2009 Toyota Highlander Parts
 2009 Toyota Highlander Cabin Air Filter
 2009 Toyota Highlander Blower Motor
 2009 Toyota Highlander Heater Core
 2009 Toyota Highlander A/C Accumulator
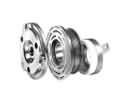 2009 Toyota Highlander A/C Clutch
 2009 Toyota Highlander A/C Condenser
 2009 Toyota Highlander A/C Expansion Valve
 2009 Toyota Highlander A/C Hose
 2009 Toyota Highlander Ambient Temperature Sensor
 2009 Toyota Highlander Blower Control Switches
 2009 Toyota Highlander Evaporator
 2009 Toyota Highlander HVAC Pressure Switch