×
ToyotaParts- Hello
- Login or Register
- Quick Links
- Live Chat
- Track Order
- Parts Availability
- RMA
- Help Center
- Contact Us
- Shop for
- Toyota Parts
- Scion Parts
My Garage
My Account
Cart
OEM 2009 Toyota Avalon Control Arm
Suspension Arm- Select Vehicle by Model
- Select Vehicle by VIN
Select Vehicle by Model
orMake
Model
Year
Select Vehicle by VIN
For the most accurate results, select vehicle by your VIN (Vehicle Identification Number).
3 Control Arms found


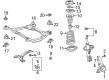
2009 Toyota Avalon Control Arm, Lower Driver Side
Part Number: 48069-06100$169.42 MSRP: $239.84You Save: $70.42 (30%)Ships in 1 Business DayProduct Specifications- Other Name: Arm Sub-Assembly, Suspension; Suspension Control Arm, Front Left; Control Arm Assembly; Lower Control Arm; Arm Sub-Assembly, Front Suspension, Lower Driver Side; Suspension Control Arm
- Position: Lower Driver Side
- Replaces: 48069-58010, 48069-28120
- Part Name Code: 48069
- Item Weight: 10.60 Pounds
- Item Dimensions: 2.9 x 2.9 x 2.8 inches
- Condition: New
- Fitment Type: Direct Replacement
- SKU: 48069-06100
- Warranty: This genuine part is guaranteed by Toyota's factory warranty.

2009 Toyota Avalon Control Arm, Passenger Side
Part Number: 48068-06100$161.79 MSRP: $229.03You Save: $67.24 (30%)Ships in 1 Business DayProduct Specifications- Other Name: Arm Sub-Assembly, Suspension; Suspension Control Arm, Front Right; Control Arm Assembly; Lower Control Arm; Arm Sub-Assembly, Front Suspension, Lower Passenger Side; Suspension Control Arm
- Position: Passenger Side
- Replaces: 48068-28120, 48068-58010
- Part Name Code: 48068
- Item Weight: 7.80 Pounds
- Item Dimensions: 18.2 x 2.8 x 15.4 inches
- Condition: New
- Fitment Type: Direct Replacement
- SKU: 48068-06100
- Warranty: This genuine part is guaranteed by Toyota's factory warranty.

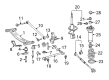
2009 Toyota Avalon Control Arm, Rear Passenger Side
Part Number: 48730-33150$121.95 MSRP: $172.64You Save: $50.69 (30%)Ships in 1-3 Business DaysProduct Specifications- Other Name: Arm Assembly, Rear Suspension; Suspension Control Arm; Rear Lateral Arm; Arm
- Position: Rear Passenger Side
- Replaces: 48730-07030, 48730-07050
- Item Weight: 1.80 Pounds
- Item Dimensions: 9.2 x 1.9 x 1.9 inches
- Condition: New
- SKU: 48730-33150
- Warranty: This genuine part is guaranteed by Toyota's factory warranty.
2009 Toyota Avalon Control Arm
Looking for affordable OEM 2009 Toyota Avalon Control Arm? Explore our comprehensive catalogue of genuine 2009 Toyota Avalon Control Arm. All our parts are covered by the manufacturer's warranty. Plus, our straightforward return policy and speedy delivery service ensure an unparalleled shopping experience. We look forward to your visit!
2009 Toyota Avalon Control Arm Parts Q&A
- Q: How to install the rear No. 1 Control Arm on 2009 Toyota Avalon?A: Start to install the rear No. 1 suspension arm by setting it with the bolt while completing only temporary bolt tightening. The bracket needs to face towards the front of the vehicle while showing the paint mark at the rear end. Fasten the arm after placing it correctly while utilizing a torque wrench to achieve 100 Nm (1,020 kgf-cm, 74 ft-lbf). The rear suspension member installation requires a jack to raise it then mechanics need to use 4 nuts and 2 bolts with 4 retainers tightened with A and B receiving 55 Nm (561 kgf-cm, 41 ft-lbf) torque and C receiving 38 Nm (387 kgf-cm, 28 ft-lbf) torque. Place the rear No. 1 suspension arm LH bolt and nut onto the rear axle carrier bolt facing against the front while doing the same procedure for the RH side. To install the rear No. 2 suspension arm, connect each of its sides to the rear axle carrier through bolt and nuts by inserting the bolts from their corresponding rear insertion points. The rear strut rod needs to be briefly secured. Use a wooden block to stabilize the suspension while you jack up the rear axle carrier because this will prevent damage. Make sure that the bolt of the suspension arm assembly No. 1 points horizontally toward the center of the rear axle hub. Tighten the rear No. 1 suspension arm LH bolt to 100 Nm (1,020 kgf-cm, 74 ft-lbf) while fixing the nut during tightening. Tighten all rear No. 2 suspension arm bolts to 100 Nm with the sequence starting from the LH and moving to the RH side. Fasten the rear strut rod completely. The service requires installation of the rear stabilizer bar together with the height control sensor sub-assembly rear RH applying 5.4 Nm torque (55 kgf-cm, 48 in-lbf) and the exhaust pipe assembly center. Install the rear wheel at 103 Nm torque (1,050 kgf-cm, 76 ft-lbf) before inspecting and adjusting the rear wheel alignment while you also need to correct the headlight aiming if necessary.
Related 2009 Toyota Avalon Parts
 2009 Toyota Avalon Bump Stop
 2009 Toyota Avalon Coil Spring Insulator
 2009 Toyota Avalon Coil Springs
 2009 Toyota Avalon Front Cross-Member
 2009 Toyota Avalon Lateral Link
 2009 Toyota Avalon Shock And Strut Mount
 2009 Toyota Avalon Shock and Strut Boot
 2009 Toyota Avalon Strut Housing
 2009 Toyota Avalon Suspension Strut Rod
 2009 Toyota Avalon Sway Bar Bracket
 2009 Toyota Avalon Sway Bar Bushing
 2009 Toyota Avalon Sway Bar Kit