×
ToyotaParts- Hello
- Login or Register
- Quick Links
- Live Chat
- Track Order
- Parts Availability
- RMA
- Help Center
- Contact Us
- Shop for
- Toyota Parts
- Scion Parts
My Garage
My Account
Cart
OEM 2008 Toyota Yaris Coil Springs
Strut Spring- Select Vehicle by Model
- Select Vehicle by VIN
Select Vehicle by Model
orMake
Model
Year
Select Vehicle by VIN
For the most accurate results, select vehicle by your VIN (Vehicle Identification Number).
5 Coil Springs found


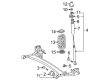
2008 Toyota Yaris Coil Spring, Rear
Part Number: 48231-52A51$121.25 MSRP: $171.64You Save: $50.39 (30%)Ships in 1-3 Business DaysProduct Specifications- Other Name: Spring, Coil, Rear; Coil Spring, Rear, Rear Left, Rear Right; Coil Springs; Spring; Spring, Coil, Rear Passenger Side; Spring, Coil, Rear Driver Side
- Position: Rear
- Replaces: 48231-52A50
- Item Weight: 6.20 Pounds
- Item Dimensions: 16.8 x 10.7 x 5.6 inches
- Condition: New
- Fitment Type: Direct Replacement
- SKU: 48231-52A51
- Warranty: This genuine part is guaranteed by Toyota's factory warranty.

2008 Toyota Yaris Coil Spring, Rear
Part Number: 48231-52C01$95.62 MSRP: $134.22You Save: $38.60 (29%)Ships in 1-2 Business DaysProduct Specifications- Other Name: Spring, Coil, Rear; Coil Spring, Rear, Rear Left, Rear Right; Coil Springs; Spring; Spring, Coil, Rear Passenger Side; Spring, Coil, Rear Driver Side
- Position: Rear
- Replaces: 48231-52C00
- Item Weight: 5.40 Pounds
- Item Dimensions: 16.7 x 10.8 x 5.7 inches
- Condition: New
- Fitment Type: Direct Replacement
- SKU: 48231-52C01
- Warranty: This genuine part is guaranteed by Toyota's factory warranty.

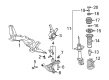
2008 Toyota Yaris Coil Spring, Front
Part Number: 48131-52E11$89.69 MSRP: $125.90You Save: $36.21 (29%)Ships in 1-3 Business DaysProduct Specifications- Other Name: Spring, Coil, Front; Coil Spring, Front, Front Left; Coil Springs; Spring; Spring, Front Coil, Passenger Side; Spring, Front Coil, Driver Side
- Position: Front
- Replaces: 48131-52E10
- Item Weight: 6.80 Pounds
- Item Dimensions: 16.1 x 7.0 x 5.7 inches
- Condition: New
- Fitment Type: Direct Replacement
- SKU: 48131-52E11
- Warranty: This genuine part is guaranteed by Toyota's factory warranty.
2008 Toyota Yaris Coil Spring, Front
Part Number: 48131-52A52$72.15 MSRP: $101.28You Save: $29.13 (29%)Ships in 1-3 Business DaysProduct Specifications- Other Name: Spring, Coil, Front; Coil Spring, Front; Coil Springs; Spring
- Position: Front
- Replaces: 48131-52A50, 48131-52A51
- Item Weight: 3.90 Pounds
- Item Dimensions: 16.2 x 7.0 x 5.7 inches
- Condition: New
- SKU: 48131-52A52
- Warranty: This genuine part is guaranteed by Toyota's factory warranty.

2008 Toyota Yaris Coil Spring, Front
Part Number: 48131-52A40$79.26 MSRP: $111.27You Save: $32.01 (29%)Product Specifications- Other Name: Spring, Coil, Front; Coil Spring, Front; Coil Springs; Spring; Spring, Front Coil, Passenger Side; Spring, Front Coil, Driver Side
- Position: Front
- Item Weight: 6.20 Pounds
- Item Dimensions: 15.9 x 6.8 x 5.9 inches
- Condition: New
- Fitment Type: Direct Replacement
- SKU: 48131-52A40
- Warranty: This genuine part is guaranteed by Toyota's factory warranty.
2008 Toyota Yaris Coil Springs
Looking for affordable OEM 2008 Toyota Yaris Coil Springs? Explore our comprehensive catalogue of genuine 2008 Toyota Yaris Coil Springs. All our parts are covered by the manufacturer's warranty. Plus, our straightforward return policy and speedy delivery service ensure an unparalleled shopping experience. We look forward to your visit!
2008 Toyota Yaris Coil Springs Parts Q&A
- Q: How to remove the front shock absorber with coil springs on 2008 Toyota Yaris?A: The first step to remove the front shock absorber with coil spring is disconnecting the negative battery cable terminal. Follow the front wiper arm head caps with both front wiper arms and blades assemblies from the left and right sides of the vehicle. The hatchback needs users to take off its hood to cowl top seal whereas the sedan demands users to delete the cowl side ventilator sub-assembly from both left and right sides. You should first remove the front wiper motor and link followed by the cowl top ventilator louver sub-assembly. The cowl to register duct sub-assembly must be removed from the hatchback while the front air shutter seal needs removal on the sedan. Remove the outer cowl top panel followed by the front wheel according to the instructions. Use socket hexagon wrench 6 to remove the stabilizer link nut and separate the shock absorber from the front link assembly while using it to fix the stud when the ball joint moves with the nut. To proceed with the front flexible hose separation you must first eliminate the bolt which functions for both ABS and non-ABS setups. To remove the front shock absorber with coil spring the 2 nuts and 2 bolts must be taken off to detach it from the steering knuckle while using a socket hexagon wrench 6 for the shock absorber rod nut removal before removing No. 2 suspension support for complete front shock absorber removal.
Related 2008 Toyota Yaris Parts
 2008 Toyota Yaris Sway Bar Link
 2008 Toyota Yaris Alignment Bolt
 2008 Toyota Yaris Axle Beam Mount
 2008 Toyota Yaris Bump Stop
 2008 Toyota Yaris Coil Spring Insulator
 2008 Toyota Yaris Crossmember Bushing
 2008 Toyota Yaris Shock And Strut Mount
 2008 Toyota Yaris Shock and Strut Boot
 2008 Toyota Yaris Strut Housing
 2008 Toyota Yaris Sway Bar Bracket
 2008 Toyota Yaris Sway Bar Kit
 2008 Toyota Yaris Trailing Arm Bushing