×
ToyotaParts- Hello
- Login or Register
- Quick Links
- Live Chat
- Track Order
- Parts Availability
- RMA
- Help Center
- Contact Us
- Shop for
- Toyota Parts
- Scion Parts
My Garage
My Account
Cart
OEM 2008 Toyota RAV4 Rack And Pinion
Steering Rack And Pinion- Select Vehicle by Model
- Select Vehicle by VIN
Select Vehicle by Model
orMake
Model
Year
Select Vehicle by VIN
For the most accurate results, select vehicle by your VIN (Vehicle Identification Number).
2 Rack And Pinions found

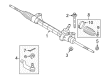
2008 Toyota RAV4 Steering Gear
Part Number: 45510-42240$653.07 MSRP: $957.08You Save: $304.01 (32%)Ships in 1-3 Business DaysProduct Specifications- Other Name: Gear Assembly, Steering; Rack and Pinion Assembly; Steering Gearbox; Gear Assembly
- Replaces: 45510-0R020, 45510-42040, 45510-42090, 45510-42110
- Condition: New
- SKU: 45510-42240
- Warranty: This genuine part is guaranteed by Toyota's factory warranty.
2008 Toyota RAV4 Steering Gear
Part Number: 45510-42230$626.05 MSRP: $917.49You Save: $291.44 (32%)Ships in 1-2 Business DaysProduct Specifications- Other Name: Gear Assembly, Steering; Rack and Pinion Assembly; Steering Gearbox; Gear Assembly
- Replaces: 45510-42030, 45510-42100, 45510-0R100, 45510-0R010, 45510-0R070, 45510-42080
- Condition: New
- SKU: 45510-42230
- Warranty: This genuine part is guaranteed by Toyota's factory warranty.
2008 Toyota RAV4 Rack And Pinion
Looking for affordable OEM 2008 Toyota RAV4 Rack And Pinion? Explore our comprehensive catalogue of genuine 2008 Toyota RAV4 Rack And Pinion. All our parts are covered by the manufacturer's warranty. Plus, our straightforward return policy and speedy delivery service ensure an unparalleled shopping experience. We look forward to your visit!
2008 Toyota RAV4 Rack And Pinion Parts Q&A
- Q: How to install the Rack And Pinion on 2008 Toyota RAV4?A: Dans installation begin with thread in the lock nut and No. 2 tie rod end sub-assembly onto the rack end while matching their marks before loosely tightening the lock nut to secure it permanently after toe in adjustment and repeat with No. 1 tie rod end sub-assembly. The front suspension crossmember requires the installation of the rack and pinion by tightening 2 bolts with 2 nuts to 138 Nm (1407 kgf-cm, 102 ft-lbf). At the same time, prevent the nut from rotating during installation. Place the intermediate shaft on the rack and pinion matching positions before tightening it to 35 Nm (360 kgf-cm, 26 ft-lbf). The new clamp should be used for attaching the No. 1 steering column hole cover sub-assembly to the rack and pinion. Following that, install engine assembly with transaxle. Fasten the body to the clip B while fitting the No. 1 hole cover with clip A in position but make sure the cover's lip remains unharmed. Position the matchmarks exactly before installing the sliding yoke to the intermediate shaft and tightening it to 35 Nm (360 kgf cm, 26 ft lb). The floor carpet must be installed first before applying the 2 clips to the column hole cover silencer sheet. The No. 2 tie rod end sub-assembly must attach to the steering knuckle by using a castle nut and torque it to 49 Nm (500 kgf-cm, 36 ft-lbf). When the holes for the clip are misaligned, slowly tighten the nut another 60 degrees then install a new cotter pin. Rephrase the method used for connecting the No. 1 tie rod end sub-assembly. Position the front wheels while torquing them to 103 Nm (1,050 kgf-cm, 76 ft-lbf), next hook up the cable to the negative battery terminal. Proceed with aligning the wheels forward before performing their inspection and adjustment.
Related 2008 Toyota RAV4 Parts
 2008 Toyota RAV4 Steering Wheel
 2008 Toyota RAV4 Ignition Switch
 2008 Toyota RAV4 Rack and Pinion Boot
 2008 Toyota RAV4 Shift Interlock Solenoid
 2008 Toyota RAV4 Steering Angle Sensor
 2008 Toyota RAV4 Steering Column
 2008 Toyota RAV4 Steering Column Cover
 2008 Toyota RAV4 Steering Gear Box
 2008 Toyota RAV4 Steering Shaft
 2008 Toyota RAV4 Tie Rod End
 2008 Toyota RAV4 Wiper Switch