×
ToyotaParts- Hello
- Login or Register
- Quick Links
- Live Chat
- Track Order
- Parts Availability
- RMA
- Help Center
- Contact Us
- Shop for
- Toyota Parts
- Scion Parts
My Garage
My Account
Cart
OEM 2009 Toyota RAV4 Rack And Pinion
Steering Rack And Pinion- Select Vehicle by Model
- Select Vehicle by VIN
Select Vehicle by Model
orMake
Model
Year
Select Vehicle by VIN
For the most accurate results, select vehicle by your VIN (Vehicle Identification Number).
2 Rack And Pinions found

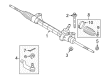
2009 Toyota RAV4 Steering Gear
Part Number: 45510-42240$653.07 MSRP: $957.08You Save: $304.01 (32%)Ships in 1-3 Business DaysProduct Specifications- Other Name: Gear Assembly, Steering; Rack and Pinion Assembly; Steering Gearbox; Gear Assembly
- Replaces: 45510-0R020, 45510-42040, 45510-42090, 45510-42110
- Condition: New
- SKU: 45510-42240
- Warranty: This genuine part is guaranteed by Toyota's factory warranty.
2009 Toyota RAV4 Steering Gear
Part Number: 45510-42230$626.05 MSRP: $917.49You Save: $291.44 (32%)Ships in 1-2 Business DaysProduct Specifications- Other Name: Gear Assembly, Steering; Rack and Pinion Assembly; Steering Gearbox; Gear Assembly
- Replaces: 45510-42030, 45510-42100, 45510-0R100, 45510-0R010, 45510-0R070, 45510-42080
- Condition: New
- SKU: 45510-42230
- Warranty: This genuine part is guaranteed by Toyota's factory warranty.
2009 Toyota RAV4 Rack And Pinion
Looking for affordable OEM 2009 Toyota RAV4 Rack And Pinion? Explore our comprehensive catalogue of genuine 2009 Toyota RAV4 Rack And Pinion. All our parts are covered by the manufacturer's warranty. Plus, our straightforward return policy and speedy delivery service ensure an unparalleled shopping experience. We look forward to your visit!
2009 Toyota RAV4 Rack And Pinion Parts Q&A
- Q: How to remove the Rack And Pinion on 2009 Toyota RAV4?A: A necessary first step for removing the rack and pinion involves pointing the front wheels straight ahead before disconnecting the negative battery terminal cable for at least 90 seconds to deactivate Air Bags and pretensioners. The next step involves disassembly of No. 2 tie rod end sub-assembly by removing its castle nut and cotter pin then applying Special Service Tool: 09628-62011 to disconnect the tie rod end from the steering knuckle without damaging the dust cover. The installation steps for the No. 1 tie rod end sub-assembly should be identical to the previous procedure. Use the floor carpet removal to access the two clips which allow the column hole cover silencer sheet to be taken out. Secure the steering wheel with a seat belt to prevent breaking the spiral cable and then place matchmarks on the sliding yoke of the steering intermediate shaft before unbolting the shaft. Unfasten the sliding yoke. Take care when separating the No. 1 steering column hole cover sub-assembly by both executing clip B separation followed by clip A detachment from the system. Prior to removing the engine assembly with transaxle, apply this procedure only to motors of 2GR-FE or 2AR-FE type. First disconnect the column hole cover from the rack and pinion by taking out the clamp then apply matchmarks to the intermediate shaft followed by bolt removal before separating the intermediate shaft from the rack and pinion. The rack and pinion assembly removal requires two bolts and two nuts to be taken off from the suspension crossmember but during bolt removal the nut must stay still and stationary. Use Special Service Tool: 09612-00012 wrapped with protective tape while applying it into a vise. You must take and replace this tool during work. Industrial Tape should be used to make matchmarks between the No. 2 tie rod end sub-assembly and rack end before the No. 2 tie rod end sub-assembly and lock nut can be removed the same way as the No. 1 tie rod end sub-assembly.
Related 2009 Toyota RAV4 Parts
 2009 Toyota RAV4 Steering Wheel
 2009 Toyota RAV4 Ignition Switch
 2009 Toyota RAV4 Rack and Pinion Boot
 2009 Toyota RAV4 Shift Interlock Solenoid
 2009 Toyota RAV4 Steering Angle Sensor
 2009 Toyota RAV4 Steering Column
 2009 Toyota RAV4 Steering Column Cover
 2009 Toyota RAV4 Steering Gear Box
 2009 Toyota RAV4 Steering Shaft
 2009 Toyota RAV4 Tie Rod End
 2009 Toyota RAV4 Wiper Switch