×
ToyotaParts- Hello
- Login or Register
- Quick Links
- Live Chat
- Track Order
- Parts Availability
- RMA
- Help Center
- Contact Us
- Shop for
- Toyota Parts
- Scion Parts
My Garage
My Account
Cart
OEM 2008 Toyota Corolla Exhaust Pipe
Exhaust Tail Pipe- Select Vehicle by Model
- Select Vehicle by VIN
Select Vehicle by Model
orMake
Model
Year
Select Vehicle by VIN
For the most accurate results, select vehicle by your VIN (Vehicle Identification Number).
4 Exhaust Pipes found


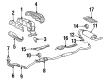
2008 Toyota Corolla Front Pipe
Part Number: 17410-0D341$1367.66 MSRP: $1835.80You Save: $468.14 (26%)Product Specifications- Other Name: Pipe Assembly, Exhaust; Catalytic Converter; Exhaust Pipe; Converter & Pipe
- Replaces: 17410-0D340
- Item Weight: 11.30 Pounds
- Item Dimensions: 47.2 x 18.0 x 9.6 inches
- Condition: New
- SKU: 17410-0D341
- Warranty: This genuine part is guaranteed by Toyota's factory warranty.

2008 Toyota Corolla Front Pipe
Part Number: 17410-22500$1554.94 MSRP: $2087.18You Save: $532.24 (26%)Ships in 1-3 Business DaysProduct Specifications- Other Name: Pipe Assembly, Exhaust; Catalytic Converter; Exhaust Pipe; Converter & Pipe; Pipe Assembly, Exhaust, Front
- Position: Front
- Part Name Code: 17410
- Item Weight: 11.70 Pounds
- Item Dimensions: 46.8 x 17.8 x 9.1 inches
- Condition: New
- Fitment Type: Direct Replacement
- SKU: 17410-22500
- Warranty: This genuine part is guaranteed by Toyota's factory warranty.

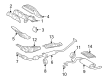
2008 Toyota Corolla Muffler & Pipe
Part Number: 17430-22470$430.95 MSRP: $578.46You Save: $147.51 (26%)Ships in 1-3 Business DaysProduct Specifications- Other Name: Pipe Assembly, Exhaust Tail; Muffler Assembly; Direct-Fit Exhaust; System Kit; Pipe; Tail; Muffler; Pipe Assembly, Exhaust, Tail
- Part Name Code: 17430
- Item Weight: 10.60 Pounds
- Item Dimensions: 43.2 x 12.7 x 8.9 inches
- Condition: New
- Fitment Type: Direct Replacement
- SKU: 17430-22470
- Warranty: This genuine part is guaranteed by Toyota's factory warranty.

2008 Toyota Corolla Muffler & Pipe
Part Number: 17430-0D360$430.95 MSRP: $578.46You Save: $147.51 (26%)Ships in 1-3 Business DaysProduct Specifications- Other Name: Pipe Assembly, Exhaust Tail; Muffler Assembly; Direct-Fit Exhaust; System Kit; Pipe; Tail; Muffler; Pipe Assembly, Exhaust, Tail
- Part Name Code: 17430
- Item Weight: 10.20 Pounds
- Item Dimensions: 44.0 x 12.7 x 9.1 inches
- Condition: New
- Fitment Type: Direct Replacement
- SKU: 17430-0D360
- Warranty: This genuine part is guaranteed by Toyota's factory warranty.
2008 Toyota Corolla Exhaust Pipe
Looking for affordable OEM 2008 Toyota Corolla Exhaust Pipe? Explore our comprehensive catalogue of genuine 2008 Toyota Corolla Exhaust Pipe. All our parts are covered by the manufacturer's warranty. Plus, our straightforward return policy and speedy delivery service ensure an unparalleled shopping experience. We look forward to your visit!
2008 Toyota Corolla Exhaust Pipe Parts Q&A
- Q: How to install the exhaust pipe assembly front and related components on 2008 Toyota Corolla?A: Measure the compression spring length using vernier calipers before installing the exhaust pipe front assembly. If the reading shows less than 41.5 mm (1.6339 in.), replace the spring. Start by putting a new gasket in its proper position using a wooden block combined with a plastic-faced hammer until it reaches the exhaust manifold with no leftover gasket from the previous installation. Follow these steps to install the exhaust pipe front into the 2 exhaust pipe supports No. 4 [C]: Avoid shoving the gasket into the manifold and then tighten the 2 compression springs and 2 bolts [D] to a torque of 43 Nm (440 kgf-cm, 32 ft-lbf). The floor panel brace front requires installation with two nuts at a torque level of 30 Nm (302 kgf-cm, 22 ft-lbf). Moreover check that the compression spring within the exhaust pipe assembly tail has at least 38.5 mm (1.5158 in.) of free length before replacing it if needed. The installation of a fresh gasket should proceed with correct orientation and without damaging the pipe as the exhaust pipe tail receives attachment to the 3 exhaust pipe supports No. 4 [C]. Then secure the 2 compression springs and 2 bolts [D] to 43 Nm (440 kgf-cm, 32 ft-lbf). Use the Special Service Tool: 09224-00010 to install the heated oxygen sensor with 44 Nm (450 kgf-cm, 33 ft-lbf) torque before removing the sensor connector from the vehicle to put on the grommet and connect the heated oxygen sensor connector [C]. The floor carpet needs to be installed at the front using the clip [D] after connecting the battery negative terminal with 5.4 Nm (55 kgf-cm, 48 in-lbf) torque and testing exhaust gas leak levels.
Related 2008 Toyota Corolla Parts
 2008 Toyota Corolla Catalytic Converter
 2008 Toyota Corolla Muffler
 2008 Toyota Corolla Vapor Canister
 2008 Toyota Corolla Exhaust Manifold
 2008 Toyota Corolla Exhaust Heat Shield
 2008 Toyota Corolla Exhaust Manifold Gasket
 2008 Toyota Corolla PCV Valve
 2008 Toyota Corolla Exhaust Flange Gasket
 2008 Toyota Corolla Exhaust Hanger