×
ToyotaParts- Hello
- Login or Register
- Quick Links
- Live Chat
- Track Order
- Parts Availability
- RMA
- Help Center
- Contact Us
- Shop for
- Toyota Parts
- Scion Parts
My Garage
My Account
Cart
OEM 2007 Toyota Solara Drive Belt
Serpentine Belt- Select Vehicle by Model
- Select Vehicle by VIN
Select Vehicle by Model
orMake
Model
Year
Select Vehicle by VIN
For the most accurate results, select vehicle by your VIN (Vehicle Identification Number).
3 Drive Belts found


2007 Toyota Solara Belt, V (Cooler Compressor To Crankshaft Pulley)
Part Number: 99366-31040$26.76 MSRP: $37.25You Save: $10.49 (29%)Ships in 1-2 Business DaysProduct Specifications- Other Name: Belt, V-Ribbed; Accessory Drive Belt; Serpentine Belt
- Replaces: 99366-21040-83, 99366-21040, 99366-D1040, 90080-91147
- Part Name Code: 88310A
- Item Weight: 0.70 Pounds
- Item Dimensions: 10.2 x 4.2 x 0.9 inches
- Condition: New
- Fitment Type: Direct Replacement
- SKU: 99366-31040
- Warranty: This genuine part is guaranteed by Toyota's factory warranty.


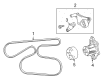
2007 Toyota Solara Serpentine Belt
Part Number: 90916-A2012$51.73 MSRP: $72.01You Save: $20.28 (29%)Ships in 1-3 Business DaysProduct Specifications- Other Name: Belt, V-Ribbed; Serpentine Belt Drive Kit; Accessory Drive Belt; Drive Belt; V-Belt; Belt, V(For Fan & Alternator)
- Manufacturer Note: (L)
- Replaces: 90916-A2008, 90080-91205, 90916-02598, 90916-T2014, 90916-02502
- Part Name Code: 16361A
- Item Weight: 0.80 Pounds
- Item Dimensions: 16.9 x 8.3 x 0.9 inches
- Condition: New
- Fitment Type: Direct Replacement
- SKU: 90916-A2012
- Warranty: This genuine part is guaranteed by Toyota's factory warranty.


 Product Specifications
- Other Name: Belt, V-Ribbed; Accessory Drive Belt; Serpentine Belt Drive Kit; Serpentine Belt; V-Belt; Belt, V(For Vane Pump); Drive Belt
- Part Name Code: 44310A
- Item Weight: 0.60 Pounds
- Item Dimensions: 14.0 x 7.3 x 0.8 inches
- Condition: New
- Fitment Type: Direct Replacement
- SKU: 90916-A2009
- Warranty: This genuine part is guaranteed by Toyota's factory warranty.
2007 Toyota Solara Drive Belt
Looking for affordable OEM 2007 Toyota Solara Drive Belt? Explore our comprehensive catalogue of genuine 2007 Toyota Solara Drive Belt. All our parts are covered by the manufacturer's warranty. Plus, our straightforward return policy and speedy delivery service ensure an unparalleled shopping experience. We look forward to your visit!
2007 Toyota Solara Drive Belt Parts Q&A
- Q: How to service and repair the drive belt on 2007 Toyota Solara?A: Service and repair procedures for the drive belt start with front wheel RH removal followed by the front fender apron seal RH removal and engine cover sub-assembly No.1 separations. Then service the engine moving control rod with bracket by extracting its 3 bolts and later remove the engine mounting stay No.2 RH and engine mounting bracket No.2 RH. Remove the fan together with generator V belt using Special Service Tool: 09249-63010 to rotate the V-ribbed belt tensioner clockwise with slow pressure before removing both belts from each pulley and returning the tensioner slowly. Apply tensioner Special Service Tool and all other tools to their positions on the tensioner unit before carefully avoiding finger contact with moving parts. Check the V-ribbed belt to verify it has correct fitment in the dotted patterns and remains within the crisp edge running across the crank pulley bottom. A new belt encompasses any belt that runs a running engine for less than five minutes whereas a used belt functions in the motor for five minutes or beyond. A new installed belt needs five minutes of engine operation before rechecking the correct tension. Installation requires Special Service Tool: 09249-63010 to gradually turn the V-ribbed belt tensioner clockwise while putting in the V belt. Begin installation by tightening the engine mounting bracket No.2 RH to 52 Nm (531 kgf-cm, 38 ft. lbs.). Proceed by maintaining the engine mounting stay No.2 RH to 64 Nm (653 kgf-cm, 47 ft. lbs.) and finish by installing the engine moving control rod with bracket using three bolts at 64 Nm (653 kgf-cm, 47 ft. lbs.). The final step includes fitting the right-hand front wheel while tightening it to 103 Nm (1,050 kgf-cm, 76 ft. lbs.).
Related 2007 Toyota Solara Parts
 2007 Toyota Solara Radiator
 2007 Toyota Solara Thermostat
 2007 Toyota Solara Water Pump
 2007 Toyota Solara Coolant Reservoir
 2007 Toyota Solara Coolant Reservoir Hose
 2007 Toyota Solara Fan Blade
 2007 Toyota Solara Fan Motor
 2007 Toyota Solara Radiator Cap
 2007 Toyota Solara Thermostat Gasket
 2007 Toyota Solara Thermostat Housing
 2007 Toyota Solara Water Pump Gasket
 2007 Toyota Solara Water Pump Pulley