×
ToyotaParts- Hello
- Login or Register
- Quick Links
- Live Chat
- Track Order
- Parts Availability
- RMA
- Help Center
- Contact Us
- Shop for
- Toyota Parts
- Scion Parts
My Garage
My Account
Cart
OEM 2007 Toyota Highlander Exhaust Pipe
Exhaust Tail Pipe- Select Vehicle by Model
- Select Vehicle by VIN
Select Vehicle by Model
orMake
Model
Year
Select Vehicle by VIN
For the most accurate results, select vehicle by your VIN (Vehicle Identification Number).
10 Exhaust Pipes found

2007 Toyota Highlander Pipe Sub-Assembly, Exhaust, Front
Part Number: 17403-0P100$128.89 MSRP: $167.11You Save: $38.22 (23%)Ships in 1-3 Business DaysProduct Specifications- Other Name: Pipe Sub-Assembly, Exhaust; Exhaust System; Exhaust Y Pipe; Exhaust Pipe
- Replaces: 17403-20170
- Part Name Code: 17403
- Item Weight: 5.10 Pounds
- Item Dimensions: 71.5 x 23.3 x 11.0 inches
- Condition: New
- Fitment Type: Direct Replacement
- SKU: 17403-0P100
- Warranty: This genuine part is guaranteed by Toyota's factory warranty.

2007 Toyota Highlander Exhaust Pipe, Front
Part Number: 17410-28490$271.34 MSRP: $354.84You Save: $83.50 (24%)Ships in 1-3 Business DaysProduct Specifications- Other Name: Pipe Assembly, Exhaust; Exhaust Pipe, Front; Front Pipe; Pipe Assembly, Exhaust, Front
- Position: Front
- Part Name Code: 17410
- Item Weight: 11.30 Pounds
- Item Dimensions: 49.1 x 19.1 x 9.8 inches
- Condition: New
- Fitment Type: Direct Replacement
- SKU: 17410-28490
- Warranty: This genuine part is guaranteed by Toyota's factory warranty.
2007 Toyota Highlander Exhaust Pipe, Front
Part Number: 17410-28480$291.70 MSRP: $381.47You Save: $89.77 (24%)Ships in 1-3 Business DaysProduct Specifications- Other Name: Pipe Assembly, Exhaust; Exhaust Pipe, Front; Front Pipe; Pipe Assembly, Exhaust, Front
- Position: Front
- Part Name Code: 17410
- Item Weight: 11.30 Pounds
- Item Dimensions: 52.0 x 18.9 x 9.6 inches
- Condition: New
- Fitment Type: Direct Replacement
- SKU: 17410-28480
- Warranty: This genuine part is guaranteed by Toyota's factory warranty.

2007 Toyota Highlander Pipe Assembly, Exhaust, Front
Part Number: 17410-20480$260.37 MSRP: $340.48You Save: $80.11 (24%)Ships in 1-3 Business DaysProduct Specifications- Other Name: Pipe Assembly, Exhaust; Exhaust Pipe
- Position: Front
- Part Name Code: 17410
- Item Weight: 11.30 Pounds
- Item Dimensions: 50.1 x 18.9 x 9.5 inches
- Condition: New
- Fitment Type: Direct Replacement
- SKU: 17410-20480
- Warranty: This genuine part is guaranteed by Toyota's factory warranty.

2007 Toyota Highlander Front Pipe
Part Number: 17410-20450$260.37 MSRP: $340.48You Save: $80.11 (24%)Ships in 1-3 Business DaysProduct Specifications- Other Name: Pipe Assembly, Exhaust; Exhaust Intermediate Pipe, Front; Exhaust Pipe; Pipe Assembly, Exhaust, Front
- Position: Front
- Part Name Code: 17410
- Item Weight: 11.10 Pounds
- Item Dimensions: 48.7 x 18.6 x 9.6 inches
- Condition: New
- Fitment Type: Direct Replacement
- SKU: 17410-20450
- Warranty: This genuine part is guaranteed by Toyota's factory warranty.

2007 Toyota Highlander Rear Muffler
Part Number: 17430-20150$277.96 MSRP: $363.50You Save: $85.54 (24%)Ships in 1-3 Business DaysProduct Specifications- Other Name: Pipe Assembly, Exhaust Tail; Exhaust Muffler; Direct-Fit Exhaust; Exhaust System Kit; Muffler; Pipe Assembly, Exhaust, Tail
- Part Name Code: 17430
- Item Weight: 11.10 Pounds
- Item Dimensions: 43.2 x 12.7 x 9.1 inches
- Condition: New
- Fitment Type: Direct Replacement
- SKU: 17430-20150
- Warranty: This genuine part is guaranteed by Toyota's factory warranty.

2007 Toyota Highlander Intermediate Pipe
Part Number: 17403-20190$228.79 MSRP: $299.20You Save: $70.41 (24%)Ships in 1-3 Business DaysProduct Specifications- Other Name: Pipe Sub-Assembly, Exhaust; Intermediate Pipe, Center; Exhaust System; Y Pipe; Connector Pipe; Extension; Pipe Sub-Assembly, Exhaust, Front
- Part Name Code: 17403
- Item Weight: 15.10 Pounds
- Item Dimensions: 70.1 x 22.2 x 10.5 inches
- Condition: New
- Fitment Type: Direct Replacement
- SKU: 17403-20190
- Warranty: This genuine part is guaranteed by Toyota's factory warranty.

2007 Toyota Highlander Intermediate Pipe, Center
Part Number: 17420-20350$1564.25 MSRP: $2099.68You Save: $535.43 (26%)Ships in 1-3 Business DaysProduct Specifications- Other Name: Pipe Assembly, Exhaust; Muffler Assembly; Direct-Fit Exhaust; System Kit; Tail Pipe; Center Pipe; Muffler & Pipe; Pipe Assembly, Exhaust, Center; Muffler
- Position: Center
- Part Name Code: 17420
- Item Weight: 15.30 Pounds
- Item Dimensions: 37.5 x 11.1 x 20.5 inches
- Condition: New
- Fitment Type: Direct Replacement
- SKU: 17420-20350
- Warranty: This genuine part is guaranteed by Toyota's factory warranty.

2007 Toyota Highlander Pipe Assembly, Exhaust, Center
Part Number: 17420-20400$1475.26 MSRP: $1980.23You Save: $504.97 (26%)Ships in 1-3 Business DaysProduct Specifications- Other Name: Pipe Assembly, Exhaust; Exhaust Muffler Assembly; Exhaust Pipe; Tail Pipe; Muffler
- Manufacturer Note: *114=TOYOTA/UA4/Y
- Position: Center
- Part Name Code: 17420
- Item Weight: 17.10 Pounds
- Item Dimensions: 102.8 x 39.0 x 12.3 inches
- Condition: New
- Fitment Type: Direct Replacement
- SKU: 17420-20400
- Warranty: This genuine part is guaranteed by Toyota's factory warranty.

2007 Toyota Highlander Intermediate Pipe, Center
Part Number: 17420-28460$1213.98 MSRP: $1629.52You Save: $415.54 (26%)Ships in 1-3 Business DaysProduct Specifications- Other Name: Pipe Assembly, Exhaust; Exhaust Muffler Assembly; Direct-Fit Exhaust; Exhaust System Kit; Exhaust Pipe; Center Pipe; Pipe Assembly, Exhaust, Center
- Position: Center
- Part Name Code: 17420
- Item Weight: 2.20 Pounds
- Item Dimensions: 7.7 x 4.2 x 8.8 inches
- Condition: New
- Fitment Type: Direct Replacement
- SKU: 17420-28460
- Warranty: This genuine part is guaranteed by Toyota's factory warranty.
2007 Toyota Highlander Exhaust Pipe
Looking for affordable OEM 2007 Toyota Highlander Exhaust Pipe? Explore our comprehensive catalogue of genuine 2007 Toyota Highlander Exhaust Pipe. All our parts are covered by the manufacturer's warranty. Plus, our straightforward return policy and speedy delivery service ensure an unparalleled shopping experience. We look forward to your visit!
2007 Toyota Highlander Exhaust Pipe Parts Q&A
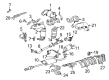
- Q: How to service and repair the exhaust pipe on 2007 Toyota Highlander?A: The service and repair process of the exhaust pipe starts with gasket removal and a comprehensive inspection of rusted bolts and nuts which need replacement when detected. The first step involves removing the exhaust pipe assembly tail through bolt removal of two pieces [A] then separating the pipe tail from the exhaust pipe center before extracting it from exhaust pipe support [B]. The technician should disconnect the heated oxygen sensor (bank 1 sensor 2) connector. Remove the exhaust pipe assembly center through the process of unscrewing 2 bolts to separate the pipe center from the exhaust pipe front followed by taking out the center from the 4 exhaust pipe supports. The exhaust pipe front requires removal of its 2 bolts to disconnect its pipe front section from the exhaust manifold. When installing the exhaust pipe assembly front you should first place a new gasket then install the front pipe toward the exhaust manifold using two bolts that require a torque of 48 Nm (489 kgf-cm, 35 ft. lbs). The installation process starts with pipe center attachment to the 4 exhaust pipe supports followed by adding a new gasket between pipe center and pipe front then torquing 2 bolts to 56 Nm (571 kgf-cm, 41 ft. lbs.). The heated oxygen sensor (bank 1 sensor 2) must go on the pipe front while being torqued to 44 Nm (449 kgf-cm, 32 ft. lbs.) as well as receiving 3 and 1/2 counterclockwise wire twists before installation. Post-installation checks should be performed to verify the wire remains untwisted requiring sensor replacement if necessary. As the final stage of installation secure the pipe tail to the supports by affixing it to the exhaust pipe center with two bolts which should be tightened to 48 Nm (489 kgf-cm, 35 ft. lbs.) then connect the pipe to all three supports. After assembly verify exhaust gas security before tightening the allocation points to prevent leaks while replacing harmed components.
Related 2007 Toyota Highlander Parts
 2007 Toyota Highlander Catalytic Converter
 2007 Toyota Highlander Exhaust Manifold
 2007 Toyota Highlander Muffler
 2007 Toyota Highlander PCV Valve
 2007 Toyota Highlander Canister Purge Valve
 2007 Toyota Highlander Diverter Valve
 2007 Toyota Highlander Exhaust Flange Gasket
 2007 Toyota Highlander Exhaust Hanger
 2007 Toyota Highlander Exhaust Heat Shield
 2007 Toyota Highlander Exhaust Manifold Gasket
 2007 Toyota Highlander Vapor Canister
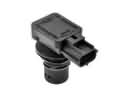 2007 Toyota Highlander Vapor Pressure Sensor