×
ToyotaParts- Hello
- Login or Register
- Quick Links
- Live Chat
- Track Order
- Parts Availability
- RMA
- Help Center
- Contact Us
- Shop for
- Toyota Parts
- Scion Parts
My Garage
My Account
Cart
OEM 2006 Toyota Matrix Fuel Injector
Gas Injector- Select Vehicle by Model
- Select Vehicle by VIN
Select Vehicle by Model
orMake
Model
Year
Select Vehicle by VIN
For the most accurate results, select vehicle by your VIN (Vehicle Identification Number).
1 Fuel Injector found

2006 Toyota Matrix Injector
Part Number: 23209-0D040$175.32 MSRP: $250.32You Save: $75.00 (30%)Ships in 1-2 Business DaysProduct Specifications- Other Name: Injector Set, Fuel; Fuel Injector; Injector Assembly, Fuel
- Manufacturer Note: (L)
- Replaces: 23209-22040
- Part Name Code: 23250
- Item Weight: 0.50 Pounds
- Item Dimensions: 3.5 x 1.8 x 1.4 inches
- Condition: New
- Fitment Type: Direct Replacement
- Require Quantity: 4
- SKU: 23209-0D040
- Warranty: This genuine part is guaranteed by Toyota's factory warranty.
2006 Toyota Matrix Fuel Injector
Looking for affordable OEM 2006 Toyota Matrix Fuel Injector? Explore our comprehensive catalogue of genuine 2006 Toyota Matrix Fuel Injector. All our parts are covered by the manufacturer's warranty. Plus, our straightforward return policy and speedy delivery service ensure an unparalleled shopping experience. We look forward to your visit!
2006 Toyota Matrix Fuel Injector Parts Q&A
- Q: How to replace the fuel injector on 2006 Toyota Matrix?A: The first step to replacing a fuel injector requires pressure discharge from the fuel system while you disconnect the battery negative terminal. Use a tool to remove the header cover number 2 after removing its two clips and two nuts. Connectors should detach the ventilation hose from the cylinder head cover. The process begins with fuel delivery pipe sub-assembly removal which requires disconnecting 4 fuel injector connectors then removing 3 wire harness clamps from clamp brackets and disconnecting fuel tube after taking off fuel pipe clamp No. 1. Pinch the connector retainer on the fuel tube before pulling it out to verify its cleanliness from outside materials and prevent part damage. Wrap the detached part with a protective vinyl bag. Push and pull actions should be used to release fuel tube connector and pipe when they become stuck. Start by removing 3 bolts from the fuel delivery pipe while keeping the fuel injectors secure until you successfully uninstall the pipe then eliminate the 2 delivery pipe spacers and 4 insulators from the cylinder head. The fuel injector assembly requires insertion of the 4 fuel injectors into the fuel delivery pipe after applying a light oil or gasoline coat to both the new O-ring and the delivery pipe contact surface. Next, check that the O-ring remains intact as well as ensure smooth injector rotation when installing the components. The installation process starts with delivering 4 new insulators inside the cylinder head and then adding the 2 delivery pipe No. 1 spacers with precise orientation. The 3 bolt installation of the fuel delivery pipe with installed fuel injectors can be temporarily tightened to check proper injector movement. To install the fuel tube properly align the connector to the pipe end and push until it clicks into position while checking for any signs of damage along the pipe. The torque specifications for bolt A are 19 N.M (194 kgf.cm, 14 ft.lbf) while bolt B requires 9.0 N.M (92 kgf.cm, 80 in.lbf). Check the fuel tube connector stability by pulling it and follow-up with the installation of fuel pipe clamp No. 1 as well as the 3 wire harness clamps before reconnecting the 4 fuel injector connectors. Screw the ventilation hose back to the cylinder head cover while orienting the hose clamp properly then attach the battery negative terminal with a torque setting at 5.4 N.m (55 kgf.cm, 48 in.lbf). Finish the installation by securing cylinder head cover No. 2 with 2 nuts and 2 clips while tightening them to 7.0 N.m (70 kgf.cm, 62 in.lbf).
Related 2006 Toyota Matrix Parts
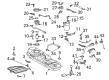
 2006 Toyota Matrix Fuel Pump
 2006 Toyota Matrix Fuel Tank
 2006 Toyota Matrix Mass Air Flow Sensor
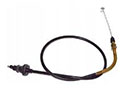 2006 Toyota Matrix Accelerator Cable
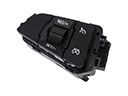 2006 Toyota Matrix Cruise Control Switch
 2006 Toyota Matrix Fuel Filler Neck
 2006 Toyota Matrix Fuel Line Clamps
 2006 Toyota Matrix Fuel Pressure Regulator
 2006 Toyota Matrix Fuel Pump Seal
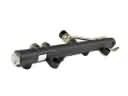 2006 Toyota Matrix Fuel Rail
 2006 Toyota Matrix Fuel Tank Lock Ring
 2006 Toyota Matrix Idle Control Valve