×
ToyotaParts- Hello
- Login or Register
- Quick Links
- Live Chat
- Track Order
- Parts Availability
- RMA
- Help Center
- Contact Us
- Shop for
- Toyota Parts
- Scion Parts
My Garage
My Account
Cart
OEM 2006 Toyota Camry Sway Bar Kit
Stabilizer Sway Bar Set- Select Vehicle by Model
- Select Vehicle by VIN
Select Vehicle by Model
orMake
Model
Year
Select Vehicle by VIN
For the most accurate results, select vehicle by your VIN (Vehicle Identification Number).
7 Sway Bar Kits found

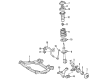
2006 Toyota Camry Stabilizer Bar, Front
Part Number: 48811-AA060$137.70 MSRP: $194.92You Save: $57.22 (30%)Ships in 1-3 Business DaysProduct Specifications- Other Name: Bar, Stabilizer, Front; Suspension Stabilizer Bar, Front; Sway Bar
- Position: Front
- Part Name Code: 48811
- Item Weight: 7.80 Pounds
- Item Dimensions: 44.2 x 12.1 x 4.9 inches
- Condition: New
- Fitment Type: Direct Replacement
- SKU: 48811-AA060
- Warranty: This genuine part is guaranteed by Toyota's factory warranty.
2006 Toyota Camry Stabilizer Bar, Front
Part Number: 48811-AA020$130.88 MSRP: $185.29You Save: $54.41 (30%)Ships in 1-3 Business DaysProduct Specifications- Other Name: Bar, Stabilizer, Front; Suspension Stabilizer Bar, Front; Sway Bar
- Manufacturer Note: OD=23
- Position: Front
- Replaces: 48811-33130
- Part Name Code: 48811
- Item Weight: 7.50 Pounds
- Item Dimensions: 45.0 x 12.6 x 5.0 inches
- Condition: New
- Fitment Type: Direct Replacement
- SKU: 48811-AA020
- Warranty: This genuine part is guaranteed by Toyota's factory warranty.

2006 Toyota Camry Stabilizer Bar, Front
Part Number: 48811-33140$132.88 MSRP: $188.11You Save: $55.23 (30%)Ships in 1-3 Business DaysProduct Specifications- Other Name: Bar, Stabilizer; Suspension Stabilizer Bar, Front; Sway Bar; Bar, Stabilizer, Front
- Position: Front
- Part Name Code: 48811
- Item Weight: 7.50 Pounds
- Item Dimensions: 45.5 x 12.7 x 5.1 inches
- Condition: New
- Fitment Type: Direct Replacement
- SKU: 48811-33140
- Warranty: This genuine part is guaranteed by Toyota's factory warranty.

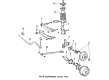
2006 Toyota Camry Stabilizer Bar, Rear
Part Number: 48812-AA090$102.85 MSRP: $144.36You Save: $41.51 (29%)Ships in 1-3 Business DaysProduct Specifications- Other Name: Bar, Stabilizer, Rear; Suspension Stabilizer Bar, Rear; Sway Bar
- Manufacturer Note: MEXICO SPEC
- Position: Rear
- Replaces: 48812-33180
- Part Name Code: 48812
- Item Weight: 5.20 Pounds
- Item Dimensions: 42.4 x 9.4 x 3.6 inches
- Condition: New
- Fitment Type: Direct Replacement
- SKU: 48812-AA090
- Warranty: This genuine part is guaranteed by Toyota's factory warranty.

2006 Toyota Camry Stabilizer Bar, Rear
Part Number: 48812-AA050$98.94 MSRP: $138.88You Save: $39.94 (29%)Ships in 1-3 Business DaysProduct Specifications- Other Name: Bar, Stabilizer, Rear; Suspension Stabilizer Bar, Rear; Sway Bar
- Position: Rear
- Replaces: 48812-33170
- Part Name Code: 48812
- Item Weight: 5.00 Pounds
- Item Dimensions: 54.1 x 9.6 x 9.7 inches
- Condition: New
- Fitment Type: Direct Replacement
- SKU: 48812-AA050
- Warranty: This genuine part is guaranteed by Toyota's factory warranty.

2006 Toyota Camry Stabilizer Bar, Rear
Part Number: 48812-AA071$86.23 MSRP: $121.05You Save: $34.82 (29%)Ships in 1-3 Business DaysProduct Specifications- Other Name: Bar, Stabilizer, Rear; Suspension Stabilizer Bar, Rear; Sway Bar
- Position: Rear
- Part Name Code: 48812
- Item Weight: 5.40 Pounds
- Item Dimensions: 41.1 x 9.5 x 3.4 inches
- Condition: New
- Fitment Type: Direct Replacement
- SKU: 48812-AA071
- Warranty: This genuine part is guaranteed by Toyota's factory warranty.
2006 Toyota Camry Bar, Stabilizer, Rear
Part Number: 48812-33200$186.50 MSRP: $266.29You Save: $79.79 (30%)Ships in 1-3 Business DaysProduct Specifications- Other Name: Sway Bar
- Position: Rear
- Part Name Code: 48812
- Item Weight: 5.00 Pounds
- Item Dimensions: 41.5 x 9.4 x 3.5 inches
- Condition: New
- Fitment Type: Direct Replacement
- SKU: 48812-33200
- Warranty: This genuine part is guaranteed by Toyota's factory warranty.
2006 Toyota Camry Sway Bar Kit
Looking for affordable OEM 2006 Toyota Camry Sway Bar Kit? Explore our comprehensive catalogue of genuine 2006 Toyota Camry Sway Bar Kit. All our parts are covered by the manufacturer's warranty. Plus, our straightforward return policy and speedy delivery service ensure an unparalleled shopping experience. We look forward to your visit!
2006 Toyota Camry Sway Bar Kit Parts Q&A
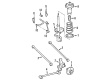
- Q: How to replace the rear Sway Bar Kit on 2006 Toyota Camry?A: The first step to replace the rear sway bar kit begins with removing the rear wheel. The first step to change the rear sway bar link assembly on the left-hand side begins with removing 2 nuts and the sway bar link followed by checking if the ball joint turns with the nut before using a 5 mm hexagon wrench to maintain the stud. Follow the exact step for the right-hand sway bar link assembly installation. First test the left-hand sway bar link assembly ball joint stud by moving it 5 times before tightening the nut. Then perform consistent nut rotation using a torque wrench at 2-4 seconds per turn until reaching the fifth turn. Adjust the turning torque between 0.05-1.0 Nm corresponding to 0.5-10 kgf-cm or 0.4-8.7 inch lbs. Take away the rear sway bar kit by uninstalling its 8 bolts along with 2 No. 1 brackets and 2 bushings. The installation should begin with a correct placement of the bushing and bracket on the left-hand side which requires using the 4 bolts along with 19 Nm (195 kgf-cm, 14 ft. lbs.) of torque while noting that two bolt types (A, B) need proper selection for correct installation because the bushing needs to face the inner side of the sway bar bushing stopper. Secure the left-hand side rear sway bar link assembly with two nuts through torquing them to 39 Nm (400 kgf-cm, 29 ft. lbs.). In case the ball joint rotates with the nut use a 5mm hexagon wrench to stabilize the stud. The same method should be applied to assemble the right-hand side rear sway bar link assembly. Reinstall the rear wheel after achieving a torque of 103 Nm that amounts to 1,050 kgf-cm or 76 ft. lbs.
Related 2006 Toyota Camry Parts
 2006 Toyota Camry Ball Joint
 2006 Toyota Camry Sway Bar Link
 2006 Toyota Camry Coil Springs
 2006 Toyota Camry Rear Crossmember
 2006 Toyota Camry Axle Shaft
 2006 Toyota Camry Bump Stop
 2006 Toyota Camry Coil Spring Insulator
 2006 Toyota Camry Crossmember Bushing
 2006 Toyota Camry Front Cross-Member
 2006 Toyota Camry Lateral Link
 2006 Toyota Camry Strut Housing
 2006 Toyota Camry Sway Bar Bracket