×
ToyotaParts- Hello
- Login or Register
- Quick Links
- Live Chat
- Track Order
- Parts Availability
- RMA
- Help Center
- Contact Us
- Shop for
- Toyota Parts
- Scion Parts
My Garage
My Account
Cart
OEM 2006 Toyota 4Runner Power Steering Pump
Power Steering Pump Unit- Select Vehicle by Model
- Select Vehicle by VIN
Select Vehicle by Model
orMake
Model
Year
Select Vehicle by VIN
For the most accurate results, select vehicle by your VIN (Vehicle Identification Number).
2 Power Steering Pumps found


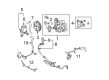
2006 Toyota 4Runner Power Steering Pump
Part Number: 44310-35660$341.06 MSRP: $499.82You Save: $158.76 (32%)Ships in 1-3 Business DaysProduct Specifications- Other Name: Pump Assembly, Vane; Pump
- Replaces: 44310-35650
- Part Name Code: 44310
- Item Weight: 4.10 Pounds
- Item Dimensions: 8.1 x 5.9 x 5.0 inches
- Condition: New
- Fitment Type: Direct Replacement
- SKU: 44310-35660
- Warranty: This genuine part is guaranteed by Toyota's factory warranty.

2006 Toyota 4Runner Power Steering Pump
Part Number: 44320-35610$287.16 MSRP: $410.00You Save: $122.84 (30%)Product Specifications- Other Name: Pump Assembly, L/Pulley; Pump Assembly, Vane; Pump
- Part Name Code: 44320
- Item Weight: 11.10 Pounds
- Item Dimensions: 8.3 x 6.6 x 5.5 inches
- Condition: New
- Fitment Type: Direct Replacement
- SKU: 44320-35610
- Warranty: This genuine part is guaranteed by Toyota's factory warranty.
2006 Toyota 4Runner Power Steering Pump
Looking for affordable OEM 2006 Toyota 4Runner Power Steering Pump? Explore our comprehensive catalogue of genuine 2006 Toyota 4Runner Power Steering Pump. All our parts are covered by the manufacturer's warranty. Plus, our straightforward return policy and speedy delivery service ensure an unparalleled shopping experience. We look forward to your visit!
2006 Toyota 4Runner Power Steering Pump Parts Q&A
- Q: How to service and repair the power steering pump on 2006 Toyota 4Runner?A: Service and repairing the power steering pump requires you to drain power steering fluid and remove the air cleaner assembly first. First disconnect hose No.1 between the oil reservoir and pump while counterclockwise releasing the belt tensioner to remove the vane pump V belt. The pressure feed tube assembly can be removed when you uninstall the union bolt along with its gasket. Use a Torx(R) socket (E10) together with the stud bolt in order to disassemble the vane pump assembly after unscrewing its bolts and nut. An examination of the vane pump rotation torque must be performed to verify smooth operation with no strange noises while preserving a maximum torque value at 0.28 Nm (2.8 kgf-cm or 2.4 inch lbs.). Cold weld the vane pump pulley stationary for nut loosening using the Special Service Tool rated as 09960-10010 (09962-01000, 09963-01000). Place the power steering suction port union and O-ring on one side as you remove the pressure port union with flow control valve and spring before taking out the O-ring from the pressure port union. The four bolts securing the vane pump housing rear must be removed to achieve dismounting. A plastic hammer may assist detaching the wave washer and side plate when needed along with removing the two O-rings. First remove the snap ring which allows access to the side plate and wave washer to extract them and finally remove the cam ring and vane pump rotor with ten vane plates while maintaining control of the plates. Extract the housing oil seal from the vane pump front after removing its shaft and two straight pins while protecting the housing front with vinyl tape-wrapped screwdriver. Use micrometer and caliper gauge to measure oil clearance until it reaches between 0.03 - 0.05 mm (0.0012 - 0.0020 inch) standards while staying below the maximum limit of 0.07 mm (0.0028 inch). The technical specifications for the ten vane plates require an 8.6 mm (0.33858 inch) measure of height alongside a 1.397 mm (0.05500 inch) measurement for thickness and a 14.991 mm (0.59020 inch) length. Verify that the vane pump rotor groove clearance with vane plate matches the standard 0.033 mm (0.00130 inch) maximum value. Keep a flow control valve under test by applying power steering fluid then verify it fits into the hole with no leaks during compressed air inspection. Free length measurement of the flow control valve compression spring should be at least 33.2 mm (1.307 inches). Replacement of the pressure union seat in the pressure port union becomes necessary when damage appears. To install the new oil seal lip you must use Special Service Tools: 09950-60010 (09951-00320), 09950-70010 (09951-07100) that position the lip with proper face direction while applying power steering fluid coating. Instal the vane pump shaft first before tapping the two new pins into place using a plastic hammer but handle them gently to avoid damage. Place the cam ring with its inscribed mark showing from outside before positioning the vane pump rotor and installing a new snap ring. Also install the ten plates facing outward while positioning the new gasket on the front housing. Install the vane pump side plate rear while setting its holes against the straight pins before mounting the rear housing using power steering fluid-coated wave washer and new O-rings together with four bolts torqued to 24 Nm (240 kgf cm, 17 ft lbs). The pressure port union requires installation while featuring a primed O-ring with power steering fluid and a spring which should be torqued at 83 Nm (850 kgf-cm, 61 ft. lbs.). Use the power steering suction port union with a new O-ring before torqueing it at 13 Nm (130 kgf-cm, 9 ft. lbs.). Reinstall the vane pump pulley and complete its nut installation by using Special Service Tool: 09960-10010 (09962-01000, 09963-01000) to prevent pulley rotation during torque application of the new pulley set nut to 44 Nm (449 kgf-cm, 32 ft. lbs.). Recheck the vane pump rotation torque until it falls below 0.28 Nm (2.8 kgf-cm, 2.4 inch lbs.) after which you should mount the vane pump assembly by using a Torx(R) socket (E10) to fasten the stud bolt to 22 Nm (224 kgf-cm, 16 ft. lbs.) and bolt down the two bolts and nut to 43 Nm (438 kgf-cm, 32 ft. lbs.). The installation process begins with reattaching the vane pump V belt and follows with pressure feed tube assembly joining using a new gasket torqued to 51 Nm (520 kgf-cm, 38 ft. lbs.). Next, the oil reservoir should be connected to pump hose No.1 and the air cleaner assembly needs to be reinstated. Subsequently, power steering fluid must be added and the system needs bleeding before a fluid leak inspection takes place.
Related 2006 Toyota 4Runner Parts
 2006 Toyota 4Runner Steering Wheel
 2006 Toyota 4Runner Rack And Pinion
 2006 Toyota 4Runner Steering Angle Sensor
 2006 Toyota 4Runner Drag Link
 2006 Toyota 4Runner Fuel Line Clamps
 2006 Toyota 4Runner Power Steering Hose
 2006 Toyota 4Runner Power Steering Reservoir
 2006 Toyota 4Runner Rack and Pinion Boot
 2006 Toyota 4Runner Steering Column
 2006 Toyota 4Runner Tie Rod End
 2006 Toyota 4Runner Turn Signal Switch
 2006 Toyota 4Runner Wiper Switch