×
ToyotaParts- Hello
- Login or Register
- Quick Links
- Live Chat
- Track Order
- Parts Availability
- RMA
- Help Center
- Contact Us
- Shop for
- Toyota Parts
- Scion Parts
My Garage
My Account
Cart
OEM 2004 Toyota MR2 Spyder Throttle Body
Fuel Injection Throttle Body- Select Vehicle by Model
- Select Vehicle by VIN
Select Vehicle by Model
orMake
Model
Year
Select Vehicle by VIN
For the most accurate results, select vehicle by your VIN (Vehicle Identification Number).
2 Throttle Bodies found


2004 Toyota MR2 Spyder Throttle Body
Part Number: 22030-20051$409.84 MSRP: $600.62You Save: $190.78 (32%)Ships in 1-3 Business DaysProduct Specifications- Other Name: Body Assembly, Throttle; Fuel Injection Throttle Body Assembly; Fuel Injection ETB Assembly
- Replaces: 22030-0A031, 22030-20020, 22030-0A030, 22030-20050, 22030-0A010, 22030-22010
- Item Weight: 2.70 Pounds
- Item Dimensions: 9.0 x 7.7 x 5.9 inches
- Condition: New
- SKU: 22030-20051
- Warranty: This genuine part is guaranteed by Toyota's factory warranty.
 Product Specifications
- Other Name: Body Assembly, Throttle
- Part Name Code: 22210
- Item Weight: 2.60 Pounds
- Item Dimensions: 8.8 x 7.6 x 5.7 inches
- Condition: New
- Fitment Type: Direct Replacement
- SKU: 22210-22100
- Warranty: This genuine part is guaranteed by Toyota's factory warranty.
2004 Toyota MR2 Spyder Throttle Body
Looking for affordable OEM 2004 Toyota MR2 Spyder Throttle Body? Explore our comprehensive catalogue of genuine 2004 Toyota MR2 Spyder Throttle Body. All our parts are covered by the manufacturer's warranty. Plus, our straightforward return policy and speedy delivery service ensure an unparalleled shopping experience. We look forward to your visit!
2004 Toyota MR2 Spyder Throttle Body Parts Q&A
- Q: How to Service and Repair the Throttle Body on 2004 Toyota MR2 Spyder?A: The service and repair of the Throttle Body (smt) begins with draining engine coolant then removing the suspension upper brace and disconnecting the vsv for the evap hose and finally removing the vsv for the evap together with the air cleaner hose. Service of the Throttle Body (smt) requires disconnecting the accelerator cable along with the removal of the throttle body through disconnecting the throttle position sensor connector, throttle control motor connector, pcv hose, and the two water bypass hoses, followed by removing the two bolts and throttle body bracket and then removing the two bolts, two nuts, throttle body and two gaskets from the intake manifold. The installation begins by placing two new gaskets onto the intake manifold followed by connecting the accelerator position sensor connector and securing the throttle body with two bolts and two nuts which require torquing to 30 n.m (305 kgf.cm, 22 ft.lbf) and then proceeding to fasten the throttle body bracket with two bolts torqued to 49 n.m (500 kgf.cm, 36 ft.lbf). First connect both water bypass hoses and the pcv hose alongside the throttle control motor connector and throttle position sensor connector before you reconnect the accelerator cable followed by installing vsv for the evap with its air cleaner hose and vsv for the evap hose then reinstall the suspension upper brace followed by engine coolant filling in the radiator. A test of the throttle control motor requires measurement of resistance between terminal 1 (m+) and 2 (m-) at 20 degrees Celsius (68 degrees Fahrenheit) to verify it falls within 0.3 - 100 Ohms while measuring clutch resistance between 3 (cl-) and 4 (cl+) to confirm it lies between 4.2 - 5.2 Ohms at 20 degrees Celsius (68 degrees Fahrenheit); replace the throttle body assembly if the measured values are outside these specifications. A faulty ignition or fuel controls may be indicated when testing the throttle position sensor resistance at 20 degrees Celsius (68 degrees Fahrenheit). The sensor replacement is necessary if resistance falls outside its range of 1.2 - 3.2 kOhms. Examine the accelerator position sensor to check its resistance compliance with the specified range. To replace the throttle position sensor first remove its two set screws and the sensor then install a new unit while setting the throttle angle to about 4% by connecting the throttle position sensor connector and using a hand-held tester or obd II scan tool to verify the standard value of 15.2 plus or minus 0.8 % where you will tighten the screws to 2.0 n.m (20 kgf.cm, 18 in.lbf) and recheck the percentage. Execute the adjustment process again if required. Before finishing the procedure, paint the set screws while turning off the ignition switch and removing the throttle position sensor connector with its test equipment. Replace the accelerator position sensor by removing its four bolts and sensor then install the new sensor using 5.4 n.m (55 kgf.cm, 48 in.lbf) torque value and verify that the accel pos #1 (vpa) voltage meets the range of 0.3 - 0.9 V. Complete the operation check of the system after installing the throttle body.
Related 2004 Toyota MR2 Spyder Parts
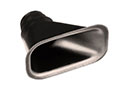 2004 Toyota MR2 Spyder Air Duct
 2004 Toyota MR2 Spyder Air Filter
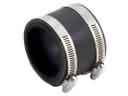 2004 Toyota MR2 Spyder Air Intake Coupling
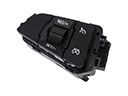 2004 Toyota MR2 Spyder Cruise Control Switch
 2004 Toyota MR2 Spyder Fuel Filter
 2004 Toyota MR2 Spyder Fuel Pressure Regulator
 2004 Toyota MR2 Spyder Fuel Pump Seal
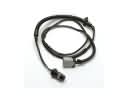 2004 Toyota MR2 Spyder Fuel Pump Wiring Harness
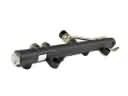 2004 Toyota MR2 Spyder Fuel Rail
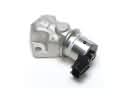 2004 Toyota MR2 Spyder Idle Control Valve
 2004 Toyota MR2 Spyder Mass Air Flow Sensor
 2004 Toyota MR2 Spyder Throttle Body Gasket