×
ToyotaParts- Hello
- Login or Register
- Quick Links
- Live Chat
- Track Order
- Parts Availability
- RMA
- Help Center
- Contact Us
- Shop for
- Toyota Parts
- Scion Parts
My Garage
My Account
Cart
OEM 2004 Toyota Camry Sway Bar Kit
Stabilizer Sway Bar Set- Select Vehicle by Model
- Select Vehicle by VIN
Select Vehicle by Model
orMake
Model
Year
Select Vehicle by VIN
For the most accurate results, select vehicle by your VIN (Vehicle Identification Number).
5 Sway Bar Kits found

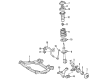
2004 Toyota Camry Stabilizer Bar, Front
Part Number: 48811-AA060$137.70 MSRP: $194.92You Save: $57.22 (30%)Ships in 1-3 Business DaysProduct Specifications- Other Name: Bar, Stabilizer, Front; Suspension Stabilizer Bar, Front; Sway Bar
- Position: Front
- Part Name Code: 48811
- Item Weight: 7.80 Pounds
- Item Dimensions: 44.2 x 12.1 x 4.9 inches
- Condition: New
- Fitment Type: Direct Replacement
- SKU: 48811-AA060
- Warranty: This genuine part is guaranteed by Toyota's factory warranty.
2004 Toyota Camry Stabilizer Bar, Front
Part Number: 48811-AA020$130.88 MSRP: $185.29You Save: $54.41 (30%)Ships in 1-3 Business DaysProduct Specifications- Other Name: Bar, Stabilizer, Front; Suspension Stabilizer Bar, Front; Sway Bar
- Manufacturer Note: OD=23
- Position: Front
- Replaces: 48811-33130
- Part Name Code: 48811
- Item Weight: 7.50 Pounds
- Item Dimensions: 45.0 x 12.6 x 5.0 inches
- Condition: New
- Fitment Type: Direct Replacement
- SKU: 48811-AA020
- Warranty: This genuine part is guaranteed by Toyota's factory warranty.

2004 Toyota Camry Stabilizer Bar, Front
Part Number: 48811-33140$132.88 MSRP: $188.11You Save: $55.23 (30%)Ships in 1-3 Business DaysProduct Specifications- Other Name: Bar, Stabilizer; Suspension Stabilizer Bar, Front; Sway Bar; Bar, Stabilizer, Front
- Position: Front
- Part Name Code: 48811
- Item Weight: 7.50 Pounds
- Item Dimensions: 45.5 x 12.7 x 5.1 inches
- Condition: New
- Fitment Type: Direct Replacement
- SKU: 48811-33140
- Warranty: This genuine part is guaranteed by Toyota's factory warranty.

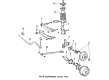
2004 Toyota Camry Stabilizer Bar, Rear
Part Number: 48812-AA090$102.85 MSRP: $144.36You Save: $41.51 (29%)Ships in 1-3 Business DaysProduct Specifications- Other Name: Bar, Stabilizer, Rear; Suspension Stabilizer Bar, Rear; Sway Bar
- Manufacturer Note: MEXICO SPEC
- Position: Rear
- Replaces: 48812-33180
- Part Name Code: 48812
- Item Weight: 5.20 Pounds
- Item Dimensions: 42.4 x 9.4 x 3.6 inches
- Condition: New
- Fitment Type: Direct Replacement
- SKU: 48812-AA090
- Warranty: This genuine part is guaranteed by Toyota's factory warranty.

2004 Toyota Camry Stabilizer Bar, Rear
Part Number: 48812-AA050$98.94 MSRP: $138.88You Save: $39.94 (29%)Ships in 1-3 Business DaysProduct Specifications- Other Name: Bar, Stabilizer, Rear; Suspension Stabilizer Bar, Rear; Sway Bar
- Position: Rear
- Replaces: 48812-33170
- Part Name Code: 48812
- Item Weight: 5.00 Pounds
- Item Dimensions: 54.1 x 9.6 x 9.7 inches
- Condition: New
- Fitment Type: Direct Replacement
- SKU: 48812-AA050
- Warranty: This genuine part is guaranteed by Toyota's factory warranty.
2004 Toyota Camry Sway Bar Kit
Looking for affordable OEM 2004 Toyota Camry Sway Bar Kit? Explore our comprehensive catalogue of genuine 2004 Toyota Camry Sway Bar Kit. All our parts are covered by the manufacturer's warranty. Plus, our straightforward return policy and speedy delivery service ensure an unparalleled shopping experience. We look forward to your visit!
2004 Toyota Camry Sway Bar Kit Parts Q&A
- Q: How to replace the rear Sway Bar Kit on 2004 Toyota Camry?A: Workers must remove the rear wheel before starting replacement of the rear sway bar kit. The removal of the left-hand side rear sway bar link assembly begins with removing 2 nuts and the sway bar link; however if the ball joint turns with the nut then use a 5 mm hexagon wrench to secure the stud. The same step will need to be followed for the right-hand side sway bar link assembly. The left-hand side sway bar link assembly ball joint stud requires testing through back-and-forth motion five times before installing the nut. A torque wrench should then be used to rotate the nut continuously for two to four seconds per turn while measuring torque on the fifth turn aiming for a range of 0.05 Nm to 1.0 Nm (0.5 kgf-cm to 10 kgf-cm or 0.4 inch lbs. to 8.7 inch lbs.). Remove the rear sway bar kit by uninstalling its 8 bolts and 2 bent brackets with 2 bushings. The installation begins with placement of the bushing and bracket on the left-hand side where you should tighten the 4 bolts to 19 Nm (195 kgf-cm, 14 ft. lbs.) under the condition that you install the correct bolt of type A or B and position the bushing behind the bushing stopper that sits on the sway bar kit. Install the rear sway bar link assembly on the left-hand side while tightening it with 2 nuts until a torque of 39 Nm (400 kgf-cm, 29 ft. lbs.) is achieved; however, use a hexagon (5 mm) wrench to stabilize the stud because the ball joint rotates during nutting. Proceed with installation of the sway bar link assembly on the right-hand side using the same process. After installation of the rear wheel check that you achieve a torque measurement of 103 Nm (1,050 kgf-cm, 76 ft. lbs.).
Related 2004 Toyota Camry Parts
 2004 Toyota Camry Ball Joint
 2004 Toyota Camry Sway Bar Link
 2004 Toyota Camry Coil Springs
 2004 Toyota Camry Rear Crossmember
 2004 Toyota Camry Axle Shaft
 2004 Toyota Camry Bump Stop
 2004 Toyota Camry Coil Spring Insulator
 2004 Toyota Camry Crossmember Bushing
 2004 Toyota Camry Front Cross-Member
 2004 Toyota Camry Lateral Link
 2004 Toyota Camry Strut Housing
 2004 Toyota Camry Sway Bar Bracket