×
ToyotaParts- Hello
- Login or Register
- Quick Links
- Live Chat
- Track Order
- Parts Availability
- RMA
- Help Center
- Contact Us
- Shop for
- Toyota Parts
- Scion Parts
My Garage
My Account
Cart
OEM 2003 Toyota Echo Air Bag
Air Bag Module- Select Vehicle by Model
- Select Vehicle by VIN
Select Vehicle by Model
orMake
Model
Year
Select Vehicle by VIN
For the most accurate results, select vehicle by your VIN (Vehicle Identification Number).
2 Air Bags found

2003 Toyota Echo Passenger Air Bag
Part Number: 73970-52010-E0$737.14 MSRP: $1080.29You Save: $343.15 (32%)Ships in 1-3 Business DaysProduct Specifications- Other Name: Air Bag Assembly, Instrument Panel; Instrument Panel Air Bag, Upper; Air Bag Assembly, Instrument Panel Passenger
- Manufacturer Note: SANDAL WOOD,TRIM4#
- Part Name Code: 73970A
- Item Weight: 9.70 Pounds
- Item Dimensions: 15.7 x 11.6 x 8.6 inches
- Condition: New
- Fitment Type: Direct Replacement
- SKU: 73970-52010-E0
- Warranty: This genuine part is guaranteed by Toyota's factory warranty.
- Product Specifications
- Other Name: Air Bag Assembly, Instrument Panel; Instrument Panel Air Bag, Upper; Passenger Inflator Module; Air Bag Assembly, Instrument Panel Passenger
- Replaces: 73970-52010-B0
- Part Name Code: 73970A
- Item Weight: 9.80 Pounds
- Item Dimensions: 15.4 x 11.2 x 8.8 inches
- Condition: New
- Fitment Type: Direct Replacement
- SKU: 73970-52010-B2
- Warranty: This genuine part is guaranteed by Toyota's factory warranty.
2003 Toyota Echo Air Bag
Looking for affordable OEM 2003 Toyota Echo Air Bag? Explore our comprehensive catalogue of genuine 2003 Toyota Echo Air Bag. All our parts are covered by the manufacturer's warranty. Plus, our straightforward return policy and speedy delivery service ensure an unparalleled shopping experience. We look forward to your visit!
2003 Toyota Echo Air Bag Parts Q&A
- Q: What should be done if the side Air Bag assembly has been deployed or found to be faulty on 2003 Toyota Echo?A: Change the seatback assembly or the seat cover whenever the side Air Bag assembly is deployed or shows evidence of fault after inspections or has cuts along with frayed seams. During inspection replacement is needed for the side Air Bag assembly or seatback cover when they prove faulty or when the seatback assembly experienced any dropping incident. The correct procedure must be followed during both the removal and installation steps of seatback assembly work.
Related 2003 Toyota Echo Parts
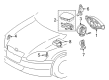
 2003 Toyota Echo Ignition Coil
 2003 Toyota Echo Air Bag Control Module
 2003 Toyota Echo Air Bag Sensor
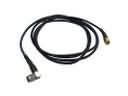 2003 Toyota Echo Antenna Cable
 2003 Toyota Echo Clock Spring
 2003 Toyota Echo Coolant Temperature Sensor
 2003 Toyota Echo Engine Control Module
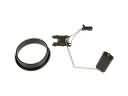 2003 Toyota Echo Fuel Level Sensor
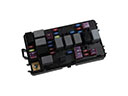 2003 Toyota Echo Fuse
 2003 Toyota Echo Horn
 2003 Toyota Echo Neutral Safety Switch
 2003 Toyota Echo Seat Belt