×
ToyotaParts- Hello
- Login or Register
- Quick Links
- Live Chat
- Track Order
- Parts Availability
- RMA
- Help Center
- Contact Us
- Shop for
- Toyota Parts
- Scion Parts
My Garage
My Account
Cart
OEM 2003 Toyota Corolla Air Bag Sensor
Air Bag Impact Sensor- Select Vehicle by Model
- Select Vehicle by VIN
Select Vehicle by Model
orMake
Model
Year
Select Vehicle by VIN
For the most accurate results, select vehicle by your VIN (Vehicle Identification Number).
6 Air Bag Sensors found


2003 Toyota Corolla Position Sensor, Passenger Side
Part Number: 89178-06020$79.26 MSRP: $111.27You Save: $32.01 (29%)Ships in 1-2 Business DaysProduct Specifications- Other Name: Sensor, Seat Position; Seat Track Position Sensor, Left, Right; Air Bag Sensor; Occupant Sensor; Seat; Sensor, Seat Position Air Bag
- Position: Passenger Side
- Part Name Code: 89178A
- Item Weight: 0.50 Pounds
- Item Dimensions: 2.1 x 1.6 x 1.3 inches
- Condition: New
- Fitment Type: Direct Replacement
- SKU: 89178-06020
- Warranty: This genuine part is guaranteed by Toyota's factory warranty.

2003 Toyota Corolla Diagnostic Module
Part Number: 89170-02L00$164.58 MSRP: $232.98You Save: $68.40 (30%)Ships in 1-3 Business DaysProduct Specifications- Other Name: Sensor Assembly, Air Bag; Air Bag Control Module; Diagnostic Unit
- Replaces: 89170-02191
- Item Weight: 2.20 Pounds
- Condition: New
- SKU: 89170-02L00
- Warranty: This genuine part is guaranteed by Toyota's factory warranty.
2003 Toyota Corolla Diagnostic Module
Part Number: 89170-02L10$190.76 MSRP: $272.36You Save: $81.60 (30%)Ships in 1-3 Business DaysProduct Specifications- Other Name: Sensor Assembly, Air Bag; Air Bag Control Module; Diagnostic Unit
- Replaces: 89170-02201
- Condition: New
- SKU: 89170-02L10
- Warranty: This genuine part is guaranteed by Toyota's factory warranty.

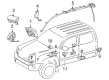
2003 Toyota Corolla Side Impact Sensor
Part Number: 89860-02040$203.63 MSRP: $249.73You Save: $46.10 (19%)Ships in 1-3 Business DaysProduct Specifications- Other Name: Sensor Assembly, Side Air Bag; Air Bag Impact Sensor; Air Bag Sensor; Side Sensor; Sensor Assembly, Side Air Bag, Passenger Side; Sensor Assembly, Side Air Bag, Driver Side
- Item Weight: 0.60 Pounds
- Item Dimensions: 4.3 x 2.6 x 2.0 inches
- Condition: New
- Fitment Type: Direct Replacement
- SKU: 89860-02040
- Warranty: This genuine part is guaranteed by Toyota's factory warranty.


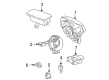
 Product Specifications
- Other Name: Sensor, Air Bag, Front; Air Bag Impact Sensor, Front Right; Air Bag Sensor; Front Sensor; Sensor, Air Bag, Front Passenger Side
- Position: Front Passenger Side
- Part Name Code: 89173A
- Item Weight: 0.70 Pounds
- Item Dimensions: 4.7 x 2.8 x 2.2 inches
- Condition: New
- Fitment Type: Direct Replacement
- SKU: 89173-19295
- Warranty: This genuine part is guaranteed by Toyota's factory warranty.
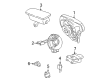
- Product Specifications
- Other Name: Sensor, Air Bag, Front; Air Bag Impact Sensor, Front Left; Air Bag Sensor; Front Sensor; Sensor, Air Bag, Front Driver Side
- Position: Front Driver Side
- Part Name Code: 89174A
- Item Weight: 0.70 Pounds
- Item Dimensions: 4.6 x 2.9 x 2.3 inches
- Condition: New
- Fitment Type: Direct Replacement
- SKU: 89174-19095
- Warranty: This genuine part is guaranteed by Toyota's factory warranty.
2003 Toyota Corolla Air Bag Sensor
Looking for affordable OEM 2003 Toyota Corolla Air Bag Sensor? Explore our comprehensive catalogue of genuine 2003 Toyota Corolla Air Bag Sensor. All our parts are covered by the manufacturer's warranty. Plus, our straightforward return policy and speedy delivery service ensure an unparalleled shopping experience. We look forward to your visit!
2003 Toyota Corolla Air Bag Sensor Parts Q&A
- Q: How to service and repair the front Air Bag sensor on 2003 Toyota Corolla?A: The service procedure for front Air Bag sensor repair begins with disconnecting both the Air Bag front sensor and side Air Bag sensor using the arrow-guided sliding motion of the outer flank sides. Unlock the connectors by freeing their locks then safely disconnect them while keeping both flank sides of the outer to prevent any obstruction. Reconnect the male sensor to the female port by putting them together into the same direction as labeled while ensuring no rubbing occurs. After proper fitting the outer part automatically moves backward before you can press it back to its original placement. The connectors will detach when the fitting fails before reaching its complete position. Run the connectors into their proper position until they lock completely before checking their secure fit by trying to pull slightly on the connectors. The outer should return to its original position while a locking sound should be heard during the connection process. The fitter should not keep holding the outer part nor should they touch the fitting parts throughout the operation.
Related 2003 Toyota Corolla Parts
 2003 Toyota Corolla Clock Spring
 2003 Toyota Corolla Knock Sensor
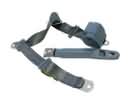 2003 Toyota Corolla Seat Belt
 2003 Toyota Corolla Coolant Temperature Sensor
 2003 Toyota Corolla Ignition Lock Cylinder
 2003 Toyota Corolla Power Window Switch
 2003 Toyota Corolla Relay
 2003 Toyota Corolla Air Bag
 2003 Toyota Corolla Air Bag Control Module
 2003 Toyota Corolla Antenna Cable
 2003 Toyota Corolla Back Up Light Switch
 2003 Toyota Corolla Crankcase Breather Hose