×
ToyotaParts- Hello
- Login or Register
- Quick Links
- Live Chat
- Track Order
- Parts Availability
- RMA
- Help Center
- Contact Us
- Shop for
- Toyota Parts
- Scion Parts
My Garage
My Account
Cart
OEM 2003 Toyota Camry Timing Cover
Engine Timing Cover- Select Vehicle by Model
- Select Vehicle by VIN
Select Vehicle by Model
orMake
Model
Year
Select Vehicle by VIN
For the most accurate results, select vehicle by your VIN (Vehicle Identification Number).
6 Timing Covers found


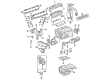
2003 Toyota Camry Cover, Timing Belt, Lower
Part Number: 11321-0A020$50.18 MSRP: $69.84You Save: $19.66 (29%)Ships in 1 Business DayProduct Specifications- Other Name: Timing Cover
- Manufacturer Note: (L)
- Position: Lower
- Replaces: 11321-20030
- Part Name Code: 11322A
- Item Weight: 0.60 Pounds
- Item Dimensions: 9.2 x 6.9 x 1.7 inches
- Condition: New
- Fitment Type: Direct Replacement
- SKU: 11321-0A020
- Warranty: This genuine part is guaranteed by Toyota's factory warranty.


2003 Toyota Camry Cover, Timing Belt, Upper Inner
Part Number: 11323-20030$171.54 MSRP: $242.83You Save: $71.29 (30%)Ships in 1-2 Business DaysProduct Specifications- Other Name: Timing Cover
- Position: Upper Inner
- Part Name Code: 11322C
- Item Weight: 2.30 Pounds
- Item Dimensions: 34.0 x 8.4 x 8.7 inches
- Condition: New
- Fitment Type: Direct Replacement
- SKU: 11323-20030
- Warranty: This genuine part is guaranteed by Toyota's factory warranty.


2003 Toyota Camry Timing Cover, Upper Outer
Part Number: 11303-20040$91.00 MSRP: $127.73You Save: $36.73 (29%)Ships in 1-3 Business DaysProduct Specifications- Other Name: Cover Sub-Assembly, Timing Chain; Engine Timing Cover, Outer Upper; Front Cover; Upper Timing Cover; Outer Timing Cover; Cover, Timing Belt
- Manufacturer Note: (J)
- Position: Upper Outer
- Replaces: 11303-0A031, 11303-0A030
- Part Name Code: 11322B
- Item Weight: 1.30 Pounds
- Item Dimensions: 11.2 x 9.0 x 2.9 inches
- Condition: New
- Fitment Type: Direct Replacement
- SKU: 11303-20040
- Warranty: This genuine part is guaranteed by Toyota's factory warranty.
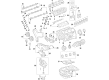
2003 Toyota Camry Timing Cover, Lower
Part Number: 11302-0A020$55.56 MSRP: $77.32You Save: $21.76 (29%)Ships in 1-3 Business DaysProduct Specifications- Other Name: Cover Sub-Assembly, Timing Chain; Engine Timing Cover, Lower; Front Cover; Outer Timing Cover; Cover, Timing Belt
- Manufacturer Note: (L)
- Position: Lower
- Replaces: 11302-20040
- Part Name Code: 11322A
- Item Weight: 0.60 Pounds
- Item Dimensions: 9.0 x 6.8 x 1.8 inches
- Condition: New
- Fitment Type: Direct Replacement
- SKU: 11302-0A020
- Warranty: This genuine part is guaranteed by Toyota's factory warranty.

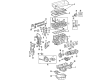
2003 Toyota Camry Timing Cover
Part Number: 11310-28070$256.64 MSRP: $366.42You Save: $109.78 (30%)Ships in 1-3 Business DaysProduct Specifications- Other Name: Cover Assembly, Timing Chain Or Belt; Engine Timing Cover; Front Cover; Cover Sub-Assembly, Timing Chain Or Belt
- Replaces: 11310-28040
- Part Name Code: 11302
- Item Weight: 2.40 Pounds
- Item Dimensions: 12.3 x 9.6 x 2.7 inches
- Condition: New
- Fitment Type: Direct Replacement
- SKU: 11310-28070
- Warranty: This genuine part is guaranteed by Toyota's factory warranty.

2003 Toyota Camry Timing Cover
Part Number: 11310-0H010$237.76 MSRP: $339.47You Save: $101.71 (30%)Ships in 1-3 Business DaysProduct Specifications- Other Name: Cover Assembly, Timing Chain Or Belt; Engine Timing Cover; Front Cover; Cover Sub-Assembly, Timing Chain Or Belt
- Part Name Code: 11302
- Item Weight: 6.80 Pounds
- Item Dimensions: 12.7 x 9.9 x 2.7 inches
- Condition: New
- Fitment Type: Direct Replacement
- SKU: 11310-0H010
- Warranty: This genuine part is guaranteed by Toyota's factory warranty.
2003 Toyota Camry Timing Cover
Looking for affordable OEM 2003 Toyota Camry Timing Cover? Explore our comprehensive catalogue of genuine 2003 Toyota Camry Timing Cover. All our parts are covered by the manufacturer's warranty. Plus, our straightforward return policy and speedy delivery service ensure an unparalleled shopping experience. We look forward to your visit!
2003 Toyota Camry Timing Cover Parts Q&A
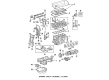
- Q: How to replace the timing cover on 2003 Toyota Camry?A: Start the timing cover replacement process by removing the front wheel RH followed by the front fender apron seal RH, engine cover sub-assy No.1 and engine moving control rod with bracket by uninstalling its 3 bolts and then remove the engine mounting stay No.2 RH and engine mounting bracket No.2 RH. After using Special Service Tool: 09249-63010 you can remove the fan and generator V belt followed by the crankshaft pulley. Follow these steps to take off the pulley bolt of TMC-made pulleys: Use Service Tool 09213-54015 plus 91651-60855 and Special Service Tool 09330-00021, then employ Service Tool 09950-50013 to remove it together with its components 09951-05010, 09952-05010, 09953-05020, and 09954-05021. The tightening and removal of TMMK made pulley bolts requires Special Service Tool 09960-10010 (09962-01000, 09963-01000) and Special Service Tool 09950-40011 (09951-04010, 09952-04010, 09953-04030, 09954-04010, 09955-04041, 09957-04010, 91111-51014). The timing gear case or timing chain case oil seal can be removed through seal lip cutting and screwdriver scraping. Check the crankshaft condition after removal by utilizing sandpaper (#400) when required for repair. Use Special Service Tool: 09223-22010 along with a hammer to install a new oil seal by applying MP grease to its lip while making sure no foreign matter remains inside the lip. Deepen the lip into the rear oil seal retainer edge before wiping off excess grease from the crankshaft. Reinstall the crankshaft pulley while aligning the pulley set key to the key groove by using Special Service Tool: 09213-54015 (91651-60855), 09330-00021 for TMC made or Special Service Tool: 09960-10010 (09962-01000, 09963-01000) for TMMK made and tightening the pulley bolt to 170 Nm (1,733 kgf-cm, 125 ft. lbs.). First reinstall the fan and generator V belt using Special Service Tool: 09249-63010 and proceed to bolt the engine mounting bracket No.2 RH at 52 Nm (531 kgf-cm, 38 ft. lbs.) followed by tightening the engine mounting stay No.2 RH to 64 Nm (653 kgf-cm, 47 ft. lbs.) before securing the engine moving control rod with bracket by tightening its 3 bolts to 64 Nm (653 kgf-cm, 47 ft. lbs.). To complete the repair the mechanic should reinstall the front wheel RH at 103 Nm (1,050 kgf-cm, 76 ft. lbs.) before checking for oil leaks.
Related 2003 Toyota Camry Parts
 2003 Toyota Camry Engine Mount
 2003 Toyota Camry Oil Pan
 2003 Toyota Camry Camshaft
 2003 Toyota Camry Cylinder Head
 2003 Toyota Camry Harmonic Balancer
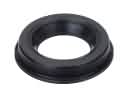 2003 Toyota Camry Camshaft Seal
 2003 Toyota Camry Cylinder Head Gasket
 2003 Toyota Camry Oil Pump Gasket
 2003 Toyota Camry Crankshaft Seal
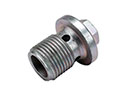 2003 Toyota Camry Drain Plug
 2003 Toyota Camry Rod Bearing
 2003 Toyota Camry Timing Cover Gasket