×
ToyotaParts- Hello
- Login or Register
- Quick Links
- Live Chat
- Track Order
- Parts Availability
- RMA
- Help Center
- Contact Us
- Shop for
- Toyota Parts
- Scion Parts
My Garage
My Account
Cart
OEM 2002 Toyota Sienna Axle Shaft
Car Axle Shaft- Select Vehicle by Model
- Select Vehicle by VIN
Select Vehicle by Model
orMake
Model
Year
Select Vehicle by VIN
For the most accurate results, select vehicle by your VIN (Vehicle Identification Number).
2 Axle Shafts found


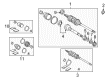
2002 Toyota Sienna Axle Assembly, Driver Side
Part Number: 43420-08010$404.50 MSRP: $592.80You Save: $188.30 (32%)Ships in 1-3 Business DaysProduct Specifications- Other Name: Shaft Assembly, Front Drive; CV Axle Assembly, Front Left; GSP Cv Axle; Axle Shaft; Shaft Assembly, Front Drive, Driver Side; CV Axle Assembly
- Position: Driver Side
- Part Name Code: 43420
- Item Weight: 23.00 Pounds
- Item Dimensions: 31.0 x 5.1 x 5.3 inches
- Condition: New
- Fitment Type: Direct Replacement
- SKU: 43420-08010
- Warranty: This genuine part is guaranteed by Toyota's factory warranty.

 Product Specifications
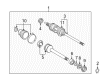
- Other Name: Shaft Assembly, Front Drive; CV Axle Assembly, Front Right; GSP Cv Axle; Axle Shaft; Shaft Assembly, Front Drive, Passenger Side; CV Axle Assembly
- Position: Passenger Side
- Part Name Code: 43410
- Item Weight: 21.60 Pounds
- Item Dimensions: 43.3 x 5.6 x 5.4 inches
- Condition: New
- Fitment Type: Direct Replacement
- SKU: 43410-08020
- Warranty: This genuine part is guaranteed by Toyota's factory warranty.
2002 Toyota Sienna Axle Shaft
Looking for affordable OEM 2002 Toyota Sienna Axle Shaft? Explore our comprehensive catalogue of genuine 2002 Toyota Sienna Axle Shaft. All our parts are covered by the manufacturer's warranty. Plus, our straightforward return policy and speedy delivery service ensure an unparalleled shopping experience. We look forward to your visit!
2002 Toyota Sienna Axle Shaft Parts Q&A
- Q: How to service and repair the axle shaft on 2002 Toyota Sienna?A: Inspection of the axle shaft begins with checking outboard joint shaft play followed by inboard joint shaft thrust movement and inboard joint shaft radial movement without boot damage inspection. Use pliers to open the hooks on the large inboard joint boot clamp before cutting the small inboard and two outboard joint boot clamps with the help of a side cutter. Use a snap ring expander to pull out the outboard joint shaft after expanding the snap ring without punching any marks on the joints. Use a screwdriver and hammer to remove the inboard joint shaft dust cover from the LH drive shaft before sliding out the two boots. The RH drive shaft requires use of a press instead. To remove the inboard joint shaft components of the RH drive shaft, Special Service Tool: 09950-00020 and a press will be used to uninstall the dust cover followed by removing the snap ring and bearing through pressing before finishing with snap ring extraction. Use a screwdriver along with a hammer to remove the No.2 dust deflector from the outboard joint shaft while it is mounted in a soft jaw vise making sure you avoid damaging its ABS speed sensor rotor. Construct a new No.2 dust deflector by using tools Special Service Tool: 09309-36010, 09316-20011 and a press for installation. This procedure establishes the inboard joint shaft assembly for the RH drive shaft by first placing a new snap ring followed by inserting a new bearing utilizing Special Service Tool: 09223-56010 and a press then adding a new snap ring and new dust cover. For the LH drive shaft dust cover application use Special Service Tool: 09223-56010, 09555-55010, 09223-56010 and a press equipment while the RH drive shaft requires proper dust cover placement until the distance measurement from outboard drive shaft tip to dust cover meets technical specifications. The outboard and inboard joint boots together with new boot clamps need to be temporarily mounted while vinyl tape needs to cover the drive shaft spline to prevent damage before installing three new clamps on both boot ends. Insert the inboard joint shaft into the outboard joint shaft by aligning matchmarks with the help of a snap ring expander. Greasening the outboard joint boot requires at least 105 g and up to 125 g of grease before blackboot assembly. Likewise the inboard joint shaft needs grease packing before boot installation as follows: joint side 120.0 g to 130.0 g and boot side 52.5 g to 57.5 g. The boot clamps need installation to both boot pieces while verifying proper seating and eliminating any deformation or stretching at standard drive shaft length. Use Special Service Tools 09521-24010 to secure the boot clamps by threading the unit onto the clamps until Special Service Tool 09240-00020 reaches the pinch point. The adjustment process of clamp clearance requires measurement adherence at A: less than 1.9 mm and B: 1.5 - 2.5 mm and C: between 3.0 - 4.0 mm with a final safety check on the drive shaft.
Related 2002 Toyota Sienna Parts
 2002 Toyota Sienna Spare Wheel
 2002 Toyota Sienna CV Joint
 2002 Toyota Sienna Sway Bar Bushing
 2002 Toyota Sienna CV Boot
 2002 Toyota Sienna Coil Spring Insulator
 2002 Toyota Sienna Coil Springs
 2002 Toyota Sienna Control Arm Bushing
 2002 Toyota Sienna Shock Absorber
 2002 Toyota Sienna Shock and Strut Boot
 2002 Toyota Sienna Steering Knuckle
 2002 Toyota Sienna Sway Bar Bracket
 2002 Toyota Sienna Transfer Case Output Shaft Snap Ring