×
ToyotaParts- Hello
- Login or Register
- Quick Links
- Live Chat
- Track Order
- Parts Availability
- RMA
- Help Center
- Contact Us
- Shop for
- Toyota Parts
- Scion Parts
My Garage
My Account
Cart
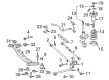
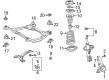
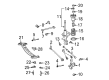
OEM 2002 Toyota Camry Coil Springs
Strut Spring- Select Vehicle by Model
- Select Vehicle by VIN
Select Vehicle by Model
orMake
Model
Year
Select Vehicle by VIN
For the most accurate results, select vehicle by your VIN (Vehicle Identification Number).
20 Coil Springs found

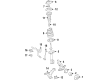
2002 Toyota Camry Coil Spring, Front
Part Number: 48131-06730$111.07 MSRP: $155.90You Save: $44.83 (29%)Ships in 1-3 Business DaysProduct Specifications- Other Name: Spring, Coil, Front; Coil Spring, Front; Coil Springs; Spring; Spring, Front Coil, Passenger Side; Spring, Front Coil, Driver Side
- Manufacturer Note: L=379.0
- Position: Front
- Item Weight: 7.10 Pounds
- Item Dimensions: 15.6 x 6.9 x 5.8 inches
- Condition: New
- Fitment Type: Direct Replacement
- SKU: 48131-06730
- Warranty: This genuine part is guaranteed by Toyota's factory warranty.
2002 Toyota Camry Coil Spring, Front
Part Number: 48131-06560$103.38 MSRP: $145.11You Save: $41.73 (29%)Ships in 1-3 Business DaysProduct Specifications- Other Name: Spring, Coil, Front; Coil Spring, Front; Coil Springs; Spring; Spring, Front Coil, Passenger Side; Spring, Front Coil, Driver Side
- Manufacturer Note: L=367.0
- Position: Front
- Item Weight: 6.80 Pounds
- Item Dimensions: 15.5 x 7.1 x 5.8 inches
- Condition: New
- Fitment Type: Direct Replacement
- SKU: 48131-06560
- Warranty: This genuine part is guaranteed by Toyota's factory warranty.
2002 Toyota Camry Coil Spring, Front
Part Number: 48131-AA190$103.07 MSRP: $144.68You Save: $41.61 (29%)Ships in 1-3 Business DaysProduct Specifications- Other Name: Spring, Coil, Front; Coil Spring, Front; Coil Springs; Spring; Spring, Front Coil, Passenger Side; Spring, Front Coil, Driver Side
- Position: Front
- Item Weight: 6.90 Pounds
- Item Dimensions: 15.9 x 6.8 x 5.8 inches
- Condition: New
- Fitment Type: Direct Replacement
- SKU: 48131-AA190
- Warranty: This genuine part is guaranteed by Toyota's factory warranty.
2002 Toyota Camry Coil Spring, Front
Part Number: 48131-AA180$98.85 MSRP: $138.76You Save: $39.91 (29%)Ships in 1-3 Business DaysProduct Specifications- Other Name: Spring, Coil, Front; Coil Spring, Front; Coil Springs; Spring; Spring, Front Coil, Passenger Side; Spring, Front Coil, Driver Side
- Manufacturer Note: L=395.5
- Position: Front
- Item Weight: 7.10 Pounds
- Item Dimensions: 15.8 x 6.9 x 5.9 inches
- Condition: New
- Fitment Type: Direct Replacement
- SKU: 48131-AA180
- Warranty: This genuine part is guaranteed by Toyota's factory warranty.
2002 Toyota Camry Coil Spring, Front
Part Number: 48131-AA170$95.65 MSRP: $134.27You Save: $38.62 (29%)Ships in 1-3 Business DaysProduct Specifications- Other Name: Spring, Coil, Front; Coil Spring, Front; Coil Springs; Spring; Spring, Front Coil, Passenger Side; Spring, Front Coil, Driver Side
- Manufacturer Note: L=391.0
- Position: Front
- Item Weight: 7.10 Pounds
- Item Dimensions: 15.8 x 6.9 x 5.8 inches
- Condition: New
- Fitment Type: Direct Replacement
- SKU: 48131-AA170
- Warranty: This genuine part is guaranteed by Toyota's factory warranty.

2002 Toyota Camry Coil Spring, Rear
Part Number: 48231-AA120$71.28 MSRP: $100.05You Save: $28.77 (29%)Ships in 1-3 Business DaysProduct Specifications- Other Name: Spring, Coil, Rear; Coil Spring, Rear; Coil Springs; Spring; Spring, Coil, Rear Passenger Side; Spring, Coil, Rear Driver Side
- Position: Rear
- Item Weight: 4.30 Pounds
- Item Dimensions: 17.0 x 11.0 x 5.7 inches
- Condition: New
- Fitment Type: Direct Replacement
- SKU: 48231-AA120
- Warranty: This genuine part is guaranteed by Toyota's factory warranty.

2002 Toyota Camry Coil Spring, Front
Part Number: 48131-AA160$107.89 MSRP: $151.45You Save: $43.56 (29%)Ships in 1-3 Business DaysProduct Specifications- Other Name: Spring, Coil, Front; Coil Spring, Front; Coil Springs; Spring, Front Coil, Passenger Side; Spring, Front Coil, Driver Side
- Manufacturer Note: L=359.5
- Position: Front
- Replaces: 48131-3T260
- Item Weight: 7.10 Pounds
- Item Dimensions: 16.4 x 7.1 x 6.1 inches
- Condition: New
- Fitment Type: Direct Replacement
- SKU: 48131-AA160
- Warranty: This genuine part is guaranteed by Toyota's factory warranty.
2002 Toyota Camry Coil Spring, Front
Part Number: 48131-AA150$106.89 MSRP: $150.04You Save: $43.15 (29%)Ships in 1-3 Business DaysProduct Specifications- Other Name: Spring, Coil, Front; Coil Spring, Front; Coil Springs; Spring; Spring, Front Coil, Passenger Side; Spring, Front Coil, Driver Side
- Manufacturer Note: L=373
- Position: Front
- Replaces: 48131-3T250
- Item Weight: 6.70 Pounds
- Item Dimensions: 16.6 x 7.0 x 5.9 inches
- Condition: New
- Fitment Type: Direct Replacement
- SKU: 48131-AA150
- Warranty: This genuine part is guaranteed by Toyota's factory warranty.
2002 Toyota Camry Coil Spring, Front
Part Number: 48131-AA120$110.55 MSRP: $155.17You Save: $44.62 (29%)Ships in 1-3 Business DaysProduct Specifications- Other Name: Spring, Coil, Front; Coil Spring, Front; Coil Springs; Spring, Front Coil, Passenger Side; Spring, Front Coil, Driver Side
- Manufacturer Note: L=366
- Position: Front
- Replaces: 48131-3T220
- Item Weight: 6.70 Pounds
- Item Dimensions: 16.1 x 7.4 x 5.9 inches
- Condition: New
- Fitment Type: Direct Replacement
- SKU: 48131-AA120
- Warranty: This genuine part is guaranteed by Toyota's factory warranty.
2002 Toyota Camry Coil Spring, Front
Part Number: 48131-AA140$101.59 MSRP: $142.61You Save: $41.02 (29%)Ships in 1-3 Business DaysProduct Specifications- Other Name: Spring, Coil, Front; Coil Spring, Front; Coil Springs; Spring; Spring, Front Coil, Passenger Side; Spring, Front Coil, Driver Side
- Manufacturer Note: L=352.5
- Position: Front
- Item Weight: 6.90 Pounds
- Item Dimensions: 16.1 x 7.0 x 5.9 inches
- Condition: New
- Fitment Type: Direct Replacement
- SKU: 48131-AA140
- Warranty: This genuine part is guaranteed by Toyota's factory warranty.

2002 Toyota Camry Coil Spring, Rear
Part Number: 48231-33480$91.15 MSRP: $127.95You Save: $36.80 (29%)Ships in 1-3 Business DaysProduct Specifications- Other Name: Spring, Coil, Rear; Coil Spring, Rear; Coil Springs; Spring; Spring, Coil, Rear Passenger Side; Spring, Coil, Rear Driver Side
- Position: Rear
- Item Weight: 5.70 Pounds
- Item Dimensions: 17.0 x 10.9 x 5.9 inches
- Condition: New
- Fitment Type: Direct Replacement
- SKU: 48231-33480
- Warranty: This genuine part is guaranteed by Toyota's factory warranty.
2002 Toyota Camry Coil Spring, Rear
Part Number: 48231-AA090$82.07 MSRP: $115.21You Save: $33.14 (29%)Ships in 1-3 Business DaysProduct Specifications- Other Name: Spring, Coil, Rear; Coil Spring, Rear; Coil Springs; Spring; Spring, Coil, Rear Passenger Side; Spring, Coil, Rear Driver Side
- Position: Rear
- Item Weight: 5.60 Pounds
- Item Dimensions: 16.7 x 10.8 x 5.7 inches
- Condition: New
- Fitment Type: Direct Replacement
- SKU: 48231-AA090
- Warranty: This genuine part is guaranteed by Toyota's factory warranty.
2002 Toyota Camry Coil Spring, Rear
Part Number: 48231-AA140$75.20 MSRP: $105.56You Save: $30.36 (29%)Ships in 1-3 Business DaysProduct Specifications- Other Name: Spring, Coil, Rear; Coil Spring, Rear; Coil Springs; Spring; Spring, Coil, Rear Passenger Side; Spring, Coil, Rear Driver Side
- Manufacturer Note: MEXICO SPEC
- Position: Rear
- Item Weight: 4.30 Pounds
- Item Dimensions: 17.0 x 11.0 x 5.6 inches
- Condition: New
- Fitment Type: Direct Replacement
- SKU: 48231-AA140
- Warranty: This genuine part is guaranteed by Toyota's factory warranty.
2002 Toyota Camry Coil Spring, Rear
Part Number: 48231-AA130$82.23 MSRP: $115.42You Save: $33.19 (29%)Product Specifications- Other Name: Spring, Coil, Rear; Coil Spring, Rear; Coil Springs; Spring; Spring, Coil, Rear Passenger Side; Spring, Coil, Rear Driver Side
- Position: Rear
- Item Weight: 4.10 Pounds
- Item Dimensions: 17.2 x 10.8 x 5.8 inches
- Condition: New
- Fitment Type: Direct Replacement
- SKU: 48231-AA130
- Warranty: This genuine part is guaranteed by Toyota's factory warranty.
- Product Specifications
- Other Name: Spring, Coil, Front; Coil Spring, Front; Coil Springs; Spring; Spring, Front Coil, Passenger Side; Spring, Front Coil, Driver Side
- Manufacturer Note: L=387.5
- Position: Front
- Item Weight: 7.10 Pounds
- Item Dimensions: 15.9 x 6.9 x 5.8 inches
- Condition: New
- Fitment Type: Direct Replacement
- SKU: 48131-AA200
- Warranty: This genuine part is guaranteed by Toyota's factory warranty.
- Product Specifications
- Other Name: Spring, Coil, Rear; Coil Spring, Rear; Coil Springs; Spring; Spring, Coil, Rear Passenger Side; Spring, Coil, Rear Driver Side
- Position: Rear
- Item Weight: 4.00 Pounds
- Item Dimensions: 17.2 x 10.6 x 5.7 inches
- Condition: New
- Fitment Type: Direct Replacement
- SKU: 48231-06270
- Warranty: This genuine part is guaranteed by Toyota's factory warranty.
- Product Specifications
- Other Name: Spring, Coil, Rear; Coil Spring, Rear; Coil Springs; Spring; Spring, Coil, Rear Passenger Side; Spring, Coil, Rear Driver Side
- Position: Rear
- Item Weight: 4.40 Pounds
- Item Dimensions: 18.0 x 11.1 x 6.1 inches
- Condition: New
- Fitment Type: Direct Replacement
- SKU: 48231-33490
- Warranty: This genuine part is guaranteed by Toyota's factory warranty.
- Product Specifications
- Other Name: Spring, Coil, Front; Coil Spring, Front; Coil Springs; Spring, Front Coil, Passenger Side; Spring, Front Coil, Driver Side
- Position: Front
- Item Weight: 6.70 Pounds
- Item Dimensions: 16.7 x 7.0 x 6.1 inches
- Condition: New
- Fitment Type: Direct Replacement
- SKU: 48131-3T240
- Warranty: This genuine part is guaranteed by Toyota's factory warranty.
- Product Specifications
- Other Name: Spring, Coil, Front; Coil Spring, Front; Coil Springs; Spring, Front Coil, Passenger Side; Spring, Front Coil, Driver Side
- Position: Front
- Item Weight: 7.20 Pounds
- Item Dimensions: 16.7 x 7.3 x 6.3 inches
- Condition: New
- Fitment Type: Direct Replacement
- SKU: 48131-3T210
- Warranty: This genuine part is guaranteed by Toyota's factory warranty.
- Product Specifications
- Other Name: Spring, Coil, Front; Coil Spring, Front; Coil Springs; Spring; Spring, Front Coil, Passenger Side; Spring, Front Coil, Driver Side
- Position: Front
- Item Weight: 6.70 Pounds
- Item Dimensions: 16.4 x 7.1 x 6.0 inches
- Condition: New
- Fitment Type: Direct Replacement
- SKU: 48131-3T230
- Warranty: This genuine part is guaranteed by Toyota's factory warranty.
2002 Toyota Camry Coil Springs
Looking for affordable OEM 2002 Toyota Camry Coil Springs? Explore our comprehensive catalogue of genuine 2002 Toyota Camry Coil Springs. All our parts are covered by the manufacturer's warranty. Plus, our straightforward return policy and speedy delivery service ensure an unparalleled shopping experience. We look forward to your visit!
2002 Toyota Camry Coil Springs Parts Q&A
- Q: How to overhaul the front coil springs and shock absorber assembly on 2002 Toyota Camry?A: The process of front coil spring and shock absorber assembly overhaul starts with removing the front wheel and disconnecting the front stabilizer link assembly LH by removing its nut and separating it from the shock absorber assembly front LH using a hexagon (6 mm) wrench to steady the stud if the ball joint moves with the nut. Before you take off the lock nut from the front shock absorber with coil spring take caution to avoid disassembly of the whole assembly. Detach the bolt followed by disconnecting the front flexible hose No. 1 and speed sensor front LH for models with ABS while models without ABS require removal of the front flexible hose No. 1 only. Begin the process by first loosening and then removing two nuts and two bolts on the lower part of the front shock absorber with coil spring while preventing bolt rotation and finishing by removing the upper-side three nuts. When extracting the front shock absorber with coil spring handle it cautiously while avoiding dropping the two washers unless the vehicle contains front suspension upper brace center. Two nuts and a bolt need to be installed onto the front shock absorber bracket at the lower side before placing it in a vise for secure retention. Special Service Tool: 09727-30021 should be used to apply compressive force on the LH front coil spring without an impact wrench to prevent tool damage before removing the front suspension support sub-assembly LH and additional components mentioned below. The shock absorber assembly needs checking by performing rod extension and compression tests to detect unusual noises alongside irregular resistance which requires replacement based on those findings. The front coil spring insulator lower LH should be positioned onto the shock absorber assembly front LH followed by the front spring bumper LH attached to the piston rod with front coil spring LH compression using the same special service tool. The front coil spring LH must be installed by positioning its lower end into the spring lower seat gap before placing front coil spring insulator upper LH along with front coil spring seat upper LH with their mark facing outward. Tighten the new lock nut only temporarily on the front suspension support bearing LH and front suspension support sub-assembly LH before installing both components together with their marks facing outward. You must secure the front shock absorber with coil spring through three upper side nuts to 80 Nm (816 kgf-cm, 59 ft. lbs.) torque along with two lower side bolts and nuts to 210 Nm (2,141 kgf-cm, 155 ft. lbs.) torque but torque the nut when it stops the bolt from rotating and achieve 49 Nm (500 kgf-cm, 36 ft. lbs.) lock nut torque. Models with ABS can receive front flexible hose No. 1 and speed sensor front LH together with the bolt which should be tightened to 18.8 Nm (192 kgf-cm, 14 ft. lbs.) while ABS-free models need only installation of front flexible hose No. 1 using the same torque value. Reinstallation of the front wheel requires torquing to 103 Nm (1,050 kgf-cm, 76 ft. lbs.) after you finish installing the front stabilizer link assembly LH with its nut torqued to 74 Nm (755 kgf-cm, 55 ft. lbs.). The procedure ends with front wheel alignment inspection and adjustment. To dispose of the component extend the shock absorber rod fully and create a hole in the cylinder to release gas contents while keeping chips from flying around and confirming the discharged gas has no color or smell and poses no toxic threat.
Related 2002 Toyota Camry Parts
 2002 Toyota Camry Control Arm
 2002 Toyota Camry Ball Joint
 2002 Toyota Camry Sway Bar Link
 2002 Toyota Camry Shock Absorber
 2002 Toyota Camry Axle Shaft
 2002 Toyota Camry Coil Spring Insulator
 2002 Toyota Camry Front Cross-Member
 2002 Toyota Camry Lateral Link
 2002 Toyota Camry Shock and Strut Boot
 2002 Toyota Camry Strut Housing
 2002 Toyota Camry Sway Bar Bracket
 2002 Toyota Camry Sway Bar Bushing