×
ToyotaParts- Hello
- Login or Register
- Quick Links
- Live Chat
- Track Order
- Parts Availability
- RMA
- Help Center
- Contact Us
- Shop for
- Toyota Parts
- Scion Parts
My Garage
My Account
Cart
OEM 2001 Toyota Sequoia Radiator
Cooling Radiator- Select Vehicle by Model
- Select Vehicle by VIN
Select Vehicle by Model
orMake
Model
Year
Select Vehicle by VIN
For the most accurate results, select vehicle by your VIN (Vehicle Identification Number).
2 Radiators found


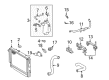
2001 Toyota Sequoia Radiator Assembly
Part Number: 16410-AZ012$164.29 MSRP: $232.20You Save: $67.91 (30%)Ships in 1-3 Business DaysProduct Specifications- Other Name: Radiator Assembly, L/Cap; Radiator
- Item Weight: 20.50 Pounds
- Item Dimensions: 36.0 x 34.7 x 7.1 inches
- Condition: New
- SKU: 16410-AZ012
- Warranty: This genuine part is guaranteed by Toyota's factory warranty.
- Product Specifications
- Other Name: Radiator Assembly, Mvp; Radiator
- Item Weight: 20.70 Pounds
- Item Dimensions: 35.2 x 29.3 x 6.1 inches
- Condition: New
- SKU: 16410-YZZAU
- Warranty: This genuine part is guaranteed by Toyota's factory warranty.
2001 Toyota Sequoia Radiator
Looking for affordable OEM 2001 Toyota Sequoia Radiator? Explore our comprehensive catalogue of genuine 2001 Toyota Sequoia Radiator. All our parts are covered by the manufacturer's warranty. Plus, our straightforward return policy and speedy delivery service ensure an unparalleled shopping experience. We look forward to your visit!
2001 Toyota Sequoia Radiator Parts Q&A
- Q: How to remove and reinstall a radiator on 2001 Toyota Sequoia?A: You must begin the radiator removal task by taking off the engine under cover then draining engine coolant followed by disconnecting the reservoir hose along with both radiator hoses and the A/T oil cooler hoses from the radiator. To begin remove the two clips from the No.2 fan shroud and proceed by taking out the radiator assembly using all 4 bolts before finishing with the No.1 fan shroud removal through its 4 bolts. Relax the radiator by first extracting 4 bolts followed by removing both pipes and bushings and radiator supports and afterward removing the radiator cap and drain plug. The overhaul handle requires the 09230-01010 Special Service Tool equipped with the claw section after which users must adjust the stopper bolt till the measurement "B" reaches 0.2 - 0.3 mm (0.008 - 0.012 inch) to prevent claw damage. Use the tool to unseal the lock plates until the stopper bolt stops the process and extract the tanks and O-rings by delivering soft blows of a soft-faced hammer on the radiator port. Prior to reinstallation note that replacement or additional caulking will be possible two times maximum before the radiator must be replaced. Examine the lock plate for damage while fixing any deformities for normal operation. Customers should install new O-rings along with tanks while maintaining a clear groove area from foreign matter. They should use a soft-faced hammer to tap the lock plate for eliminating gaps between parts. Special Service Tool 09230-01010 and 09231-14010 should be assembled for lock plate caulking. Adjust the stopper bolt to achieve a target dimension "B" of 8.4 mm (0.34 inch) before pressing the tool onto the lock plate to check the height measurement (H) between 7.4 - 7.8 mm (0.2959 - 0.3119 inch). Put the new O-ring on the drain plug before applying soapy water to install it. To accomplish this test install Special Service Tool: 09230-01010 and apply a pressure of 147 kPa (1.5 kgf/cm2, 21 psi) through the radiator cap tester while checking for presence of any water leakage. Use 4 bolts to secure the radiator supports and bushings and pipes while tightening them at 12.7 Nm (130 kgf-cm, 9 ft. lbs.). Install the radiator cap afterwards. Begin by installing the No.1 fan shroud with 4 bolts at 5 Nm (50 kgf-cm, 44 inch lbs.) before setting the radiator bracket hooks to the support holes and securing the radiator with 4 bolts at 12 Nm (120 Nm, 9 ft. lbs.). The installation includes attaching the No.2 fan shroud with 2 clips followed by reconnection of A/T oil cooler hoses coupled with upper and lower radiator hoses and radiator reservoir hose and engine coolant filling. To begin the check turn on the vehicle using the key while inspecting for coolant leakages then check the coolant level before positioning the engine covering.
Related 2001 Toyota Sequoia Parts
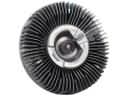 2001 Toyota Sequoia Fan Clutch
 2001 Toyota Sequoia Thermostat
 2001 Toyota Sequoia Water Pump
 2001 Toyota Sequoia Coolant Reservoir
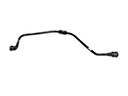 2001 Toyota Sequoia Coolant Reservoir Hose
 2001 Toyota Sequoia Cooling Fan Assembly
 2001 Toyota Sequoia Fan Blade
 2001 Toyota Sequoia Fan Shroud
 2001 Toyota Sequoia Radiator Cap
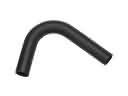 2001 Toyota Sequoia Radiator Hose
 2001 Toyota Sequoia Thermostat Housing
 2001 Toyota Sequoia Water Pump Gasket