×
ToyotaParts- Hello
- Login or Register
- Quick Links
- Live Chat
- Track Order
- Parts Availability
- RMA
- Help Center
- Contact Us
- Shop for
- Toyota Parts
- Scion Parts
My Garage
My Account
Cart
OEM 2001 Toyota RAV4 Timing Chain
Engine Timing Chain- Select Vehicle by Model
- Select Vehicle by VIN
Select Vehicle by Model
orMake
Model
Year
Select Vehicle by VIN
For the most accurate results, select vehicle by your VIN (Vehicle Identification Number).
2 Timing Chains found


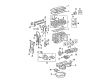
2001 Toyota RAV4 Timing Chain
Part Number: 13506-0H011$268.87 MSRP: $383.89You Save: $115.02 (30%)Ships in 1-2 Business DaysProduct Specifications- Other Name: Chain Sub-Assembly, Timing; Engine Timing Chain; Chain Sub-Assembly
- Replaces: 13506-28020, 13506-0H031, 13506-28010, 13506-28011, 13506-28021, 13506-0H010
- Part Name Code: 13506
- Item Weight: 1.20 Pounds
- Item Dimensions: 6.8 x 3.4 x 1.4 inches
- Condition: New
- Fitment Type: Direct Replacement
- SKU: 13506-0H011
- Warranty: This genuine part is guaranteed by Toyota's factory warranty.


2001 Toyota RAV4 Timing Chain
Part Number: 13507-28010$89.46 MSRP: $125.57You Save: $36.11 (29%)Ships in 1-2 Business DaysProduct Specifications- Other Name: Chain Sub-Assembly, Oil; Engine Timing Chain; Chain; Chain Sub-Assembly
- Replaces: 13507-0H020
- Part Name Code: 13507
- Item Weight: 0.70 Pounds
- Item Dimensions: 2.6 x 2.4 x 0.4 inches
- Condition: New
- Fitment Type: Direct Replacement
- SKU: 13507-28010
- Warranty: This genuine part is guaranteed by Toyota's factory warranty.
2001 Toyota RAV4 Timing Chain
Looking for affordable OEM 2001 Toyota RAV4 Timing Chain? Explore our comprehensive catalogue of genuine 2001 Toyota RAV4 Timing Chain. All our parts are covered by the manufacturer's warranty. Plus, our straightforward return policy and speedy delivery service ensure an unparalleled shopping experience. We look forward to your visit!
2001 Toyota RAV4 Timing Chain Parts Q&A
- Q: How to remove and install the timing chain on 2001 Toyota RAV4?A: A proper timing chain removal starts with draining engine oil before continuing with the removal of the RH engine under cover followed by the PS vane pump and ABS actuator along with the RH engine mounting insulator and drive belt and generator and air cleaner assembly and ignition coils. Begin the procedure of removing the cylinder head cover by unplugging the 2 PCV hoses and then removing 8 bolts and 2 nuts. Structure the No. 1 cylinder to TDC/compression by rotating the crankshaft pulley to reach timing mark 0 alignment with the camshaft and VVT timing sprocket bearing caps while checking for correct linkage. If realignment is needed adjust the crankshaft by 1 revolution. To proceed with this job, start by using Special Service Tools 09213-54015 and 0933-00021 to remove the crankshaft pulley before the chain tensioner and drive belt tensioner and crankshaft position sensor and oil pan and timing chain cover by removing the stud bolt for drive belt tensioner the 14 bolts and 2 nuts along with careful prying of the cover. Take out the crank angle sensor plate as well as the chain tensioner slipper, chain vibration damper and timing chain guide but be cautious to prevent damage to both the cylinder head and valve lifter while also removing the timing chain, crankshaft timing sprocket, camshaft timing sprocket and VVT timing sprocket. You should examine the timing chain together with sprockets for wear and elongation then proceed to replace them while testing the chain tensioner slipper and vibration damper for replacement if wear is present. To replace the crankshaft front oil seal either Special Service Tool 09309-37010 should be used with timing chain cover removal or Tool 09308-10010 should be used for situations when the cover remains installed. First correctly position the camshaft timing sprocket and VVT timing sprocket before torque tightening them to specifications then reset the No. 1 cylinder to TDC/compression position. The chain vibration damper should be installed together with crankshaft timing sprocket and timing chain guide and timing chain and chain tensioner slipper and crank angle sensor plate followed by the timing chain cover installation using proper torque values. Start installation by putting the drive belt tensioner followed by crankshaft position sensor and oil pan and crankshaft pulley using this set of Special Service Tools: 09213-54015, 0933-00021. Finish the process by installing the timing chain tensioner while setting appropriate chain tension and checking vital valve timing. To finish the installation process secure the cylinder head cover and all following parts including ignition coils, vane pump, generator, RH engine mounting insulator, drive belt, ABS actuator and air cleaner assembly and engine under cover and fill with engine oil, start the engine, check for leaks and verify the engine oil level once again.
Related 2001 Toyota RAV4 Parts
 2001 Toyota RAV4 Oil Pump
 2001 Toyota RAV4 Cylinder Head
 2001 Toyota RAV4 Crankshaft Gear
 2001 Toyota RAV4 Crankshaft Seal
 2001 Toyota RAV4 Dipstick
 2001 Toyota RAV4 Exhaust Valve
 2001 Toyota RAV4 Harmonic Balancer
 2001 Toyota RAV4 Intake Valve
 2001 Toyota RAV4 Oil Pump Gasket
 2001 Toyota RAV4 Piston
 2001 Toyota RAV4 Rod Bearing
 2001 Toyota RAV4 Timing Cover