×
ToyotaParts- Hello
- Login or Register
- Quick Links
- Live Chat
- Track Order
- Parts Availability
- RMA
- Help Center
- Contact Us
- Shop for
- Toyota Parts
- Scion Parts
My Garage
My Account
Cart
OEM 2001 Toyota Echo Radiator
Cooling Radiator- Select Vehicle by Model
- Select Vehicle by VIN
Select Vehicle by Model
orMake
Model
Year
Select Vehicle by VIN
For the most accurate results, select vehicle by your VIN (Vehicle Identification Number).
2 Radiators found

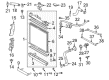
2001 Toyota Echo Radiator Assembly
Part Number: 16400-21071$251.86 MSRP: $359.61You Save: $107.75 (30%)Ships in 1-3 Business DaysProduct Specifications- Other Name: Radiator
- Replaces: 16400-21070
- Item Weight: 8.50 Pounds
- Item Dimensions: 24.7 x 22.2 x 4.0 inches
- Condition: New
- SKU: 16400-21071
- Warranty: This genuine part is guaranteed by Toyota's factory warranty.
2001 Toyota Echo Radiator Assembly
Part Number: 16400-21081$221.12 MSRP: $315.70You Save: $94.58 (30%)Ships in 1-3 Business DaysProduct Specifications- Other Name: Radiator
- Replaces: 16400-21080
- Condition: New
- SKU: 16400-21081
- Warranty: This genuine part is guaranteed by Toyota's factory warranty.
2001 Toyota Echo Radiator
Looking for affordable OEM 2001 Toyota Echo Radiator? Explore our comprehensive catalogue of genuine 2001 Toyota Echo Radiator. All our parts are covered by the manufacturer's warranty. Plus, our straightforward return policy and speedy delivery service ensure an unparalleled shopping experience. We look forward to your visit!
2001 Toyota Echo Radiator Parts Q&A
- Q: How to remove and reassemble the radiator assembly on 2001 Toyota Echo?A: Begin radiator assembly removal by draining engine coolant and then removing engine under covers and disconnecting electric cooling fan and horn connectors together with upper and lower radiator hoses and reservoir hose. Disconnect and remove the transmission oil cooler hoses before removing 7 radiator bolts when using a vehicle without A/C. Disconnect the electric cooling fan connector together with the horn connector and the upper and lower radiator hoses and the radiator reservoir hose. Also for automatic transmission models disconnect the two oil cooler hoses. First remove the radiator cover and its 2 clips with a following step to extract the radiator assembly combined with the 2 radiator support cushions and grommets by taking out either 7 bolts (without A/C) or 9 bolts (with A/C) along with upper radiator supports. Separate the electric cooling fan from the radiator through bolt removal of the three bolts. The disassembly process requires removing the drain plug with its O-ring and disconnecting the No. 3 radiator hose and taking out two bolts and water filter components. Use Special Service Tool: 09230-01010 by placing the claw onto the overhaul handle then setting the stopper bolts at 0.2 - 0.3 mm (0.008 - 0.012 inch) dimension "B". The same tool should be used to unseat the lock plates after which a gentle tap on the radiator bracket will permit tank and O-ring removal. To work on automatic transmission one must remove the lower tank's oil cooler by unfastening and removing two nuts together with two plate washers and finally take out the oil cooler and its two O-rings. The lock plate should be examined for damage since any deformities might lead to reassembly challenges while noting that radiator replacement becomes necessary after two recaulkings. Reassemble the oil cooler by inserting two fresh O-rings before attaching it to the lower tank and tightening 2 plate washers and 2 nuts to 8.334 Nm (85 kgf-cm, 74 inch lbs.). Follow the steps for putting new O-rings and tanks in place, verify that no objects exist in the lock plate groove before performing soft-faced hammer taps to close the gaps. To complete assembly use Special Service Tools 09230-01010 and 09231-14010 to adjust the stopper bolt to reach a 8.4 mm (0.331 inch) dimension while performing lock plate caulking that must avoid staking in the vicinity of pipes or brackets. Examine the lock plate height for a measurement between 7.40 - 7.80 mm (0.2913 - 0.3071 inch) after caulking before necessary adjustments. Fasten the water filter in place using two bolts which need to be torqued to 7.5 Nm before reconnecting the No. 3 radiator hose. Place and lock a fresh O-ring into the drain plug installation. A proper water leak test requires the drain plug to be tightened as technicians use Special Service Tool: 09230-01010 to apply pressure with a radiator cap tester to 177 kPa (1.8 kgf/cm2, 26 psi) while submerging the radiator in water. The electric cooling fan installation process requires bolting it onto the radiator using 3 bolts which should reach a torque level of 7.5 Nm (80 kgf-cm, 66 inch lbs.). Next, install the radiator assembly by placing 2 radiator support cushions with grommets and aligning the grommets with body brackets before installing the appropriate number of upper radiator support bolts and reconnecting all hoses and connectors. Before starting the engine, agents will install the engine under covers while filling the system with coolant then initiate engine startup to verify coolant leakage.
Related 2001 Toyota Echo Parts
 2001 Toyota Echo Radiator Cap
 2001 Toyota Echo Thermostat
 2001 Toyota Echo Water Pump
 2001 Toyota Echo Coolant Reservoir
 2001 Toyota Echo Cooling Fan Assembly
 2001 Toyota Echo Fan Blade
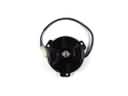 2001 Toyota Echo Fan Motor
 2001 Toyota Echo Fan Shroud
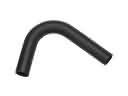 2001 Toyota Echo Radiator Hose
 2001 Toyota Echo Thermostat Gasket
 2001 Toyota Echo Thermostat Housing
 2001 Toyota Echo Water Pump Gasket