×
ToyotaParts- Hello
- Login or Register
- Quick Links
- Live Chat
- Track Order
- Parts Availability
- RMA
- Help Center
- Contact Us
- Shop for
- Toyota Parts
- Scion Parts
My Garage
My Account
Cart
OEM 2000 Toyota Echo Radiator
Cooling Radiator- Select Vehicle by Model
- Select Vehicle by VIN
Select Vehicle by Model
orMake
Model
Year
Select Vehicle by VIN
For the most accurate results, select vehicle by your VIN (Vehicle Identification Number).
2 Radiators found

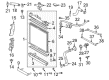
2000 Toyota Echo Radiator Assembly
Part Number: 16400-21071$251.86 MSRP: $359.61You Save: $107.75 (30%)Ships in 1-3 Business DaysProduct Specifications- Other Name: Radiator
- Replaces: 16400-21070
- Item Weight: 8.50 Pounds
- Item Dimensions: 24.7 x 22.2 x 4.0 inches
- Condition: New
- SKU: 16400-21071
- Warranty: This genuine part is guaranteed by Toyota's factory warranty.
2000 Toyota Echo Radiator Assembly
Part Number: 16400-21081$221.12 MSRP: $315.70You Save: $94.58 (30%)Ships in 1-3 Business DaysProduct Specifications- Other Name: Radiator
- Replaces: 16400-21080
- Condition: New
- SKU: 16400-21081
- Warranty: This genuine part is guaranteed by Toyota's factory warranty.
2000 Toyota Echo Radiator
Looking for affordable OEM 2000 Toyota Echo Radiator? Explore our comprehensive catalogue of genuine 2000 Toyota Echo Radiator. All our parts are covered by the manufacturer's warranty. Plus, our straightforward return policy and speedy delivery service ensure an unparalleled shopping experience. We look forward to your visit!
2000 Toyota Echo Radiator Parts Q&A
- Q: How to remove and reinstall a radiator on 2000 Toyota Echo?A: The radiator removal process begins with coolant drain and continuation by removing engine under covers. You should disconnect the electric cooling fan connector together with the hone connector as well as upper and lower radiator hoses and radiator reservoir hose and disconnect 2 oil cooler hoses when using an automatic transmission. Start by draining engine coolant and moving on to remove engine under covers. Disconnect electric cooling fan connector, hope connector, upper and lower radiator hoses, radiator reservoir hose, and for automatic transmission disconnect the 2 oil cooler hoses. Afterwards, remove the 2 clips along with the radiator cover and then take out the radiator assembly with its accompanying 2 radiator support cushions and grommets. Finally, remove the electric cooling fan by taking out the 3 bolts. The radiator electric fan needs three bolts removed to disconnect it from the unit. The radiator disassembly process includes eliminating the drain plug with its O-ring while separating the No. 3 radiator hose and extracting the 2 bolts and water filter. Use Assembly Special Service Tool: 09230-01010 to install the claw onto the overhaul handle and adjust stopper bolts for "B" dimension at 0.2 - 0.3 mm (0.008 - 0.012 inch). The lock plates need uncaulking with this tool before tapping the radiator bracket to extract the tank along with O-ring. Automatic transmission requires the removal of oil cooler from lower tank by first removing two nuts along with two plate washers followed by oil cooler and two O-rings removal. Check the lock plate for damage before correcting deformation which may lead to water leakage but remember that the radiator must be replaced after two recaulking procedures. When reinstalling the oil cooler set it up on the lower tank while using two plate washers and two new O-rings followed by nuts torqued to 8.34 Nm (85 kgf-cm, 74 inch lbs.). The repair process requires new O-rings and tanks with specific care to exclude foreign items from the lock plate gap. A soft-faced hammer must be used to eliminate gaps when taping the lock plate. Insert Special Service Tool: 09230-01010 once more and modify the stopper bolt until it reaches 8.4 mm (0.331 inch). After that, finish the lock plate by avoiding staking around pipes and brackets. Raise or lower the lock plate until it measures between 7.40 - 7.80 mm (0.2913 - 0.3071 inch) following checks. Secure the installed water filter with two bolts tightened to 7.5 Nm then reconnect the Number 3 radiator hose. Place an additional drain plug O-ring on the drain plug and apply the correct securing mechanism. The inspection for water leaks includes drain plug tightening followed by inlet and outlet pipe plugging using Special Service Tool: 09230-01010, radiator cap tester pressure adjustment to 177 kPa (1.8 kgf/cm2, 26 psi), and complete radiator submersion in water for leak detection. To install the electric cooling fan use 3 bolts torqued to 7.5 Nm (80 kgf-cm, 66 inch lbs., after which place the 2 radiator support cushions and grommets on the body brackets before attaching the upper radiator supports with appropriate number of bolts and reconnection of all hoses and connectors. The installation process includes hiding the engine before filling with engine coolant and engine start before inspecting for coolant leakage.
Related 2000 Toyota Echo Parts
 2000 Toyota Echo Radiator Cap
 2000 Toyota Echo Thermostat
 2000 Toyota Echo Water Pump
 2000 Toyota Echo Coolant Reservoir
 2000 Toyota Echo Cooling Fan Assembly
 2000 Toyota Echo Fan Blade
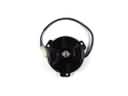 2000 Toyota Echo Fan Motor
 2000 Toyota Echo Fan Shroud
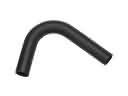 2000 Toyota Echo Radiator Hose
 2000 Toyota Echo Thermostat Gasket
 2000 Toyota Echo Thermostat Housing
 2000 Toyota Echo Water Pump Gasket