×
ToyotaParts- Hello
- Login or Register
- Quick Links
- Live Chat
- Track Order
- Parts Availability
- RMA
- Help Center
- Contact Us
- Shop for
- Toyota Parts
- Scion Parts
My Garage
My Account
Cart
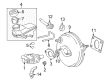
OEM 2000 Toyota Celica Brake Booster
Brake Power Booster- Select Vehicle by Model
- Select Vehicle by VIN
Select Vehicle by Model
orMake
Model
Year
Select Vehicle by VIN
For the most accurate results, select vehicle by your VIN (Vehicle Identification Number).
2 Brake Boosters found

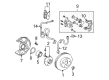
2000 Toyota Celica Brake Booster
Part Number: 44610-2G080$630.54 MSRP: $924.06You Save: $293.52 (32%)Ships in 1-3 Business DaysProduct Specifications- Other Name: Booster Assembly, Brake; Power Brake Booster; Booster Assembly
- Replaces: 44610-2G020
- Part Name Code: 44610
- Item Weight: 5.90 Pounds
- Item Dimensions: 15.6 x 10.3 x 10.3 inches
- Condition: New
- Fitment Type: Direct Replacement
- SKU: 44610-2G080
- Warranty: This genuine part is guaranteed by Toyota's factory warranty.
 Product Specifications
- Other Name: Booster Assembly, Brake; Power Brake Booster; Booster Assembly
- Replaces: 44610-2G040
- Part Name Code: 44610
- Item Weight: 7.90 Pounds
- Item Dimensions: 12.4 x 12.1 x 11.1 inches
- Condition: New
- Fitment Type: Direct Replacement
- SKU: 44610-2G060
- Warranty: This genuine part is guaranteed by Toyota's factory warranty.
2000 Toyota Celica Brake Booster
Looking for affordable OEM 2000 Toyota Celica Brake Booster? Explore our comprehensive catalogue of genuine 2000 Toyota Celica Brake Booster. All our parts are covered by the manufacturer's warranty. Plus, our straightforward return policy and speedy delivery service ensure an unparalleled shopping experience. We look forward to your visit!
2000 Toyota Celica Brake Booster Parts Q&A
- Q: How to service and repair the vacuum brake booster on 2000 Toyota Celica?A: A technician must start vacuum brake booster service by completing the front LH wheel removal task with a proper torque of 103 Nm (1,050 kgf cm, 76 ft. lbs.). The vacuum hose from the brake booster must be disconnected while also removing the master cylinder. The procedure requires Special Service Tool: 09751-36011 and a spanner to clean up the front LH brake line from the flexible hose before pulling out the brake line with its grommet from the body. Remove the brake booster after removing all parts starting with the lower No.1 panel, finish panel, return spring, clip, clevis pin and continuing to the clevis and 4 nuts before extracting the brake booster and its gasket. The installation requires a new gasket and brake booster which needs 4 nuts torqued up to 13 Nm (130 kgf-cm, 9 ft. lbs.) then the clevis needs to be placed and its lock nut torqued up to 25 Nm (260 kgf-cm, 19 ft. lbs.). Proceed by inserting the clevis pin through the clevis and brake pedal, fasten it with the clip and attach the pedal return spring. Install the front LH brake line together with the grommet by feeding it into the body then connecting it to the flexible hose through the use of Special Service Tool: 09751-36011 and a spanner for torquing up to 15 Nm (155 kgf-cm, 11 ft. lbs.). The ABS actuator assembly installation should be done when required. During brake master cylinder replacement adjust the push rod length using chalk on equipment until a 0 mm (0 inch) measurement is obtained between the rod and tool. Applicable adjustments should be made while checking that the booster maintains vacuum through multiple brake pedal depressions while the engine remains off. The vacuum hose will connect to the brake booster followed by master cylinder installation before filling the reservoir with brake fluid while performing a brake system bleed. After checking for fluid leakage you should verify and align the brake pedal before installing the finish panel with its lower No. 1 counterpart. Finally, perform an operational check.
Related 2000 Toyota Celica Parts
 2000 Toyota Celica Speed Sensor
 2000 Toyota Celica Wheel Bearing
 2000 Toyota Celica Brake Master Cylinder
 2000 Toyota Celica Backing Plate
 2000 Toyota Celica Brake Caliper
 2000 Toyota Celica Brake Disc
 2000 Toyota Celica Brake Line
 2000 Toyota Celica Brake Pad Set
 2000 Toyota Celica Brake Proportioning Valve
 2000 Toyota Celica Master Cylinder Repair Kit
 2000 Toyota Celica Parking Brake Shoe
 2000 Toyota Celica Wheel Stud