×
ToyotaParts- Hello
- Login or Register
- Quick Links
- Live Chat
- Track Order
- Parts Availability
- RMA
- Help Center
- Contact Us
- Shop for
- Toyota Parts
- Scion Parts
My Garage
My Account
Cart
2000 Toyota RAV4 Switches & Sensors
Currently shopping for
2000 Toyota RAV4
Change VehicleVehicle Options
BaseVehicle Options
BaseCategories Close X
Currently selected
A/C & Heating
Other Categories
Air & Fuel Delivery
Belts & Cooling
Body & Hardware
Brakes
Charging & Starting
Driveline & Axles
Electrical
Emission Control & Exhaust
Engine
Headlights & Lighting
Interior & Exterior Trim
Maintenance & Lubrication
Steering
Suspension
Transmission
How to use OE catalog
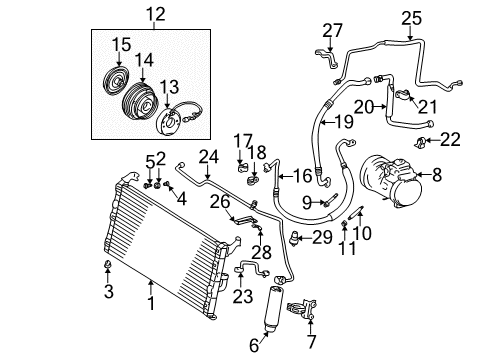
Diagram (1 of 1): Air conditioner & heater - Condenser, compressor & lines
Sort by:
Ref No.
Ref No.
Part No. & Part Description
Price & Qty.
Part No. &
Part Description
Part Description
- 1
 MSRP: $402.19 Your Price: $281.691
- 2
 MSRP: $4.47 Your Price: $3.211
- 3


- 4

 MSRP: $4.14 Your Price: $2.981
- 5

 MSRP: $1.65 Your Price: $1.181
- 6


 MSRP: $78.49 Your Price: $56.391
- 7
 MSRP: $53.85 Your Price: $38.691
- 8

- 9

 MSRP: $3.81 Your Price: $2.741
- 10
 MSRP: $8.30 Your Price: $5.961
- 11

 MSRP: $1.98 Your Price: $1.421
- 12

- 13

- 14
 MSRP: $471.64 Your Price: $330.341
- 15

- 16

- 17

- 18

- 19

- 20
 MSRP: $164.01 Your Price: $116.841
- 21

- 22
 MSRP: $35.20 Your Price: $25.291
- 23


 MSRP: $49.22 Your Price: $35.361
- 24

- 25

- 26
 MSRP: $56.87 Your Price: $40.861
- 27

- 28
 MSRP: $13.96 Your Price: $10.031
- 29


 MSRP: $317.89 Your Price: $222.641


OEM 2000 Toyota RAV4 Parts for Switches & Sensors
Genuine 2000 Toyota RAV4 parts are produced by Toyota with the official design and standards, thus they ensure a high quality throughout the production process. OEM parts are the ideal choice for people looking for new Switches & Sensors parts. With our competitive prices, we offer 2000 Toyota RAV4 parts that fit tight budgets, while still including the manufacturer warranties, a hassle-free returns policy and quick shipping options.
A/C Switch Installation and Repair Tips for 2000 Toyota RAV4
- Q: How to service and repair an A/C Switch on 2000 Toyota RAV4?A: To repair the Air Conditioning Switch, start by covering it with a cloth. Next, use pliers to remove the A/C switch. To install it back, simply reverse the steps taken during removal.