×
ToyotaParts- Hello
- Login or Register
- Quick Links
- Live Chat
- Track Order
- Parts Availability
- RMA
- Help Center
- Contact Us
- Shop for
- Toyota Parts
- Scion Parts
My Garage
My Account
Cart
OEM Toyota Solara Heater Core
HVAC Heater Core- Select Vehicle by Model
- Select Vehicle by VIN
Select Vehicle by Model
orMake
Model
Year
Select Vehicle by VIN
For the most accurate results, select vehicle by your VIN (Vehicle Identification Number).
2 Heater Cores found

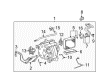
Toyota Solara Heater Core Part Number: 87107-06040
$357.85 MSRP: $524.44You Save: $166.59 (32%)Ships in 1-3 Business Days

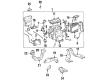
Toyota Solara Heater Core Part Number: 87107-07010
Toyota Solara Heater Core
Choose genuine Heater Core that pass strict quality control tests. You can trust the top quality and lasting durability. Shopping for OEM Heater Core for your Toyota Solara? Our website is your one-stop destination. We stock an extensive selection of genuine Toyota Solara parts. The price is affordable so you can save more. It only takes minutes to browse and find the exact fit. Easily add to cart and check out fast. Our hassle-free return policy will keep you stress-free. We process orders quickly for swift delivery. Your parts will arrive faster, so you can get back on the road sooner.
Appearing as a vital component of any car's heating system, the Heater Core of the Toyota Solara particularly uses extra heat from the engine to warm the car's cabin. Looking somewhat like a radiator, the Heater Core is cooled by a water and antifreeze solution passing close to the engine to take-up heat and warm the cabin area. Depending on the type of the Heater Core, this may be adjusted by valves in aluminum or even brass for regulation of the temperature or opening/closing of doors. In conditioned vehicles, Heater Core is useful not only in dehumidifying the air, but also as a part cooler for the engine. Nevertheless, problems such as clogging, leakage, and rust negatively influence the durability as dismantling is frequently complex due to the design of the pipes.
Toyota Solara Heater Core Parts and Q&A
- Q: How to Service and Repair the Heater Core on Toyota Solara?A:The first step for heater core servicing requires the discharge of refrigerant through Special Service Tool: 07110-58060 (07117-58080, 07117-58090, 07117-78050, 07117-88060, 07117-88070, 07117-88080). Access Hose No.1 of the cooler refrigerant suction by installing Tool: 09870-00015 into the piping clamp and unlock the clamp followed by hose removal without screwdrivers. Close all open fittings before you remove the 2 O-rings from the cooler refrigerant suction hose No.1 and secure them with vinyl tape on the openings. Disconnect pipe A of the cooler refrigerant liquid by utilizing Special Service Tool: 09870-00025 according to the same procedure used for disconnecting cooler refrigerant suction hose No.1. When working on the 2AZ-FE engine type you must split heater water outlet hose A from heater water inlet hose A but should avoid using strong force while maintaining leak protection readiness. The procedure for disconnecting heater outlet / inlet water hoses of 3MZ-FE engines mirrors the previous steps. Return to the passenger side of the driver compartment and remove the instrument panel safety pad sub-assembly with passenger air bag assembly before you detach air duct rear No.1 and air duct rear No.2 by folding back the floor carpet then removing the necessary screws and other fasteners. Take out all bolts, earth wires and connector holder from instrument panel brace sub-assembly No.1 to proceed with removing the instrument finish panel retainer lower and instrument panel brace sub-assembly No.2. Take off clips that retain foot duct heater units No.3 and No.1 to gain access to the instrument panel junction block assembly then remove the central part of the instrument panel bracket sub-assembly. Remove the instrument panel reinforcement assembly after disconnecting wire harness clamps and earth wires and removing caps and bolts. The steering column assembly requires separate disconnect procedures by releasing wire harness clamps and connectors. The last step involves taking apart the stereo component amplifier assembly and the ECM for both 2AZ-FE and 3MZ-FE engine types along with the blower assembly through connector and clamp removal and the defroster nozzle assembly lower by releasing fitting claws.

Related Toyota Solara Parts
 Toyota Solara A/C Accumulator
 Toyota Solara A/C Compressor
 Toyota Solara A/C Compressor Clutch
 Toyota Solara A/C Compressor Cut-Out Switches
 Toyota Solara A/C Condenser
 Toyota Solara A/C Expansion Valve
 Toyota Solara A/C Hose
 Toyota Solara Ambient Temperature Sensor
 Toyota Solara Blend Door Actuator
 Toyota Solara Blower Motor Resistor
 Toyota Solara Evaporator
 Toyota Solara HVAC Pressure Switch