×
ToyotaParts- Hello
- Login or Register
- Quick Links
- Live Chat
- Track Order
- Parts Availability
- RMA
- Help Center
- Contact Us
- Shop for
- Toyota Parts
- Scion Parts
My Garage
My Account
Cart
OEM Toyota Sienna Emblem
Badge- Select Vehicle by Model
- Select Vehicle by VIN
Select Vehicle by Model
orMake
Model
Year
Select Vehicle by VIN
For the most accurate results, select vehicle by your VIN (Vehicle Identification Number).
52 Emblems found


Toyota Sienna Nameplate Part Number: 75443-AE010
$22.57 MSRP: $31.42You Save: $8.85 (29%)Ships in 1-3 Business Days

Toyota Sienna Emblem Part Number: 75432-06030
$29.86 MSRP: $41.57You Save: $11.71 (29%)Ships in 1-3 Business Days


Toyota Sienna Nameplate, Chrome, Rear Part Number: 75443-08030
$23.77 MSRP: $33.08You Save: $9.31 (29%)Ships in 1-3 Business Days

Toyota Sienna Emblem Part Number: 75441-08020
$32.73 MSRP: $45.56You Save: $12.83 (29%)Ships in 1-3 Business Days


Toyota Sienna Emblem, Rear Part Number: 75403-06130
$36.79 MSRP: $51.21You Save: $14.42 (29%)Ships in 1 Business Day


Toyota Sienna Emblem, Front Part Number: 75301-AE010
$45.76 MSRP: $63.69You Save: $17.93 (29%)


Toyota Sienna Nameplate, Rear Part Number: 75443-06200
$14.45 MSRP: $20.11You Save: $5.66 (29%)

Toyota Sienna Nameplate, Rear Part Number: 75443-AE020
$20.66 MSRP: $28.76You Save: $8.10 (29%)Ships in 1-3 Business Days

Toyota Sienna Nameplate, Rear Part Number: 75445-0E010
$26.04 MSRP: $36.24You Save: $10.20 (29%)Ships in 1-3 Business Days


Toyota Sienna Nameplate, Rear Part Number: 75444-08020
$28.01 MSRP: $38.99You Save: $10.98 (29%)

Toyota Sienna Emblem, Rear Part Number: 75441-AE010
$29.15 MSRP: $40.57You Save: $11.42 (29%)Ships in 1-2 Business Days


Toyota Sienna Nameplate, Rear Part Number: 75445-0R010
$30.22 MSRP: $42.07You Save: $11.85 (29%)Ships in 1-3 Business Days

Toyota Sienna Emblem, Chrome, Rear Part Number: 75404-AC010
$29.86 MSRP: $41.57You Save: $11.71 (29%)Ships in 1-3 Business Days
Toyota Sienna Nameplate, Chrome, Rear Part Number: 75444-08010
$37.63 MSRP: $52.38You Save: $14.75 (29%)Ships in 1 Business Day

Toyota Sienna Nameplate, Rear Part Number: 75442-08020
$46.12 MSRP: $64.19You Save: $18.07 (29%)Ships in 1-3 Business Days

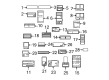
Toyota Sienna Plate, Theft Warning Part Number: 74515-14010
$14.21 MSRP: $19.78You Save: $5.57 (29%)


Toyota Sienna Emblem Part Number: 75311-08010
$38.11 MSRP: $53.04You Save: $14.93 (29%)Ships in 1 Business Day
Toyota Sienna Nameplate, Rear Part Number: 75443-06A60
$19.94 MSRP: $27.76You Save: $7.82 (29%)

Toyota Sienna Emblem, Rear Part Number: 75441-08010


Toyota Sienna Emblem, Front Part Number: 75314-AE010
| Page 1 of 3 |Next >
1-20 of 52 Results
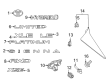
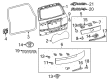
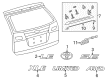
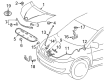
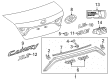
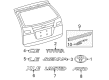
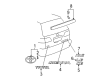
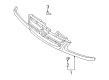
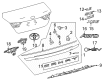
Toyota Sienna Emblem
Choose genuine Emblem that pass strict quality control tests. You can trust the top quality and lasting durability. Shopping for OEM Emblem for your Toyota Sienna? Our website is your one-stop destination. We stock an extensive selection of genuine Toyota Sienna parts. The price is affordable so you can save more. It only takes minutes to browse and find the exact fit. Easily add to cart and check out fast. Our hassle-free return policy will keep you stress-free. We process orders quickly for swift delivery. Your parts will arrive faster, so you can get back on the road sooner.
Toyota Sienna Emblem is placed in the middle of a minivan that the families rely on when they take a ride to work or drive cross country. The Toyota Sienna is comfortable to drive, has spacious interior space that can accommodate people and has clever rear seat second row that slides to create additional leg room. Its well-tested V6 engine gives it a strong acceleration and yet it achieves amiable fuel efficiency, and engineers match it with responsive steering which makes it easy to park. A basic driver support technology, good crash scores, and legendary Toyota reliability makes the owners proud and stretching maintenance service hours is making maintenance hassles less intricate. The van is also loaded with several USB ports, zone climate control, and a rear entertainment screen to ensure that all Sienna passengers are content with the road trips. Sienna Emblem it is an exquisitely produced badge created by Toyota production plants, it bears the model name with a shiny polish that enhances the attractiveness on the road and reminds the audience of the quality heritage of the van. Its primary operation is both identification and style, the Emblem is applied to tell us that this is a true Sienna produced to very high standards that constitute Toyota excellence and it provides a central point that unites the front fascia. The Emblem does not deteriorate with the weather, does not fade during the years, and is a small but proud sign of permanence. Installation steps include mount position, cleaning the mount area, peeling the base, positioning the Emblem on a tape guide and pressing hard on it, and allowing the adhesive to dry.
Related Toyota Sienna Parts
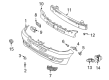
 Toyota Sienna Bumper
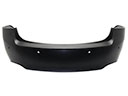 Toyota Sienna Bumper Cover
 Toyota Sienna Hood
 Toyota Sienna Hood Latch
 Toyota Sienna Mirror Cover
 Toyota Sienna Spoiler
 Toyota Sienna Windshield Washer Nozzle
 Toyota Sienna Lift Support
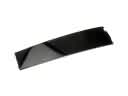 Toyota Sienna Door Moldings
 Toyota Sienna Hood Hinge
 Toyota Sienna License Plate
 Toyota Sienna Mirror Actuator
Browse Toyota Sienna Emblem by Years
2025
2024
2023
2022
2021
2020
2019
2018
2017
2016
2015
2014
2013
2012
2011
2010
2009
2008
2007
2006
2005
2004
2003
2002
2001
2000
1999
1998