×
ToyotaParts- Hello
- Login or Register
- Quick Links
- Live Chat
- Track Order
- Parts Availability
- RMA
- Help Center
- Contact Us
- Shop for
- Toyota Parts
- Scion Parts
My Garage
My Account
Cart
OEM Toyota Sienna Antenna
Radio Antenna- Select Vehicle by Model
- Select Vehicle by VIN
Select Vehicle by Model
orMake
Model
Year
Select Vehicle by VIN
For the most accurate results, select vehicle by your VIN (Vehicle Identification Number).
36 Antennas found


Toyota Sienna Antenna Mast Part Number: 86309-0C020
$38.83 MSRP: $52.38You Save: $13.55 (26%)Ships in 1-3 Business Days


Toyota Sienna Antenna, Electrical Key, Rear Part Number: 89997-0E050
$37.63 MSRP: $52.38You Save: $14.75 (29%)Ships in 1-2 Business Days


Toyota Sienna Satellite Ant Part Number: 86960-08011
$77.96 MSRP: $109.43You Save: $31.47 (29%)Ships in 1-2 Business Days

Toyota Sienna Antenna Assembly Part Number: 86300-AE010
$71.33 MSRP: $97.03You Save: $25.70 (27%)Ships in 1-3 Business Days

Toyota Sienna Antenna Base Part Number: 86309-08040
$43.01 MSRP: $58.02You Save: $15.01 (26%)Ships in 1 Business Day
Toyota Sienna Antenna Assembly Part Number: 86760-04010
$172.13 MSRP: $243.67You Save: $71.54 (30%)Ships in 1-2 Business Days
Toyota Sienna Antenna Assembly, Amplifier Part Number: 86300-08090
$92.06 MSRP: $129.23You Save: $37.17 (29%)Ships in 1-3 Business Days
Toyota Sienna Antenna Assembly, Telephone Part Number: 86760-0A020
$193.15 MSRP: $267.28You Save: $74.13 (28%)Ships in 1-2 Business Days
Toyota Sienna Gps Antenna Part Number: 86880-02090
$487.93 MSRP: $715.06You Save: $227.13 (32%)Ships in 1-2 Business Days
Toyota Sienna Antenna, Rear Part Number: 899A1-08010
$52.33 MSRP: $72.84You Save: $20.51 (29%)Ships in 1-3 Business Days
Toyota Sienna Antenna, Front Part Number: 899A0-08010
$57.47 MSRP: $79.99You Save: $22.52 (29%)Ships in 1-3 Business Days
Toyota Sienna Antenna, Center Part Number: 899A0-08020
$57.83 MSRP: $80.49You Save: $22.66 (29%)Ships in 1-3 Business Days
Toyota Sienna Antenna, Rear Part Number: 899A0-08040
$57.95 MSRP: $80.66You Save: $22.71 (29%)Ships in 1-3 Business Days
Toyota Sienna Amplifier Part Number: 86300-08050
$70.61 MSRP: $99.11You Save: $28.50 (29%)Ships in 1-3 Business DaysToyota Sienna Amplifier Part Number: 86300-08040
$72.75 MSRP: $102.11You Save: $29.36 (29%)Ships in 1-3 Business DaysToyota Sienna Amplifier Part Number: 86300-08070
$75.12 MSRP: $105.44You Save: $30.32 (29%)Ships in 1-3 Business Days
Toyota Sienna Antenna Assembly Part Number: 86300-AE021
$90.98 MSRP: $127.72You Save: $36.74 (29%)Ships in 1-3 Business Days
Toyota Sienna Antenna, Rear Part Number: 89997-08020
$98.46 MSRP: $138.21You Save: $39.75 (29%)Ships in 1-3 Business Days


Toyota Sienna Satellite Ant Part Number: 86960-08021
$38.23 MSRP: $53.21You Save: $14.98 (29%)
Toyota Sienna Antenna, Front Part Number: 899A0-08030
$56.15 MSRP: $78.16You Save: $22.01 (29%)Ships in 1-3 Business Days
| Page 1 of 2 |Next >
1-20 of 36 Results
Toyota Sienna Antenna
Choose genuine Antenna that pass strict quality control tests. You can trust the top quality and lasting durability. Shopping for OEM Antenna for your Toyota Sienna? Our website is your one-stop destination. We stock an extensive selection of genuine Toyota Sienna parts. The price is affordable so you can save more. It only takes minutes to browse and find the exact fit. Easily add to cart and check out fast. Our hassle-free return policy will keep you stress-free. We process orders quickly for swift delivery. Your parts will arrive faster, so you can get back on the road sooner.
Toyota Sienna Antenna Parts and Q&A
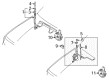
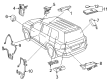
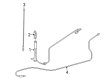
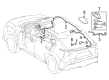
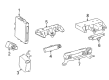
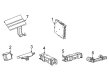
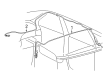
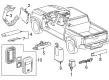
- Q: How to remove the navigation antenna on Toyota Sienna?A:The first step before navigating the navigation antenna removal requires gathering all installation and removal hardware from the instrument panel. The first step is to disconnect the negative battery terminal followed by the removal of Steering Wheel cover lower No.2 then lower No.3 and subsequently the horn button assembly and steering wheel assembly. You need to remove the steering column cover in addition to the headlight Dimmer Switch assembly along with the Windshield Wiper Switch assembly. Treating the 2 clips for removal first enables you to draw back the instrument cluster finish panel sub-assembly until you access the combination meter assembly which you can remove after unscrewing the 4 screws [C] and disconnecting all connectors. The next step requires the deletion of the 3 components which includes the front door scuff plates (RH and LH), cowl side trim boards (RH and LH) and the instrument panel finish panel sub-assembly lower LH. To perform this procedure you must remove 2 bolts [A] while disconnecting the hood lock control cable assembly and disengaging 2 claws and 3 clips. The instrument panel safety pad insert sub-assembly No.1 can be removed by first disconnecting the connector then unscrewing 4 bolts [A]. The glove compartment requires detachment by pushing its sidewalls to remove the stoppers from both assemblies. Disconnect the instrument panel box no.2 by removing its 2 claws and 4 clips and extract the instrument side panels (LH and RH). Start by taking away the instrument panel register assemblies No.1 and No.3 followed by removing the floor carpet covers (center LH and RH) by unstating clips while also disengaging claws. To access the shift lever knob sub-assembly along with the floor shift position indicator housing assembly the technician must first disengage 4 claws from the instrument cluster finish panel center assemblies No.1 and No.2. The instrument cluster finish panel assembly center requires removal by first unscrewing one screw [C], then separating five clips along with a claw followed by disconnecting all connectors. You can dismantle the instrument cluster finish panel sub-assembly lower center through the removal of 2 clips along with 3 screws [C] and 3 bolts [A] followed by unconnecting the cable wiring. A moulding remover enables removal of the instrument cluster finish panel garnish by disengaging claws and clips. Unplug the stereo component speaker assembly after removing 2 screws along with disconnecting the connector to proceed with navigation receiver assembly removal. The removal procedure includes taking out the integration control and panel assembly and front pillar garnishes for both right-hand side and left-hand side as well as the instrument panel speaker panel sub-assemblies. Unscrew two screws to remove front No.1 and No.2 speaker assemblies after disconnecting their connectors. Detach the defroster nozzle opening plate No.1 by disconnecting its connector after freeing all 6 claws. The shift lever assembly requires removal of 4 bolts then the instrument panel safety pad sub-assembly can be taken out after unscrewing 4 bolts [A] [B], 2 screws [C], and a nut [E] while disconnecting connectors and extracting the instrument panel sub-assembly with its passenger Air Bag assembly. You need to detach the navigation antenna assembly by both releasing three clamps and then removing two screws.
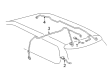
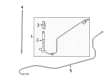
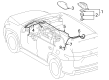
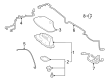
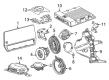
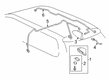
- Q: How to install the amplifier antenna assembly and its components on Toyota Sienna?A:The installation of the amplifier antenna assembly requires using 16 clamps followed by mounting 3 bolts while connecting all connectors. You need to proceed with the roof headlining assembly installation process. When installing the antenna assembly with holder use the nut before installing the bolt and connector attachment. Start by fastening the antenna ornament then continue with pull top antenna pole sub-assembly installation. A complete installation of the antenna cord sub-assembly requires the use of all 5 clamps. The instrument panel safety pad sub-assembly needs to be installed as the final step.


Related Toyota Sienna Parts
 Toyota Sienna Starter Relay
 Toyota Sienna Antenna Mast
 Toyota Sienna Radiator Fan Relay
 Toyota Sienna Antenna Cable
 Toyota Sienna Body Control Module
 Toyota Sienna Car Key
 Toyota Sienna Headlight Relay
 Toyota Sienna Ignition Lock Assembly
 Toyota Sienna Ignition Lock Cylinder
 Toyota Sienna Overload Relay
 Toyota Sienna Relay Block
 Toyota Sienna Transmitter